Successful gardening is rarely the result of luck; it is a science built on a foundation of chemistry, biology, and timing. Every single flower, vegetable, and shrub you cultivate relies on your soil to deliver a precise balance of macro-nutrients (like Nitrogen, Phosphorus, and Potassium) and micronutrients (like iron, calcium, and magnesium).
However, nutrients deplete, pH levels drift, and fertilizers accumulate. If you guess what your soil needs, you risk burning your plants with excess salts or starving them of vital elements. This is why establishing a consistent, annual soil-testing schedule is the most important habit a home gardener can develop.
Whether you are managing a backyard urban plot in San Francisco, balancing high-clay soils in Texas, handling variable seasonal weather in New York, or adapting to damp, acidic conditions in Washington State and California, this guide outlines the ultimate annual testing schedule, step-by-step methods, and regional insights to keep your garden thriving.
1. The Golden Rule of Soil Testing: When is the Best Time?
While you can technically stick a DIY test probe into your dirt at any time of year, professional agronomists and horticulturists agree that late autumn (post-harvest) or early winter is the absolute best time to test your home garden soil.
Why Late Autumn Wins
- Time for Amendments to Work: Adjusting soil chemistry takes time. If your test reveals that your soil is too acidic and needs agricultural lime to raise the pH, or too alkaline and needs elemental sulfur, these amendments take 2 to 4 months to react completely. Testing in late fall gives winter snows and rains time to break down those amendments before spring planting begins.
- Soil Stability: In autumn, your soil has finished supporting a full season of plant growth, giving you an accurate “bottom-line” reading of nutrient depletion.
- Lab Turnaround Speed: University and commercial extension laboratories are flooded with samples in March and April. Testing in October or November ensures rapid turnaround times without the spring rush.
2. The Ideal Annual Garden Testing Schedule
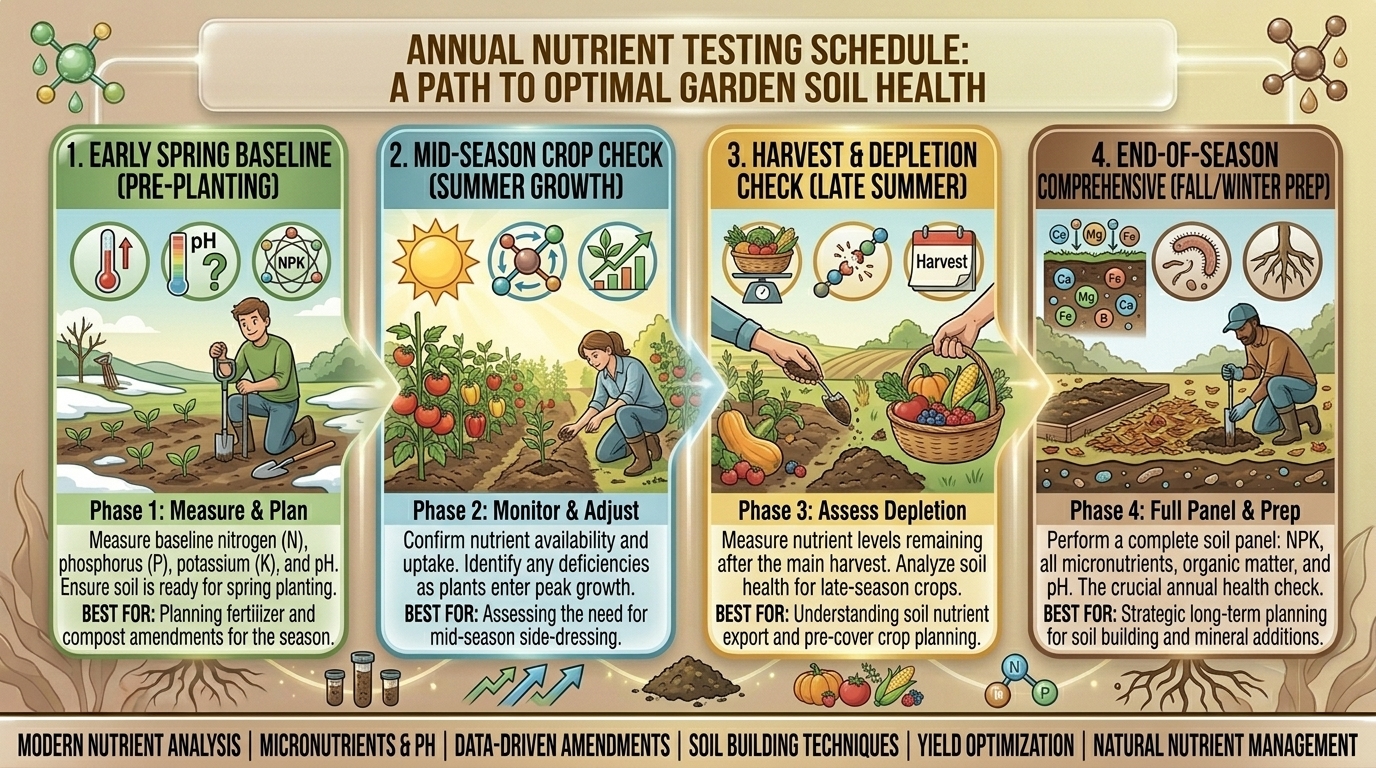
If you want a foolproof calendar to keep your beds in peak condition year after year, follow this seasonal blueprint:
[ Late Autumn / Post-Harvest ]
       │
       ├──> Step 1: Collect Soil Samples (Dry, Consistent Depth)
       │
       ├──> Step 2: Send to Lab or Use Test Kit
       │
       ├──> Step 3: Apply Slow Amendments (Lime, Sulfur, Rock Dust)
       │
       └──> Early Spring: Apply Starter Nutrients & Plant
The 12-Month Maintenance Timeline
- October – November (The Primary Test): Collect your core samples, log them, and send them to your local agricultural extension service or private lab. Review the results as soon as they arrive.
- December – January (The Correction Phase): Apply slow-acting mineral adjustments like lime, gypsum, or elemental sulfur while the garden is dormant. Let winter weather blend them into the profile.
- February – March (Pre-Planting Prep): If your test indicated a need for organic slow-release fertilizers (like bone meal or blood meal), work them into the top few inches of soil just as spring cleanup begins.
- June – July (Mid-Season Troubleshooting): Avoid full lab tests here unless crops show severe distress. Instead, rely on visual cues (yellowing leaves, stunted growth) and apply targeted, water-soluble organic feeds if necessary.
3. How Often Do You Really Need to Test?
Not every bed requires a comprehensive lab test every single year. Tailor your frequency based on the intensity of the garden zone:
| Garden Zone Type | Testing Frequency | Why? |
| Annual Vegetable Beds | Every 1–2 Years | Heavy feeders like tomatoes and corn rapidly strip nitrogen, phosphorus, and potassium out of the soil profile. |
| Established Perennial & Flower Beds | Every 2–3 Years | Undisturbed soil remains stable longer, but micronutrient drift can still occur over time. |
| New or Problem Beds | Annually until corrected | If you are trying to rescue heavily compacted clay or fix severe pH imbalances, annual checks track your progress. |
| Container & Raised Beds | Replaced/Tested Annually | Because containers rely on specialized potting mixes or synthetic blends, nutrients leach out rapidly with frequent watering. |
4. Step-by-Step Guide: How to Collect an Accurate Sample
An inaccurate sample yields useless data. Follow these steps to ensure your annual test represents your entire growing space:
- Divide Your Yard into Zones: Do not mix soil from your front lawn flower bed with your backyard vegetable patch. Sample distinct functional areas separately.
- Scrape Away Surface Mulch: Clear away raw bark, leaves, or uncomposted debris from the surface.
- Dig to Root Depth: Using a clean trowel or soil probe, dig down 6 to 8 inches (the primary root zone for most vegetables and flowers).
- Collect Multiple Cores: Take 5 to 10 small soil slices from different spots within the same zone and combine them in a clean plastic bucket.
- Dry and Package: Mix the composite sample thoroughly, let it air-dry on a clean sheet of paper (never use heat), and scoop out about one cup of soil to send for testing or use in your home kit.
5. Regional Climate Realities: Testing Across the U.S.
Soil chemistry reacts dynamically to local weather patterns, rainfall, and native geology. Here is how regional gardeners should approach their testing schedules:
California & San Francisco
- The Challenge: Mediterranean climates feature dry summers and concentrated winter rainfall, which can cause salts to accumulate or nutrients to lock up in alkaline soils.
- Testing Strategy: Test in early winter just after the first heavy rains have washed away surface salts, allowing you to accurately measure true mineral availability before spring drought conditions set in.
Texas
- The Challenge: High heat accelerates organic matter breakdown, while heavy “Blackland Prairie” or coastal clay soils often lock up phosphorus and feature high, alkaline pH levels.
- Testing Strategy: Test in late autumn after the intense summer heat breaks. Focus heavily on monitoring organic matter percentages and micronutrients like iron, which frequently becomes unavailable in alkaline Texas soils.
New York
- The Challenge: Humid summers and cold winters with heavy freeze-thaw cycles that impact microbial life and nutrient retention.
- Testing Strategy: Test in October right after harvest. This leaves ample time to incorporate lime to counteract natural soil acidification caused by local forest debris and regional precipitation.
Washington State
- The Challenge: High seasonal rainfall leaches mobile nutrients (like nitrogen and boron) deep out of the root zone, frequently resulting in naturally acidic, damp soils.
- Testing Strategy: Test in late summer or early fall before the heavy autumn rains begin. This captures your soil’s profile at its most depleted point, letting you replenish leached minerals before winter dormancy.
6. Frequently Asked Questions (FAQ)
1. Can I use a cheap DIY soil test kit instead of a lab test?
DIY chemical color-comparator kits and electronic probe meters are great for quick, general checks (especially for pH). However, for precise macro-nutrient levels and professional fertilizer recommendations, a local university agricultural extension or certified soil lab provides far superior accuracy.
2. Why do my soil test results change drastically from year to year?
Minor fluctuations are normal based on weather, moisture, and the previous season’s crops. However, drastic shifts usually mean the sample was taken from a different depth, a different spot, or during a different season. Always test at the same time of year using identical sampling depths.
3. Does testing tell me if my soil has plant diseases?
Standard soil nutrient tests analyze chemical composition, pH, and organic matter—they do not screen for specific plant pathogens, viruses, or harmful nematodes. If you suspect disease, you will need a specialized plant pathology lab screening.
4. How much does a professional soil test cost?
Most state university extension services and county agricultural offices offer comprehensive soil testing for a very modest fee, usually ranging from $15 to $40 per sample, making it one of the most cost-effective investments a gardener can make.
5. Should I fertilize right before taking a soil sample?
Never take a soil sample within 6 to 8 weeks of applying granular fertilizers, fresh manure, or chemical treatments. Doing so will skew your results, showing artificially high nutrient spikes that do not reflect your soil’s true baseline.
6. What is the single most important metric on a soil test report?
Soil pH. Even if your soil is packed with abundant nitrogen and potassium, if your pH is too high or too low, those nutrients chemically bind to the earth and become entirely inaccessible to plant roots. Getting pH right unlocks everything else.
7. Can I test potting soil from containers using a standard garden test?
Yes, but keep in mind that potting mixes behave differently than native earth. Many lab tests are calibrated for mineral-based native soils. For container mixes, following the manufacturer’s feeding schedule or using a dedicated soluble media test is often more reliable.
8. What is CEC (Cation Exchange Capacity) on my test report?
CEC measures your soil’s ability to hold onto and exchange essential nutrient ions. High CEC soils (like clay and rich loam) hold nutrients well, while low CEC soils (like sandy soils) leach nutrients quickly and require more frequent, smaller fertilizer applications.
9. Do I need to test for heavy metals like lead?
If you are gardening in an urban environment (such as older neighborhoods in New York or San Francisco) or near old painted structures, requesting a heavy metal screening alongside your standard nutrient test is a smart safety precaution, especially for vegetable gardens.
10. Can I fix bad soil test results purely with compost?
Finished organic compost is a magical multi-tool that improves structure, introduces microbes, and adds balanced micronutrients. However, if your test indicates a severe chemical deficiency (like critically low phosphorus) or an extreme pH imbalance, compost alone may not be enough; targeted amendments will be required.
Conclusion
Establishing a routine, annual soil-testing schedule—ideally in the late autumn—removes the guesswork from gardening. Instead of blindly pouring expensive fertilizers and amendments into your beds, a professional test acts as a precise roadmap for your plants’ health.
By matching your testing timeline to your regional climate—whether you are prepping alkaline clay in Texas, managing winter leaching in Washington, or optimizing container spaces in San Francisco—you ensure your garden receives exactly what it needs to flourish year after year.
Have you tested your garden soil recently, and what unexpected surprises did your last lab report reveal about your growing beds?