For plant enthusiasts across the diverse climates of the United States—from the humid summers of Texas and the crisp, changing seasons of New York, to the Mediterranean warmth of California, the damp microclimates of Washington, and the foggy, temperate urban environments of San Francisco—indoor gardening is a deeply rewarding passion. There is nothing quite like styling a pristine aesthetic in your living space, grouping lush monsteras, vibrant pothos, and delicate monsteras inside gorgeous ceramic, terracotta, or woven cachepots.
However, behind many stalled plant growth spurts, sudden leaf yellowing, and mysterious plant deaths lies a single, silent culprit: overwatering leading to root rot.
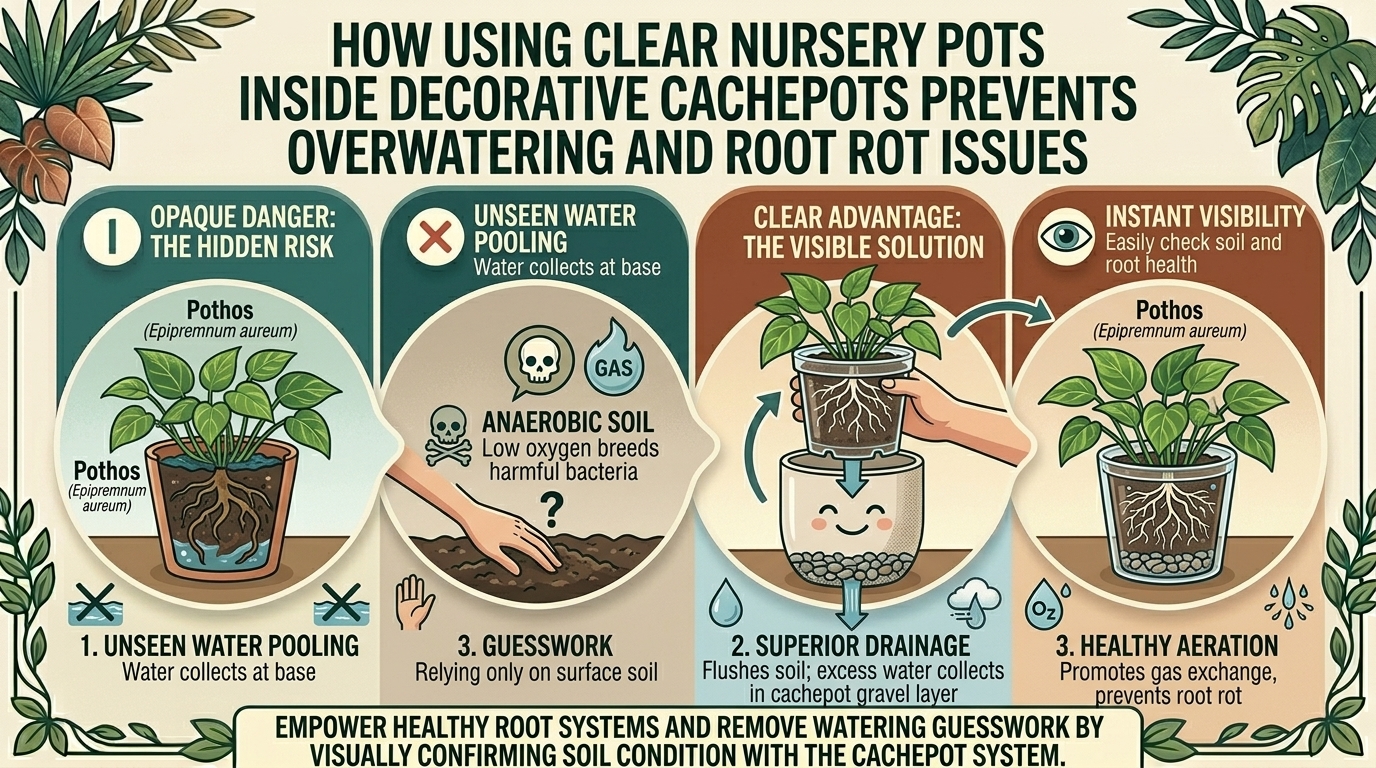
If you plant directly into a decorative cachepot (a pot without a drainage hole) or rely solely on standard guesswork, you are navigating your plant care blindfolded. The ultimate, industry-secret solution used by professional horticulturists and master plant collectors alike is the double-potting method: placing a clear plastic nursery pot inside a decorative cachepot.
This comprehensive, SEO-optimized guide explores the mechanics of root health, the physics of soil moisture, and why transparent nursery pots are the single greatest tool for preventing overwatering and root rot.
1. Understanding Root Rot: The Silent Killer of Indoor Plants
Root rot is not actually caused by a single pathogen, but rather by an anaerobic environment created by excessive moisture.
How Root Rot Develops
- The Oxygen Paradox: Healthy plant roots need to breathe. They take in oxygen from the tiny pockets of air trapped between soil particles.
- The Flood: When soil remains saturated for too long, water displaces all the oxygen. Without oxygen, root cells suffocate and die.
- Fungal Invaders: Once root tissue dies, it becomes decaying organic matter. Opportunistic soil fungi and water molds—most notably species like Pythium, Phytophthora, and Rhizoctonia—colonize the dead tissue and rapidly spread to healthy roots, turning them into a brown, mushy, foul-smelling mess.
2. The Trap of Direct Planting in Non-Drainage Cachepots
A cachepot is defined as a decorative container designed to hide an ugly growing pot. By definition, true cachepots do not have drainage holes because their purpose is to catch water leaks—or, incorrectly, to act as the primary planting vessel.
Why Direct Planting Fails
- The Perched Water Table Effect: When soil is placed in a container with a solid bottom, physics dictates that a zone of complete saturation forms at the very bottom, regardless of how porous the soil mix is.
- Invisible Moisture: When water is trapped at the base of a solid ceramic or metal pot, you cannot see it. The top inch of soil may look and feel bone dry, while the bottom roots are sitting in a stagnant swamp.
- Salt Accumulation: Without drainage holes to allow excess mineral salts from fertilizers to flush out, chemical salts build up in the soil, burning the root tips and compounding stress.
3. The Clear Advantage: Why Nursery Pots Must Be Transparent
While green or black plastic nursery pots have been standard for decades, transparent clear pots are transforming indoor horticulture. They turn an invisible subterranean world into an open book.
A. Visual Root Inspection
With a clear nursery pot, you no longer have to guess if your plant is root-bound or if its roots are healthy. You can lift the inner pot out of your cachepot and visually inspect the root system through the plastic walls.
- Healthy Roots: Plump, firm, and white, cream, or light green in color.
- Unhealthy Roots: Brown, translucent, slimy, or clinging tightly in a dense, circling mat indicating root-bound stress.
B. Accurate Moisture Tracking
Soil color changes when it is wet versus when it is dry. Dark, damp soil clings to the walls of a clear pot, while dry soil lightens in color and pulls slightly away from the plastic. You can literally see the moisture line drop down through the pot profile.
C. Photosynthesis Support (In Specific Species)
While roots primarily function underground, certain epiphytic plants (such as orchids) possess roots containing chlorophyll that can engage in minimal photosynthesis when exposed to light through clear containers.
4. How Double-Potting Works: The Mechanics of Success
Double-potting is a seamless system that marries interior design elegance with horticultural science.
The Anatomy of Double-Potting
- The Inner Vessel (Clear Nursery Pot): Contains multiple drainage holes at the base, houses the soil mix, and supports the root system.
- The Outer Vessel (Decorative Cachepot): Acts as a stylish aesthetic shield, keeping water off your furniture and matching your home decor.
- The Air Gap: The slight space between the outer wall of the nursery pot and the inner wall of the cachepot allows air circulation, preventing the base of the plant from sealing completely against moisture.
5. Step-by-Step Guide to Setting Up Your Double-Pot System
Implementing this system is straightforward, but doing it correctly ensures maximum efficiency and prevents accidental water accumulation.
Step 1: Select the Right Sized Clear Pot
Choose a clear nursery pot that is roughly 1 to 2 inches larger in diameter than your plant’s current root ball. Ensure it drops easily into your cachepot while leaving a small clearance at the bottom (at least half an inch to an inch) for drainage run-off.
Step 2: Prepare a Well-Araining Soil Mix
Do not rely on cheap, compact potting soil straight out of the bag. Combine standard potting mix with amendments like perlite, orchid bark, and horticultural charcoal to maximize aeration and drainage.
Step 3: Potting and Layering
- Place a coffee filter or a small piece of mesh at the bottom of the clear pot to keep soil from washing out through drainage holes.
- Add a base layer of soil, position your plant, and fill in the sides, tapping gently to settle the medium.
Step 4: The Watering Protocol
- Remove and Sink: Take the clear nursery pot out of the decorative cachepot and take it to the sink, shower, or watering station.
- Drench Thoroughly: Pour water over the soil until it streams freely out of the bottom drainage holes. Let it drain completely for 10–15 minutes.
- Return: Once dripping has stopped completely, place the clear pot back inside the cachepot. Crucial Rule: Never let the clear pot sit in standing water inside the cachepot. Empty any pooled water from the bottom of the cachepot after watering.
6. Climate Considerations Across Different U.S. Regions
Environmental factors dramatically influence how quickly soil dries out, making the visual monitoring provided by clear pots even more vital.
- Texas and California (Hot & Arrid / Sunny): High ambient temperatures and indoor air conditioning or heating can cause topsoil to dry rapidly while lower root zones stay damp, or vice versa. Clear pots help you monitor moisture levels accurately despite fluctuating indoor climates.
- New York (Four Distinct Seasons): During freezing winter months, heating systems dry out indoor air, slowing plant metabolism and increasing the risk of overwatering if watering schedules aren’t adjusted. Clear pots let you see when water usage drops.
- Washington & San Francisco (Cool, Humid, & Foggy): High relative humidity means soil takes significantly longer to dry out. Double-potting allows you to easily lift the plant and check for trapped moisture, preventing silent root rot during damp seasons.
7. 10 Frequently Asked Questions (FAQs)
1. Can I use clear plastic food containers to make my own nursery pots?
Yes! Upcycling clean plastic containers (like yogurt cups or clear takeout containers) by melting or drilling drainage holes into the bottom is an economical and eco-friendly way to create custom clear pots.
2. Do roots mind being exposed to light in a clear pot?
Most terrestrial plant roots are naturally adapted to darkness, but standard indoor ambient light passing through a clear plastic pot rarely causes damage. If you are concerned, simply placing the clear pot inside a cachepot blocks light until you lift it out for inspection.
3. What should I do if water collects at the bottom of my cachepot?
Always empty standing water immediately after watering. Leaving the inner pot sitting in a puddle defeats the purpose of drainage and invites root rot.
4. How do I choose the right size cachepot for my clear nursery pot?
Measure the outer diameter and height of your clear pot. Look for a cachepot that is roughly half an inch to one inch wider and slightly taller, ensuring the inner pot sits comfortably inside without sinking too low or sticking out awkwardly.
5. Is double-potting suitable for all indoor plants?
Almost all potted indoor plants—including aroids, ferns, ficus, and succulents—benefit from double-potting. Air plants and mounted specimens are exceptions, but they do not use standard pots anyway.
6. Why is my plant still getting root rot even with a drainage hole?
Root rot can still occur if the soil mix is too dense and compact (lacking perlite or bark), if you water too frequently without checking moisture levels, or if the drainage holes at the bottom of the inner pot become blocked.
7. How often should I check the roots through a clear pot?
A quick visual check once every two to three weeks when you water is plenty. It allows you to catch early signs of root crowding or discoloration before they impact upper foliage health.
8. Do clear pots degrade under indoor lighting?
High-quality clear polypropylene or polyethylene nursery pots are UV-stabilized to withstand standard indoor conditions for many years without becoming brittle.
9. Can I slip a plastic bag or liner inside my cachepot instead of a clear pot?
Plastic bags or makeshift non-draining liners trap stagnant water just like a direct-planted cachepot and lack structural rigidity. Always use a rigid, draining pot.
10. How does double-potting make repotting easier?
When it’s time to upsize, you don’t have to struggle to pry a root system out of a rigid ceramic or terracotta pot. You simply slide the flexible clear plastic pot out, gently squeeze or slide the root ball free, and transfer it into a larger clear container.
Conclusion
Elevating your indoor plant game is as much about science as it is about style. By pairing the aesthetic beauty of decorative cachepots with the functional brilliance of transparent inner nursery pots, you eliminate the guesswork of indoor gardening. You gain x-ray vision into your root system, prevent the devastating effects of stagnant water and root rot, and create a modular plant care routine that saves time, reduces plant loss, and keeps your indoor jungle thriving all year round.