For plant enthusiasts across the diverse environments of the United States—from the sweltering summers of Texas and the crisp seasonal shifts of New York, to the sunny microclimates of California, the damp, evergreen landscapes of Washington, and the foggy, temperate urban charm of San Francisco—the pothos (Epipremnum aureum) is the ultimate beloved staple. Known affectionately as the “devil’s ivy,” the pothos is celebrated for its resilience, stunning trailing vines, and heart-shaped variegated leaves.
Yet, there is a distinct magic that occurs when you take a single flourishing vine and multiply it into dozens of new plants entirely for free. While there are several methods to propagate houseplants, water propagation using simple glass jars remains the most popular, visual, and beginner-friendly technique.
This comprehensive, SEO-optimized guide walks you through every step of water-propagating your favorite pothos, ensuring high success rates and lush, vibrant results.
1. Why Choose Water Propagation for Pothos?
Before diving into the steps, it helps to understand why water propagation is the gold standard for pothos owners.
The Benefits of Glass Jar Propagation
- Visual Gratification: Unlike soil propagation where root growth happens blindly underground, transparent glass jars allow you to watch roots emerge, stretch, and branch in real time.
- High Success Rates: Pothos vines produce natural rooting hormones at their nodes, making them exceptionally eager to root when submerged in fresh water.
- Minimal Equipment Required: You do not need expensive rooting powders, specialized grow chambers, or complex potting mixes to get started. Everyday items—like empty mason jars, spice bottles, or drinking glasses—work perfectly.
2. Anatomy of a Pothos Vine: Finding the Node
Success in propagation depends entirely on where you make your cuts. If you cut a vine incorrectly, it will never grow roots.
The Secret is the Node
A pothos node is a small, bumpy swelling or knuckle located along the main vine right where a leaf petiole (stem) connects.
- Aerial Roots: You will often notice small, brownish nubbins or stubby aerial roots already starting to form at these nodes.
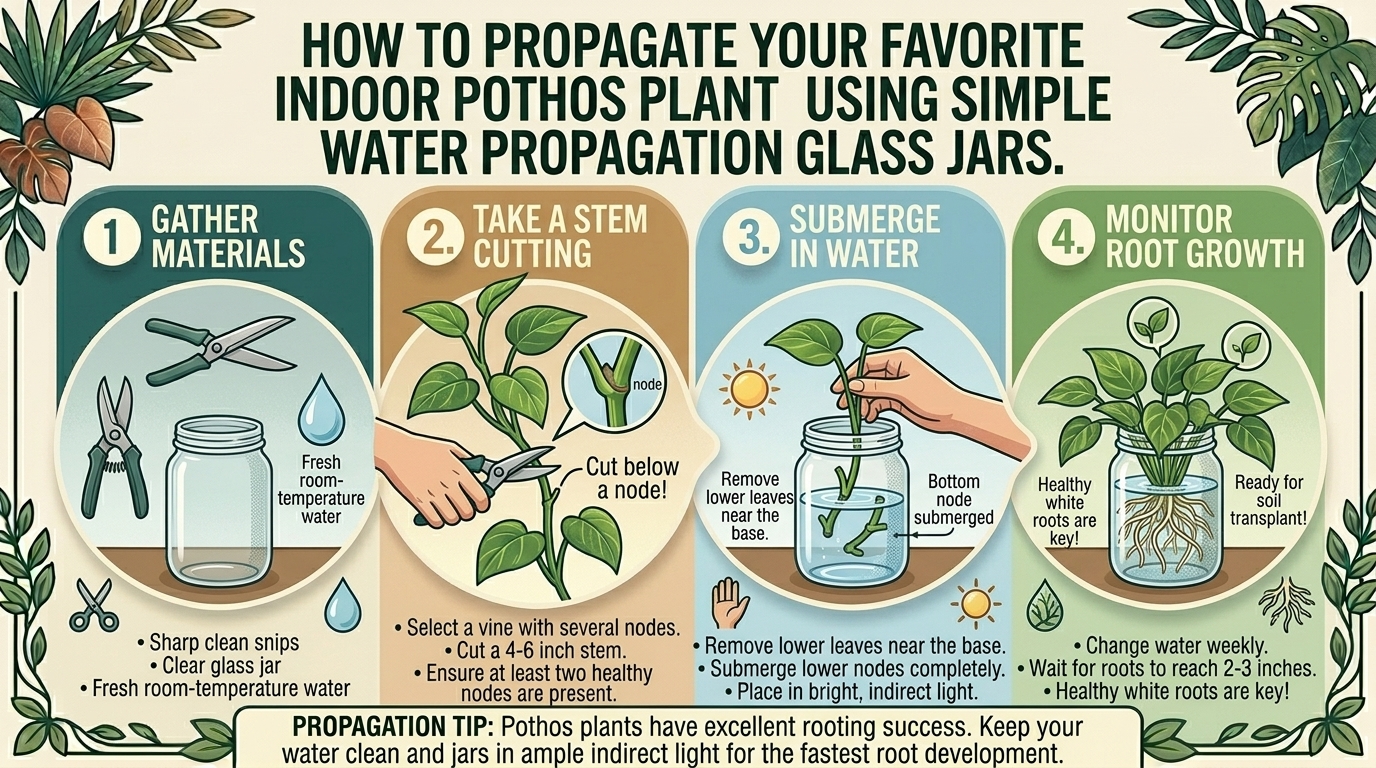
- The Rule of Thumb: Every cutting must include at least one healthy node (preferably two or three) and one or two leaves. Roots sprout from the node, not from the long stretch of bare vine between nodes.
3. Step-by-Step Guide: How to Propagate Pothos in Water Jars
Step 1: Select a Healthy Mother Plant
Choose a vigorous, pest-free, mature pothos vine. Look for sections with vibrant leaf coloration (whether Golden, Marble Queen, Neon, or Jade) and strong, thick stems free of yellowing or damage.
Step 2: Sterilize Your Tools
Always sterilize your shears, scissors, or razor blade using rubbing alcohol or hydrogen peroxide before cutting. Clean cuts prevent bacteria and fungi from infecting the open wound on both your mother plant and your cutting.
Step 3: Make the Cut
Snip a 4-to-6-inch section of the vine, making your cut about half an inch below a node. Ensure your cutting has at least 2 to 3 leaves near the top.
- Pro Tip: Remove any lower leaves that would sit below the waterline. Submerged leaves will rot, fouling the water and introducing bacteria that can kill the developing roots.
Step 4: Prep Your Glass Jars
Thoroughly wash your glass jars with soap and hot water. While any glass container works, narrow-necked jars or spice bottles are great for holding single stems upright, while wider mason jars accommodate multi-stem arrangements.
Step 5: Fill and Place
Fill your jar with clean, room-temperature water. Filtered water or tap water left out overnight to let chlorine dissipate is ideal. Place your cutting into the jar so that the node is fully submerged, but the upper leaves remain completely dry and above the rim.
6. Maintenance and Optimizing Growth Conditions
Water propagation requires ongoing care to ensure healthy, robust root development.
Water Management
- Change the Water Weekly: Stagnant water loses oxygen and breeds bacteria. Empty the jar, rinse the roots and glass, and refill with fresh water every 7 to 10 days.
- Top Off as Needed: Indoor heating and air conditioning—common in homes from Texas to New York—cause water to evaporate quickly. Keep the water level high enough to cover the nodes at all times.
Lighting and Temperature
- Bright, Indirect Light: Place your propagation jars near an east- or north-facing window, or on a brightly lit desk. Avoid direct, harsh sunlight, which can overheat the water, scorch leaves, and encourage unwanted algae growth inside the glass.
- Warmth: Pothos root fastest in warm environments (between 70°F and 80°F). Keep jars away from cold winter window drafts in Washington or chilly fog drafts in San Francisco.
5. Transitioning from Water to Soil
A common mistake is leaving pothos cuttings in water indefinitely. While they can survive in water for months, water roots are structurally different from soil roots and lack the dense root hairs needed to absorb heavy nutrients long-term.
When to Transplant
Transfer your cuttings into potting soil when the root system is 2 to 3 inches long, usually within 3 to 6 weeks.
The Planting Process
- Fill a small nursery pot with a well-draining potting mix (standard soil amended with perlite).
- Create a small hole in the center, gently place the rooted cutting inside, and backfill the soil around the roots without packing it down too tightly.
- Water thoroughly to settle the soil around the new roots.
- Keep the soil slightly more moist than usual for the first week or two to help the water roots adapt to their new terrestrial home.
6. Regional Considerations for Propagating Pothos
Environmental humidity and indoor climate control dictate how your cuttings behave:
- Texas & California (Warm & Dry Indoor Climates): Air conditioning and heating systems pull moisture from the air, causing water in propagation jars to evaporate at an accelerated rate. Monitor water levels closely every few days.
- New York (Seasonal Shifts): Winter heating makes indoor air very dry, while summer brings humidity. Ensure cuttings stay warm during winter months, away from drafty window sills.
- Washington & San Francisco (Mild & Humid): Natural humidity helps support overall plant vigor, but cooler ambient temperatures can slightly slow down root initiation times. Patience and bright indirect light are key.
7. 10 Frequently Asked Questions (FAQs)
1. Can I propagate a pothos cutting with no leaves on it?
Yes, “leafer” nodes or wet sticks can sometimes produce shoots and roots, but having at least one healthy leaf provides immediate energy through photosynthesis, speeding up the rooting process significantly.
2. Why are my water propagation roots turning brown and mushy?
Brown, slimy roots indicate root rot caused by bacterial or fungal growth in stagnant water. Cut away the rotted sections with sterilized shears, wash the jar thoroughly, and refresh the water.
3. Should I use rooting hormone for water propagation?
Rooting hormone is generally unnecessary for pothos because they naturally produce high levels of auxin (rooting hormone) at their nodes. Clean water alone yields exceptional results.
4. Can I grow a pothos plant permanently in a glass jar of water?
Yes, hydroponic growth is possible, but water-grown pothos require occasional liquid fertilizer diluted to quarter-strength to supply nutrients that soil naturally provides. Growth will typically be slower than in soil.
5. How many cuttings can I put in a single glass jar?
You can place 3 to 5 cuttings in a medium-sized mason jar to create a full, bushy look when you eventually plant them together. Avoid overcrowding, which restricts airflow around the nodes.
6. Why is green algae growing inside my glass jar?
Algae grows when transparent glass allows sunlight to hit nutrient-rich water. While harmless to the plant in small amounts, it competes for oxygen. Scrub the jar during your weekly water change and move the container slightly away from direct light sources.
7. What type of water is best for propagating pothos?
Filtered water, bottled spring water, or tap water left out in an open container for 24 hours to let chlorine and fluoride evaporate works best.
8. How long does it take for pothos roots to appear?
Under ideal warm, bright conditions, you will typically see white root bumps emerge from the nodes within 7 to 14 days, with substantial roots developing by week 4.
9. Can I plant multiple rooted cuttings into one pot?
Absolutely! Planting 3 to 5 rooted cuttings together in a single pot creates a lush, dense, multi-vined plant right from the start rather than a sparse single strand.
10. My cutting’s leaves are turning yellow in the water. What went wrong?
Yellowing leaves usually mean the cutting is using up its stored energy trying to survive, often because the water wasn’t changed, lighting was inadequate, or a leaf was accidentally submerged underwater causing decay.
Conclusion
Propagating your favorite indoor pothos using simple water propagation glass jars is one of the most rewarding and straightforward projects in houseplant care. By understanding node anatomy, maintaining fresh water weekly, providing bright indirect light, and transitioning your cuttings to soil at the right moment, you can effortlessly turn a single vine into a thriving indoor jungle. Whether you are styling a cozy nook in San Francisco or brightening up a living room in New York, water propagation unlocks endless greenery for your home.