How to Grow Tender Asparagus Spears in a Permanent Dedicated Garden Bed Layout
Welcome to the ultimate long-term cultivation guide by KCPlants, custom-tailored for passionate food gardeners across America’s diverse climates—from the sun-drenched yards of Texas and California to the crisp seasonal changes of New York and Washington, and the unique, cool maritime air of San Francisco.
There is a distinct magic in harvesting your own asparagus. Unlike most vegetables that are planted, harvested, and cleared away within a single season, asparagus is a profound botanical investment. Once established in a permanent, dedicated garden bed, a healthy asparagus patch will reward you with armfuls of thick, sweet, incredibly tender spears every single spring for 15 to 20 years or more.
However, growing world-class asparagus requires patience, precision, and architectural forethought. Because asparagus beds are permanent fixtures, you cannot simply dig them up and replant them next spring if things go wrong. Getting the soil preparation right, choosing the correct layout, managing weed suppression, and understanding seasonal care are paramount.
This comprehensive, SEO-optimized guide explores the science of asparagus cultivation, step-by-step permanent bed design, regional adjustments across the US, and harvesting best practices designed to help your website rank effortlessly on Google.
The Biology of Asparagus: Why a Permanent Bed Is Mandatory
To successfully grow asparagus (Asparagus officinalis), you must first understand how this remarkable perennial plant lives and breathes beneath the soil.
+-------------------------------------------------------------+
              THE ASPARAGUS LIFECYCLE STRUCTURE
+-------------------------------------------------------------+
| CROWNS:      Deep underground storage network of fleshy roots|
| SPEARS:      Edible shoots emerging in early spring         |
| FERNS:       Summer growth stage that photosynthesizes      |
| ENERGY:      Carbohydrates stored in roots for next spring  |
+-------------------------------------------------------------+
1. The Underground Crown and Root System
Asparagus plants do not grow from simple seeds that produce a single root ball. They develop a massive, subterranean network of thick, fleshy storage roots known as crowns. These crowns act like biological batteries, storing the sugars, starches, and carbohydrates synthesized during the previous year’s summer growth.
2. The Multi-Year Commitment
When spring arrives, these deep crowns expend their stored energy to push up crisp, tender shoots—the very spears we harvest. If you harvest too early (during the plant’s first or second year) or dig up the bed, you starve the crown of its energy reserves, permanently stunting or killing the plant. A permanent, undisturbed bed allows these roots to expand deep into the earth (up to 4 to 5 feet deep), unlocking minerals and water that shallow-rooted vegetables can never reach.
Designing a Permanent Dedicated Garden Bed Layout
Because your asparagus bed will occupy the exact same piece of earth for two decades, site selection and bed construction must be meticulously planned from day one.
+-------------------------------------------------------------+
                  PERMANENT BED SPECIFICATIONS
+-------------------------------------------------------------+
| WIDTH:       3 to 4 feet (Allows easy access from both sides)|
| LENGTH:      Customized to your garden space (e.g., 10-20 ft)|
| DEPTH:       Trench system dug 10 to 12 inches deep          |
| SUNLIGHT:    Full sun (Minimum 6 to 8 hours daily)           |
+-------------------------------------------------------------+
1. Sunlight and Site Selection
- Full Sun Is Non-Negotiable: Asparagus requires a location that receives at least 6 to 8 hours of direct, unfiltered sunlight daily. Shady spots will result in weak, spindly, pale spears and an eventual collapse of the bed.
- Avoid Waterlogged Soil: Asparagus crowns hate “wet feet.” While they love moisture, standing water or poorly drained clay soil will rot the crowns within a single wet winter. Choose a raised bed or a naturally elevated area of your yard.
2. Constructing the Permanent Trench Bed
The traditional and most successful method for establishing a permanent asparagus bed is the trench method:
- Clear the Area: Completely eradicate all perennial weeds (like Bermuda grass, thistle, or dandelion) from the footprint of the bed. Once asparagus is planted, digging out deep-rooted weeds later is exceptionally difficult without damaging the crowns.
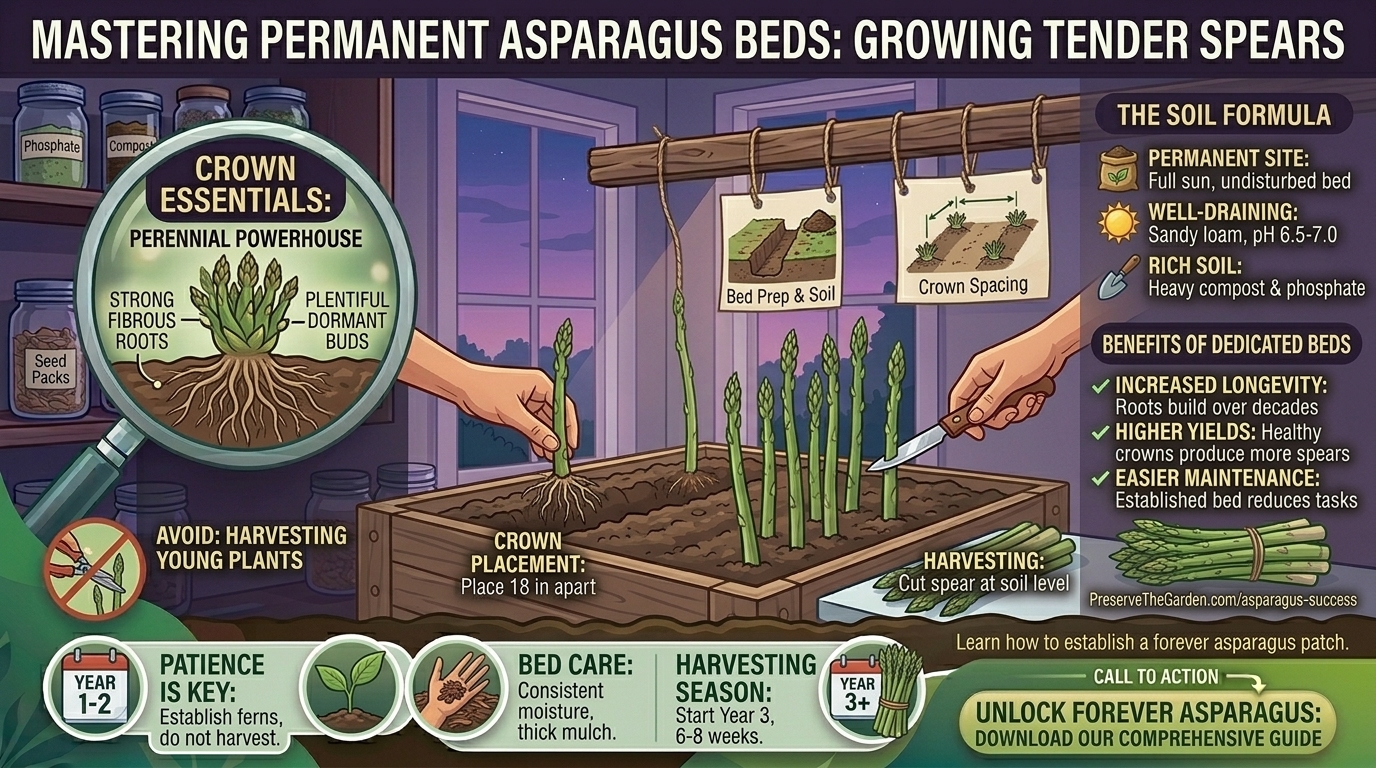
- Dig the Trench: Dig a trench 10 to 12 inches deep and roughly 12 to 18 inches wide. If you are planting multiple rows, space your trenches at least 3 to 4 feet apart to give the mature ferns ample room to spread.
- Amend the Base: Loosen the soil at the very bottom of the trench with a garden fork, and mix in a 3-to-4-inch layer of rich, aged organic compost and bone meal to establish a deep, nutrient-dense foundation.
Planting Asparagus Crowns: Step-by-Step Execution
While you can grow asparagus from seed, starting with 1-year-old dormant crowns purchased from a reputable nursery saves you an entire year of waiting.
- Inspect Your Crowns: Select firm, plump, healthy crowns that look like multi-legged octopuses with firm roots. Discard any crowns that appear moldy, shriveled, or mushy.
- Create Planting Mounds: Inside your deep trench, create small, raised mounds of rich compost spaced roughly 12 to 18 inches apart along the center line.
- Position the Crown: Drape the octopus-like roots evenly down the sides of each compost mound, ensuring the central growing buds (the “eyes”) are pointing straight up toward the sky.
- Initial Backfilling (The Slow Fill Technique):
- Cover the crowns with only 2 to 3 inches of native soil mixed with compost.
- Do not fill the trench all the way to the top yet. Water the trench gently to settle the soil around the roots.
- As the green spears emerge and grow upward through the soil over the next few weeks, gradually rake more soil into the trench little by little until the trench is eventually level with the surrounding ground by mid-summer.
Long-Term Maintenance: The Secret to Tender, Thick Spears
Once your permanent bed is established, ongoing management focuses on weed suppression, moisture, and feeding the summer ferns.
1. The Two-Year Harvesting Patience Rule
- Year 1 (Planting Year): Do not harvest any spears. Let every single spear grow into a tall, feathery green fern. These ferns capture solar energy to feed and expand the underground crown.
- Year 2: You may harvest a very light “teasing” harvest for just 2 weeks in early spring, then let the remaining spears grow into ferns.
- Year 3 and Beyond: You can enjoy a full harvest window lasting 6 to 8 weeks every spring, stopping abruptly as soon as weather warms and spear size begins to taper down to pencil-thin widths.
2. Mulching and Weed Control
Because asparagus plants are terrible competitors against aggressive weeds, keeping your permanent bed clean is critical.
- Apply a thick 3-to-4-inch layer of organic mulch (such as clean straw, shredded leaves, or well-composted bark) across the entire bed every spring.
- This mulch suppresses weed seeds, retains precious soil moisture, and keeps the soil cool, which prevents emerging spears from prematurely opening up into branches too early.
3. The Fall Fern Cut-Down
In late autumn, once freezing weather arrives (or when the green ferns turn completely yellow and brown), the above-ground foliage dies back naturally.
- Crucial Sanitation Step: Using clean pruning shears, cut all dead ferns down to ground level (about 1 to 2 inches above the soil).
- Remove all debris from the bed and discard it in the trash (never compost diseased foliage) to eliminate overwintering asparagus beetles and fungal spores. Apply a fresh 2-inch top-dressing of rich compost over the dormant bed to nourish the crowns for winter.
Regional Cultivation Strategies Across the US
Different American climates require targeted adjustments to ensure your permanent asparagus bed thrives for decades.
☀️ Texas & Southern California (Mild Winters & Heat Management)
- The Challenge: Asparagus requires a certain number of winter “chill hours” (temperatures below 45°F) to trigger dormancy and spring spear production. Very warm southern climates lack sufficient chill hours for traditional northern varieties.
- Regional Strategy: Select heat-tolerant, all-male hybrid cultivars specifically bred for southern zones, such as ‘UC 157’ or ‘Purple Passion’. Ensure your permanent bed is planted in well-draining soil to handle heavy winter rains, and use reflective straw mulch to protect crowns from intense spring heat spikes.
🌉 San Francisco (Coastal Fog & Maritime Microclimates)
- The Challenge: San Francisco offers mild temperatures and cool air, but persistent marine fog and damp conditions can encourage rust and fungal issues on asparagus ferns during summer.
- Regional Strategy: Choose rust-resistant varieties like ‘Jersey Knight’ or ‘Jersey Supreme’. Space your permanent rows slightly wider (4 feet apart) and keep the bed entirely free of weeds to maximize coastal air circulation, ensuring summer ferns dry quickly after morning fog.
🌲 Washington & New York (Cold Winters & Short Growing Seasons)
- The Challenge: Hard, freezing winters mean long dormancy periods, but northern springs bring an explosive, uniform burst of sweet, tender spears.
- Regional Strategy: Traditional cold-hardy varieties like ‘Mary Washington’, ‘Jersey Giant’, and ‘Jersey Supreme’ excel here. Apply a thick layer of organic mulch in late fall to insulate crowns against deep ground-freeze cycles, and watch your bed erupt with thick spears as soon as soil temperatures hit 50°F in spring.
Frequently Asked Questions (FAQ)
1. How long do I have to wait before I can harvest my asparagus?
You must wait until the third spring after planting your crowns. Harvesting in years one or two starves the underground root crown of essential carbohydrates, stunting or killing your permanent bed.
2. Why are my harvested asparagus spears thin like pencils?
Pencil-thin spears usually indicate that the underground crown is young, stressed, under-fertilized, or overcrowded. Let the thin spears grow into ferns to feed the crown, apply a rich compost top-dressing, and ensure they receive full sun and consistent water.
3. When is the exact right time to stop harvesting asparagus in spring?
Stop harvesting asparagus when ambient daytime temperatures consistently rise above 75°F to 80°F, or when the harvested spears naturally begin to narrow down to the thickness of a pencil. Continuing to harvest past this point exhausts the crown.
4. What are those brown beetles crawling on my asparagus ferns in summer?
Those are asparagus beetles (common and spotted varieties). They chew on ferns and lay eggs. Control them organically by hand-picking them into soapy water in the morning, or by introducing beneficial predatory insects using companion flowers like sweet alyssum.
5. Can I grow asparagus in raised beds?
Yes! Raised beds work exceptionally well for asparagus because they guarantee loose, highly fertile soil and eliminate drainage issues. Ensure your raised bed is at least 10 to 12 inches deep to accommodate the initial trench planting method.
6. Do asparagus plants produce seeds?
Yes, female asparagus plants produce small red berries containing seeds in late summer. (Modern all-male hybrid varieties like ‘Jersey Knight’ produce very few berries, channeling all their energy into edible spear production instead).
7. How do I get white asparagus instead of green asparagus?
White asparagus is not a different plant variety; it is simply standard green asparagus grown entirely in the absence of sunlight. Growers mound thick layers of soil, mulch, or black plastic over the trenches so the spears never receive light to trigger chlorophyll production.
8. How many asparagus plants do I need per person in my household?
A good rule of thumb is to plant 10 to 15 crown plants per person in your household. This provides a generous, steady supply of fresh spears during the 6-to-8-week spring harvest window.
9. Why is my permanent asparagus bed turning yellow and dying in mid-summer?
Mid-summer yellowing can be caused by drought stress, overwatering (root rot), or a fungal disease known as asparagus rust. Ensure deep, consistent watering at the base, improve airflow, and clear away diseased debris in autumn.
10. Can I transplant an established asparagus bed to a new location?
It is not recommended. Established asparagus roots grow 4 to 5 feet deep and spread extensively. Digging them up causes severe shock and root damage that usually kills the mature plants. Choose your permanent dedicated bed location carefully from the start!
Conclusion
Establishing a permanent, dedicated asparagus bed is one of the most rewarding long-term projects a home gardener can undertake. By selecting a sunny, well-draining site, digging a deep trench, planting resilient 1-year-old crowns, exercising patience during the initial years, and managing seasonal care, you unlock decades of sweet, tender, restaurant-quality harvests right in your backyard.