How to Build a Natural Stone Pathway Through Your Backyard Garden Without Using Concrete Mortar
Welcome to the ultimate hardscaping and sustainable garden design guide by KCPlants, custom-tailored for property owners and landscape enthusiasts across America’s diverse geographic landscapes—from the sun-baked clay soils of Texas and California to the brisk seasonal freeze-thaw cycles of New York and Washington, and the unique, rolling maritime microclimates of San Francisco.
There are few features in a landscape design that instantly transform a backyard from a collection of plants into an intentional, magical sanctuary quite like a natural stone pathway. A well-placed path guides the eye, invites exploration, creates clean boundaries between growing beds, and protects your soil and root systems from being trampled by foot traffic.
For decades, traditional masonry dictated that building a stone pathway required heavy forms, messy bags of concrete mortar, professional trowels, and permanent grout lines. But modern landscape design and ecological gardening embrace a smarter, more organic approach: the dry-laid stone pathway.
By eliminating concrete mortar, you create a flexible, permeable, and living hardscape. Water drains naturally between the stones straight into the earth, the path can flex and shift organically during seasonal soil freezing and thawing, and low-growing groundcovers can root organically between the cracks, blending stonework seamlessly into nature.
This comprehensive, SEO-optimized guide explores the engineering principles of dry-laid stone, step-by-step construction, regional installation strategies across the US, ongoing maintenance, and 10 detailed FAQs designed to help your website, kcplants.com, rank effortlessly at the top of Google search results.
The Philosophy of Dry-Laid Stone: Why Skip Concrete?
Before lifting your first shovel, it helps to understand why experienced landscape architects prefer dry-laid stone over mortared installation, particularly in residential garden settings.
+-------------------------------------------------------------+
               THE ADVANTAGES OF DRY-LAID HARDSCAPING
+-------------------------------------------------------------+
| 1. PERMEABILITY: Water drains naturally into soil aquifers  |
| 2. FLEXIBILITY:  Absorbs soil movement without cracking     |
| 3. ECO-FRIENDLY: Allows creeping groundcovers to grow in gaps|
| 4. DIY-FRIENDLY: Easily modified, rearranged, or repaired   |
+-------------------------------------------------------------+
1. Ecological Permeability
Mortared walkways act like concrete parking lots, creating impermeable barriers that shed rainwater straight into municipal storm drains, causing erosion and urban runoff. A dry-laid stone path acts as an open sponge, allowing stormwater to percolate directly down into the local water table, supporting nearby plant root zones.
2. Natural Flexibility and Freeze-Thaw Resilience
In regions with freezing winters, rigid concrete mortar cracks under shifting, expanding frost-heaved soil. Dry-laid stone acts like a puzzle; individual stones can shift slightly with the soil during winter thaws and settle naturally back into place without breaking.
Step 1: Planning, Layout, and Material Sourcing
A stunning pathway starts with thoughtful layout design and material selection. Never rush the planning phase.
+-------------------------------------------------------------+
                    PLANNING & SOURCING WORKFLOW
+-------------------------------------------------------------+
| 1. PATHWAY PURPOSE: Main thoroughfare or winding garden walk|
| 2. LAYOUT MAPPING:  Use garden hose or flour to trace lines   |
| 3. STONE SELECTION: Flat flagstone, pavers, or river stones  |
| 4. BASE MATERIALS:  Crushed gravel base and polymeric sand  |
+-------------------------------------------------------------+
1. Mapping the Route
Walk naturally through your backyard from your patio to your raised beds, compost bin, or seating area. Notice your natural walking lines. Lay down a flexible garden hose or spray marking paint along your intended route to visualize curves, widths, and destination points. Main thoroughfares should be at least 3 to 4 feet wide to allow comfortable two-way passage, while winding garden retreat paths can narrow to 2 feet.
2. Selecting Your Stone
- Flagstone (Flagstone Pavers): Irregular, flat-faced slabs of sandstone, slate, or limestone. They provide an organic, rustic, timeless look. Look for stones that are at least 1.5 to 2 inches thick; anything thinner will crack under pressure.
- Dimensional Pavers: Sawn into uniform rectangular shapes for clean, modern, geometric garden designs.
- Cobblestones or Fieldstones: Rounded or smaller stones ideal for rustic borders or mosaic pathways.
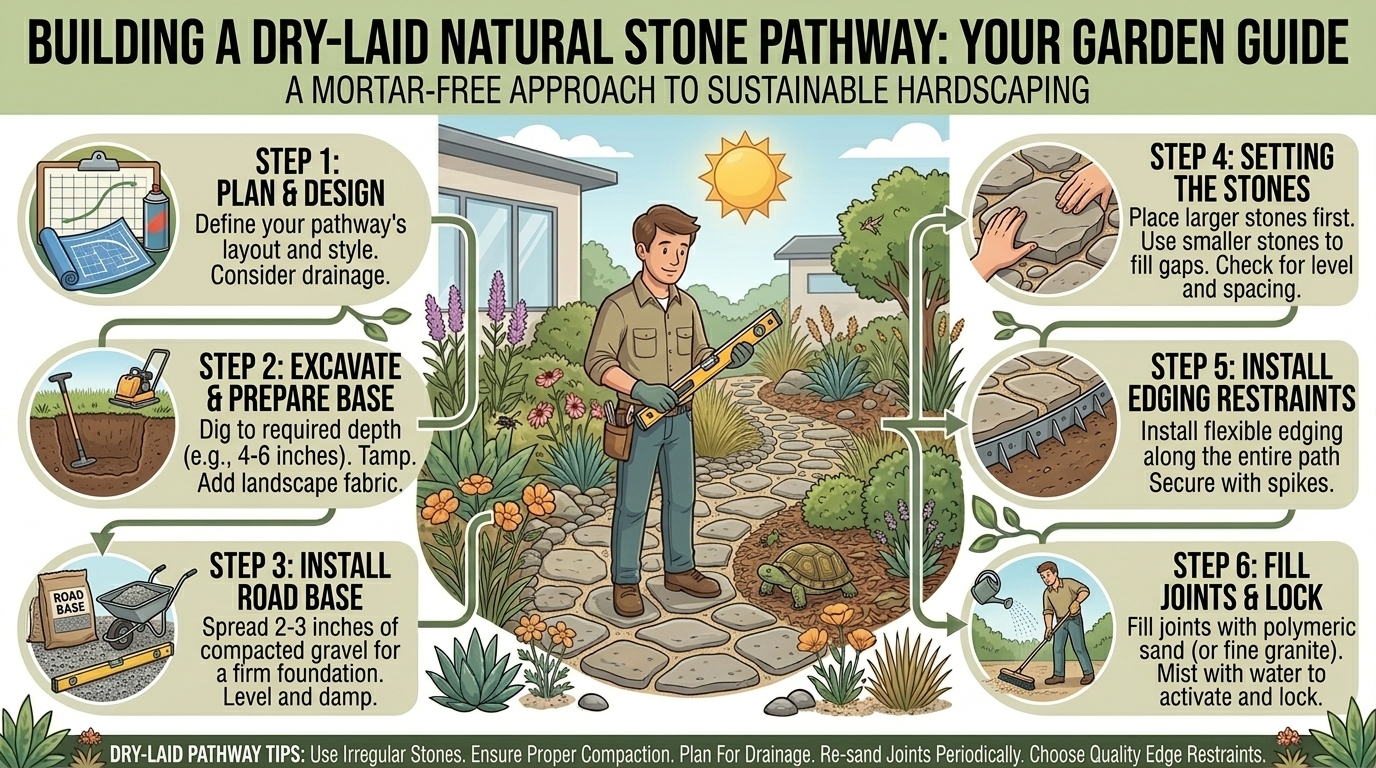
Step 2: Step-by-Step Installation Roadmap (Zero Concrete)
Building a rock-solid dry-laid pathway without mortar relies entirely on sub-base preparation. If your sub-base is sloppy, your stones will wobble. Follow this professional workflow:
+-------------------------------------------------------------+
                    DRY-LAID CONSTRUCTION STEPS
+-------------------------------------------------------------+
| Step 1: Excavation (Dig out 4 to 6 inches of topsoil)       |
| Step 2: Weed Barrier (Lay geotextile fabric down)           |
| Step 3: Sub-Base (Add 3 inches of crushed gravel & compact) |
| Step 4: Setting Bed (Add 1 inch of sharp bedding sand)      |
| Step 5: Stone Placement (Level each stone with a rubber mallet)|
| Step 6: Joint Filling (Sweep polymeric sand or organic soil)|
+-------------------------------------------------------------+
Step 1: Excavating the Trench
Using your garden spade, dig out the footprint of your pathway.
- Excavate to a depth of 4 to 6 inches (deeper if you have soft, expansive clay soil that requires a thicker gravel foundation).
- Slope the trench very slightly away from your home’s foundation to ensure proper runoff drainage. Rake and tamp the bare subgrade soil flat.
Step 2: Laying Geotextile Fabric
Roll out a heavy-duty, permeable woven geotextile landscape fabric across the bottom of the excavated trench. This prevents native soil from mixing upward into your gravel base while allowing water to drain freely and stopping weeds from sprouting from below.
Step 3: Installing the Crushed Gravel Base
Pour 3 inches of crushed angular gravel (such as 3/4-inch minus crushed stone or road base) over the fabric. Rake it flat and compact it thoroughly using a manual hand tamper or a rented mechanical plate compactor. A solid, compacted sub-base is the secret to preventing future stone settling.
Step 4: Spreading the Setting Bed
Over your compacted gravel base, spread a 1-inch layer of coarse, sharp builder’s sand or decomposed granite. Screed the sand flat using a straight 2×4 board dragged across wooden guides. Do not use fine sandbox sand, as it washes away too easily.
Step 5: Setting and Leveling the Stones
Carefully place your flagstones onto the sand bed, arranging them like an interlocking puzzle.
- Tap each stone firmly with a rubber mallet to seat it into the sand bed.
- Place a spirit level across adjacent stones to ensure they sit flush and even, preventing tripping hazards. If a stone wobbles, lift it, adjust the sand beneath it, and re-tap.
Step 6: Filling the Joints
Once all stones are securely locked in place, you have two wonderful organic choices for filling the gaps:
- Low-Growing Living Groundcover: Fill gaps with a blend of topsoil and plant drought-tolerant creeping herbs like Thyme (Thymus serpyllum), Creeping Jenny, or Corsican Mint. As you walk on them, they release a wonderful herbal fragrance.
- Polymeric Sand or Decomposed Granite: Sweep dry polymeric sand or fine crushed stone into the joints, mist it lightly with water, and let it cure to lock stones tightly without a drop of concrete.
Regional Installation Strategies Across the US
Different American climates present distinct environmental challenges that dictate how your dry-laid pathway should be constructed.
☀️ Texas & Southern California (Managing Expansion & Heat)
- The Challenge: Expansive, reactive clay soils that swell when wet and shrink into hard concrete blocks during scorching summer droughts, coupled with intense solar heat.
- Regional Strategy: Excavate deeper (6 to 8 inches) and use a thicker crushed gravel sub-base to isolate your stones from shifting clay subsoils. Choose light-colored sandstone or limestone flagstones that reflect solar radiation and remain cool to the touch for barefoot walking.
🌉 San Francisco (Coastal Fog & Soft Organic Soils)
- The Challenge: San Francisco’s rolling fog, damp maritime air, and sandy or organic-rich garden soils can encourage moss growth and weed invasion between joints.
- Regional Strategy: Embrace the coastal microclimate! Use irregular flagstones with wide gaps filled with organic soil and moss or creeping thyme. The damp air will help green groundcovers establish rapidly between stones.
🌲 Washington & New York (Soggy Thaws & Freeze-Heaving)
- The Challenge: Severe winter freeze-thaw cycles and heavy spring rainstorms can cause water to pool beneath stones, leading to severe frost-heaving and winter displacement.
- Regional Strategy: Prioritize a robust, highly permeable gravel drainage base (at least 4 to 6 inches of angular stone) so winter water never pools underneath your pathway. Ensure your pathway slopes away from structures.
Ongoing Maintenance of a Dry-Laid Path
A dry-laid stone path requires minimal maintenance compared to wooden decks or poured concrete slabs.
- Weed Control: Periodically inspect joints for stray weeds. Pull them by hand while young, or use a natural horticultural vinegar spray on sunny days.
- Re-Leveling Individual Stones: If a heavy winter frost or tree root causes a single stone to tilt slightly over the years, simply lift it up with a trowel, add a handful of fresh sand underneath, and tap it back down level with a rubber mallet.
- Groundcover Trimming: If you planted creeping thyme or moss between your stones, trim them with shears once or twice a season to keep the pathway edges crisp and clean.
Frequently Asked Questions (FAQ)
1. Do I really not need any concrete or mortar for a stone pathway?
Not at all! Traditional dry-laid stone pathways rely on gravity, interlocking edges, a compacted gravel base, and packed joint material. They have been used successfully for centuries across European and American historic gardens without a single drop of concrete.
2. What is the minimum thickness a flagstone should be for a walkway?
Flagstones used for foot traffic pathways should be at least 1.5 to 2 inches thick. Anything thinner (like 3/4-inch patio veneer) will crack under the weight of footsteps or wheelbarrows.
3. How do I stop weeds from growing up through my stone pathway?
Laying down a heavy-duty, commercial-grade woven geotextile landscape fabric directly over the excavated subgrade before adding your gravel base blocks weeds from below. Filling top joints tightly with polymeric sand or dense groundcovers prevents airborne weed seeds from taking root from above.
4. Can I push a wheelbarrow over a dry-laid stone pathway?
Yes! As long as your sub-base is thoroughly compacted, your flagstones are thick (2 inches), and they are firmly seated into the sand bed without rocking, a dry-laid path easily handles heavy garden wheelbarrows.
5. What kind of sand should I use for the setting bed?
Use coarse, sharp builder’s sand or decomposed granite. Never use fine children’s play sand or masonry sand; fine sands wash away easily during heavy rains and fail to provide stable stone support.
6. Can I build a dry-laid stone pathway on a slope?
Yes. On sloping yards, you can create gentle terraced steps using larger anchor stones as risers, filling the tread sections with flat flagstones and compacted gravel.
7. How do I fix a wobbly stone in an established pathway?
Simply slide a flat trowel or chisel under the rocking stone, lift it out, scrape away or add a small amount of fresh sand or gravel to the base, replace the stone, and tap it level with a rubber mallet.
8. What are the best plants to grow between dry-laid flagstones?
Low-growing, foot-traffic-tolerant groundcovers work best, including Creeping Thyme (Thymus serpyllum), Irish Moss (Sagina subulata), Blue Star Creeper (Pratia pedunculata), and Corsican Mint (Mentha requienii).
9. How wide should a backyard garden pathway be?
A standard garden walkway should be 3 to 4 feet wide, which allows two people to walk side-by-side or gives you comfortable room to maneuver a garden cart or wheelbarrow. Narrow decorative paths can be 2 feet wide.
10. How long does a dry-laid stone pathway last?
A properly constructed dry-laid natural stone pathway can last for generations (50 to 100+ years or more). Natural stone does not rot, rust, or degrade, and individual stones can easily be re-leveled if they shift over decades.
Conclusion
Building a natural stone pathway through your backyard garden without using concrete mortar is one of the most satisfying, eco-friendly, and durable DIY projects you can undertake. By ditching messy mortar in favor of a well-compacted gravel base, sharp sand setting bed, and interlocking dry-laid stones, you create a permeable, flexible walkway that honors nature and elevates your landscape design.