Why Installing a Drip Irrigation System Saves Water and Keeps Your Garden Beds Deeply Hydrated
Welcome to the ultimate water-conservation and smart-gardening guide by KCPlants, custom-tailored for property owners, urban cultivators, and sustainable landscape enthusiasts across America’s diverse geographic regions—from the scorching sun and water-restricted ordinances of Texas and Southern California to the brisk seasonal growing corridors of New York and Washington, and the unique, wind-cooled maritime microclimates of San Francisco.
Step out into your garden on a hot July afternoon. If you are watering your vegetable beds, flower borders, and shrub lines using a traditional handheld garden hose or an oscillating above-ground lawn sprinkler, pause for a moment to observe where that water is actually going.
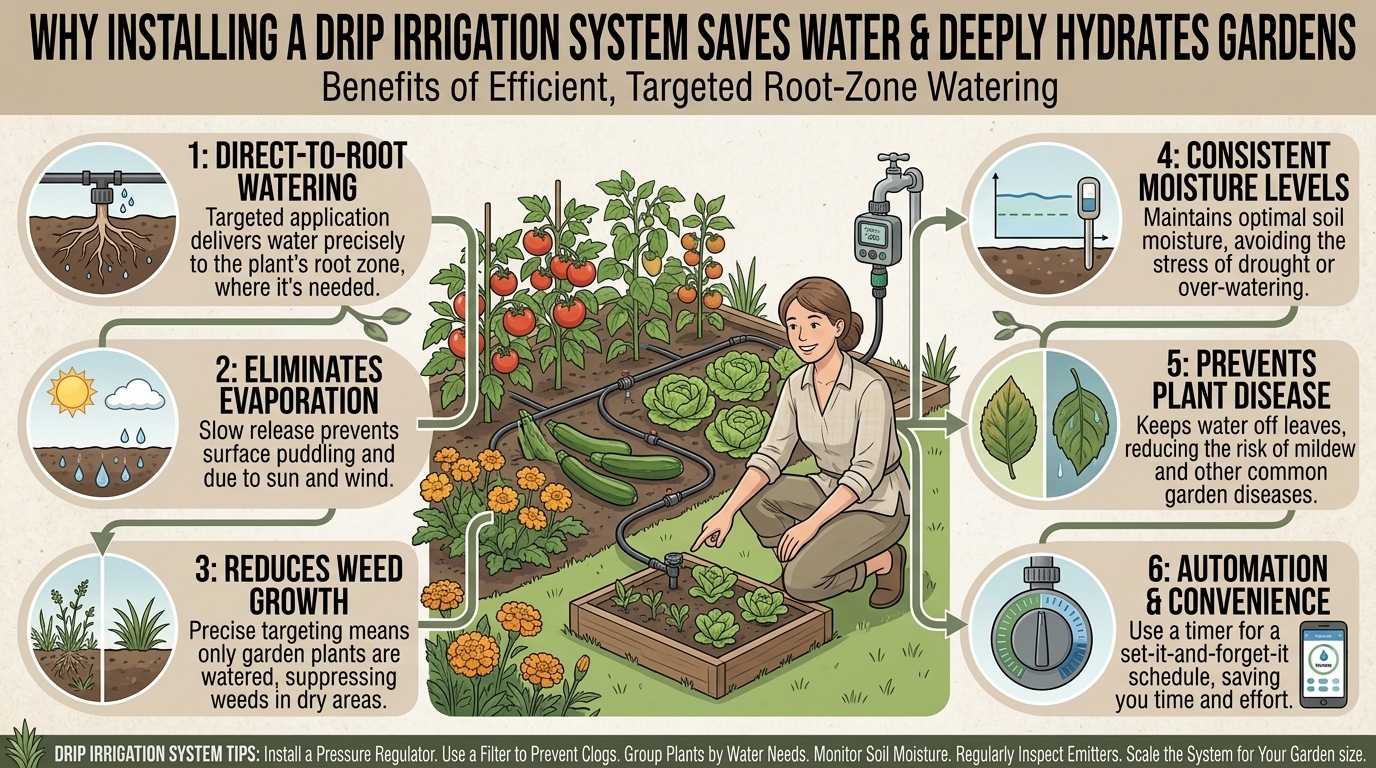
A significant portion of that stream never reaches a plant root. Instead, a large percentage vaporizes into the scorching air through direct evaporation, while another portion runs off compacted soil paths, carrying precious topsoil and organic nutrients straight into municipal storm drains. Meanwhile, water droplets splashed aggressively onto tomato and squash leaves create a moist, humid breeding ground for destructive fungal diseases like powdery mildew and blight.
In an era of rising utility costs, recurring regional droughts, and strict municipal watering restrictions, traditional overhead watering is an inefficient relic of the past.
The single most transformative upgrade you can make to your home landscape is installing a low-pressure drip irrigation system.
By delivering water directly, slowly, and precisely to the root zone beneath a layer of protective mulch, drip irrigation slashes outdoor water waste by 30% to 50% while encouraging deep, robust root growth that keeps your garden beds vibrantly healthy.
This comprehensive, SEO-optimized guide explores the engineering mechanics of drip systems, step-by-step installation instructions, regional strategies across the US, ongoing maintenance best practices, and 10 detailed FAQs designed to help your website, kcplants.com, rank effortlessly at the top of Google search results.
The Mechanics of Drip Irrigation: How It Outperforms Sprinklers
To understand why drip irrigation is superior, we must examine how water interacts with soil, plant roots, and the atmosphere.
+-------------------------------------------------------------+
              DRIP IRRIGATION VS. OVERHEAD SPRINKLERS
+-------------------------------------------------------------+
| FACTOR             | OVERHEAD SPRINKLERS  | DRIP IRRIGATION  |
+--------------------+----------------------+-----------------+
| Water Efficiency   | 50% to 65% Loss      | 90% to 95% Efficacy|
| Weed Growth        | Broadcasts everywhere| Restricted to roots|
| Fungal Disease     | High foliage wetness | Dry foliage, zero spores|
| Labor Requirement  | Manual holding/moving| Automated timers|
+-------------------------------------------------------------+
1. Eliminating Evaporation and Wind Drift
When an overhead sprinkler flings high-pressure water droplets into the air, ambient heat and wind instantly evaporate a massive percentage of the water before it ever hits the soil. Drip irrigation utilizes low-pressure emitter tubing laid flat on the soil surface or slightly buried beneath mulch. Water exits the emitters as slow, heavy drops or micro-streams, completely bypassing atmospheric evaporation.
2. Deep Root Hydration vs. Shallow Surface Wetting
Sprinklers wet only the top quarter-inch of soil, which quickly bakes dry under the sun and forces plant roots to grow upward toward the surface in search of moisture. Drip systems emit water slowly over several hours, allowing moisture to percolate deeply down 8 to 12 inches into the earth. This deep watering trains plant roots to dive deep underground, creating resilient, drought-tolerant plants.
The Core Components of a Drip Irrigation System
Before building your layout, it helps to understand the anatomy of a complete, professional drip irrigation setup.
+-------------------------------------------------------------+
                 THE DRIP IRRIGATION TOOLBOX
+-------------------------------------------------------------+
| 1. FAUCET TIMER / BACKFLOW PREVENTER: Automates watering schedules|
| 2. PRESSURE REGULATOR: Drops PSI down to a safe 25–30 PSI   |
| 3. MAINLINE TUBING:    1/2-inch durable polyethylene tubing |
| 4. EMITTER TUBING:     1/4-inch inline pressure-compensating lines|
| 5. ANCHORS & FITTINGS: Stake pins, tees, elbows, and end plugs|
+-------------------------------------------------------------+
1. The Automated Faucet Timer and Backflow Preventer
An automatic battery- or solar-powered digital hose-bib timer attaches directly to your outdoor faucet. It allows you to program watering cycles for early morning hours (the optimal window for plant hydration) and ensures you never forget to turn the water off. A backflow preventer ensures garden water never siphons backward into your home’s potable drinking supply.
2. The Pressure Regulator
Municipal water pressure typically runs at 60 to 80 PSI (pounds per square inch), which is far too high for flexible polyethylene drip tubing and will pop emitter fittings apart. A pressure regulator steps this down to a steady, safe 25 to 30 PSI.
3. Mainline and Emitter Tubing
- Mainline (1/2-Inch Tubing): Acts as the main artery transporting water from your water source to your individual garden beds.
- Inline Emitter Tubing (1/4-Inch Tubing): Features built-in pressure-compensating drip emitters spaced every 6, 12, or 18 inches, ensuring uniform water delivery even on sloping terrain.
Step-by-Step Installation Roadmap for Garden Beds
Installing a drip system is one of the most rewarding weekend DIY projects you can tackle. Follow this professional workflow:
+-------------------------------------------------------------+
                    INSTALLATION WORKFLOW
+-------------------------------------------------------------+
| Phase 1: Design & Map Layout (Trace beds and crop zones)    |
| Phase 2: Attach Head Assembly (Timer, filter, & regulator)  |
| Phase 3: Run Mainline Tubing (Lay 1/2-inch line to beds)    |
| Phase 4: Grid Emitter Lines (Run parallel rows 12 inches apart)|
| Phase 5: Test & Mulch (Flush lines, cap ends, and cover)    |
+-------------------------------------------------------------+
Phase 1: Mapping Your Garden Zones
Sketch your yard on paper, identifying where your vegetable beds, perennial flower borders, and shrub lines are located. Group plants with similar water needs together onto the same watering zone (hydrozoning).
Phase 2: Assembling the Control Head
Screw your digital timer directly onto your outdoor faucet. Attach the backflow preventer, a 120-mesh disc filter (to trap tiny sediment particles before they clog your emitters), and your pressure regulator.
Phase 3: Laying the Mainline and Branch Lines
Unroll your 1/2-inch black polyethylene mainline tubing across your yard from the faucet toward your garden beds. Use plastic stake anchors to pin it securely to the soil. Where branches diverge toward specific beds, cut the mainline with hand pruners and insert a barbed tee or elbow fitting.
Phase 4: Installing Emitter Grids in Beds
For wide garden beds, run 1/4-inch inline emitter tubing back and forth in a parallel grid pattern spaced roughly 12 inches apart. This ensures that moisture overlaps horizontally beneath the soil, creating a uniform, damp underground root zone.
Phase 5: Flushing and Mulching
Before capping the ends of your tubing with figure-8 hose plugs, turn the water on for one minute to flush out any dirt or debris trapped inside the lines. Once clean, cap the ends, run a test cycle, and cover the entire tubing network with 2 to 3 inches of organic wood mulch to protect the plastic from UV rays and eliminate surface evaporation.
Regional Drip Irrigation Strategies Across the US
Different American climates present distinct environmental challenges that dictate how you configure and manage your drip irrigation system.
☀️ Texas & Southern California (Beating Severe Heat & Drought)
- The Challenge: Extreme summer heatwaves, intense UV radiation, and strict municipal water rationing ordinances require maximum irrigation efficiency.
- Regional Strategy: Program your drip system to run during the coolest hours of the morning (between 4:00 AM and 7:00 AM) to prevent soil water from boiling or evaporating instantly when the sun rises. Use heavy-duty UV-resistant commercial tubing and pressure-compensating emitters to handle variable water pressure during peak municipal demand hours.
🌉 San Francisco (Urban Microclimates & Container Gardens)
- The Challenge: San Francisco yards are often compact, featuring urban raised beds, rooftop containers, and narrow courtyard strips exposed to cool ocean breezes.
- Regional Strategy: Utilize micro-drip emitter stakes and 1/4-inch spaghetti tubing routed directly into individual pots and raised planter boxes. Connect them to a compact faucet timer so your container plants stay perfectly hydrated despite busy urban schedules.
🌲 Washington & New York (Seasonal Adjustments & Winter Frosts)
- The Challenge: Freezing winter temperatures can cause water trapped inside rigid tubing and backflow preventers to expand and crack the plastic.
- Regional Strategy: Before the first hard autumn freeze, unscrew your digital timer and backflow preventer, drain all water from your mainline tubing using compressed air or gravity, and store delicate plastic components indoors for the winter.
Ongoing Maintenance: Keeping Your Drip System Flowing
A drip irrigation system is exceptionally reliable, but performing routine seasonal checkups ensures it operates at peak efficiency for years.
+-------------------------------------------------------------+
                     MAINTENANCE CHECKLIST
+-------------------------------------------------------------+
| 1. MONTHLY FLUSHING: Open end caps to blow out sediment     |
| 2. FILTER CLEANING:  Rinse mesh filter disc quarterly       |
| 3. LEAK INSPECTION:  Check for severed lines from garden tools|
| 4. SEASONAL TIMING:  Adjust watering run-times as weather shifts|
+-------------------------------------------------------------+
- Inspect for Rodent Damage: Squirrels, mice, and chipmunks occasionally chew on soft polyethylene tubing seeking water during dry spells. Keep a roll of 1/4-inch repair couplers handy to splice chewed lines instantly.
- Seasonal Adjustments: Dial your watering timer up during peak July and August heatwaves, and dial it down or turn it off entirely during autumn and winter rainy seasons.
Frequently Asked Questions (FAQ)
1. How much water does a drip irrigation system actually save?
Studies by agricultural extension services show that drip irrigation systems save 30% to 50% more water compared to traditional overhead sprinklers because they eliminate wind drift, evaporation, and runoff.
2. Can I install a drip irrigation system myself without professional help?
Yes! Drip irrigation is the ultimate DIY-friendly home improvement project. It requires no specialized plumbing solder, glue, or heavy trenching tools—just a pair of garden shears, push-fit barbed fittings, and basic tubing.
3. Why are some emitters in my system not releasing water?
This is usually caused by sediment clogging the tiny emitter holes or a mineral scale buildup (common in hard water areas). Unscrew the clogged emitter, soak it in white vinegar to dissolve mineral deposits, and flush your mainline before reattaching.
4. Do I need a pressure regulator for my drip system?
Yes, absolutely. Municipal water lines run at high pressure (60–80 PSI). Without a pressure regulator dropping it down to 25–30 PSI, your drip tubing will balloon, pop off fittings, or rupture.
5. Can I bury drip tubing underground beneath the mulch?
Yes! Subsurface drip irrigation (SDI) is fantastic for garden beds and lawns. Burying emitter tubing 2 to 3 inches beneath the soil surface completely eliminates evaporation and keeps the surface dry, which stops weed seeds from germinating.
6. How long should I run my drip irrigation system each week?
Instead of short daily waterings, run your drip system 2 to 3 times per week for longer durations (45 to 90 minutes per cycle). Deep, infrequent watering encourages plant roots to grow deep into the soil profile.
7. Will freezing winter weather destroy my drip system?
If water is left trapped inside rigid tubing and fittings during a hard freeze, the expanding ice will split the plastic. Always drain your system, remove timers, and blow out lines before winter temperatures drop below freezing.
8. Can I connect a fertilizer injector to my drip system?
Yes! You can install a simple siphon-style fertilizer injector (hose-end feeder) ahead of your drip lines to deliver liquid organic fish emulsion or kelp fertilizer directly to plant root zones automatically (fertigation).
9. How do I prevent squirrels and rodents from chewing my drip lines?
Rodents chew on plastic lines seeking water. Using thicker-walled commercial tubing, covering lines with a deep layer of mulch, or providing a separate shallow birdbath for wildlife drastically reduces rodent chewing damage.
10. What is the difference between point-source emitters and inline emitter tubing?
Point-source emitters are individual drip emitters punched into a blank mainline tube to water specific large plants or trees. Inline emitter tubing features factory-installed emitters built inside the tube every 12 inches, perfect for dense garden beds and rows.
Conclusion
Installing a low-pressure drip irrigation system is one of the smartest investments you can make for your home garden, your wallet, and the environment. By bypassing inefficient overhead sprinklers and delivering water slowly, deeply, and directly to plant root zones beneath protective mulch, you slash water waste, eliminate fungal foliage diseases, and foster lush, resilient plant growth.