Water is the lifeblood of any garden, yet managing irrigation efficiently is one of the greatest challenges home horticulturists face. During scorching summer heat waves, traditional overhead watering leads to massive water loss through surface evaporation, encourages fungal leaf diseases, and stresses plants through erratic wet-dry cycles. Worse, when you travel or experience water restrictions, container gardens and raised beds can dry out and perish in days.
Enter the DIY self-watering garden bed system powered by recycled plastic bottles and rich organic soil.
By repurposing everyday single-use plastic bottles into underground subterranean sub-irrigation reservoirs, you create an ultra-efficient watering system that delivers moisture directly to plant root zones via capillary action. This reduces water waste by up to 70%, eliminates surface evaporation, and fosters deep, resilient root development.
Whether you are designing water-wise urban containers on a balcony in San Francisco, managing drought-tolerant raised beds in Texas, optimizing suburban garden plots in New York, or adapting to damp variable climates across Washington State and California, this comprehensive guide explores how to build, install, and maintain your own sustainable self-watering garden system.
1. The Engineering Principle: How Sub-Irrigation Works
To appreciate why a bottle-based sub-irrigation system works so brilliantly, you must understand how water moves through soil physics.
Capillary Action vs. Gravity
In a traditional garden bed, water is poured onto the surface and pulled downward by gravity past the root zone, taking valuable nutrients with it.
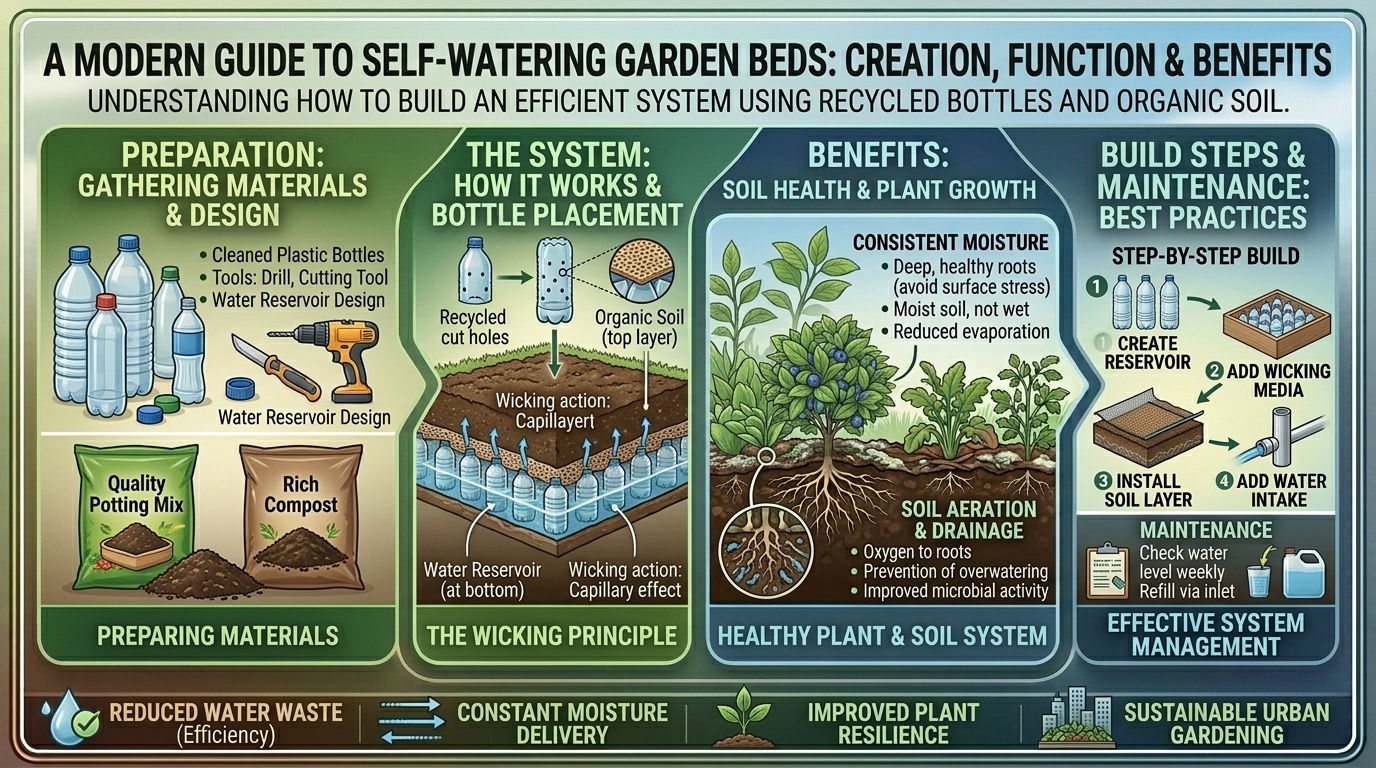
- The Sub-Irrigation Mechanism: In a self-watering system, water is stored in a sealed or semi-sealed reservoir at the bottom of the planter or bed. Through capillary action (the same physical force that pulls coffee up a sugar cube), the surrounding organic soil draws moisture upward from the reservoir, keeping the root zone consistently moist without waterlogging.
- The Oxygen-Moisture Balance: Because water comes from below, the top layers of soil remain aerated and oxygen-rich. This prevents surface crusting, stops fungus gnats, and protects delicate soil microorganisms from drowning or baking.
2. Materials Needed for Your DIY Bottle System
Gathering your materials ahead of time makes the build process quick and seamless.
[ Master Materials Checklist ]
       │
       ├──> 1. Plastic Bottles (2-Liter Soda or Milk Jugs, Cleaned)
       │
       ├──> 2. Perforated PVC Pipe or Funnel (For Refilling Reservoir)
       │
       ├──> 3. Landscape Fabric or Burlap (Separation Layer)
       │
       ├──> 4. Rich Organic Potting Mix / Compost Blend
       │
       └──> 5. Drill, Utility Knife, and Cable Ties
- Recycled Plastic Bottles: Standard 2-liter soda bottles or 1-gallon plastic milk jugs work best. Ensure they are thoroughly rinsed and labels are removed.
- Refill Tube: A short section of narrow PVC pipe, garden hose, or a funnel inserted vertically to act as your watering fill port.
- Separation Barrier: Porous landscape fabric, burlap, or weed barrier cloth to prevent soil from washing down into your water reservoir.
- Organic Soil Blend: A high-quality mixture of compost, peat moss, or coco coir, and perlite designed for moisture retention and biological activity.
3. Step-by-Step Construction Protocol
Follow these detailed steps to transform ordinary plastic waste into an automated sub-irrigation engine.
[ Constructing the Sub-Irrigation Bed ]
       │
       ├──> Step 1: Prepare and Perforate the Plastic Bottles
       │
       ├──> Step 2: Arrange Bottles Inside Planter / Raised Bed Base
       │
       ├──> Step 3: Install the Vertical Fill Tube
       │
       └──> Step 4: Lay Fabric Barrier & Add Organic Soil
Step 1: Prepare and Perforate the Bottles
- Drill Holes: Use a power drill with a small drill bit (1/8 inch) to puncture dozens of tiny holes along the sides and caps of your plastic bottles. These holes allow water to seep out into the surrounding soil matrix.
- Cut Caps or Bases: Depending on your design, you can either leave the caps on (drilling holes in the cap) or slice off the bottom of the bottles so they act as inverted funnel cups that trap air and hold maximum water volume.
Step 2: Arrange the Bottles in Your Planter
Place your bottles tightly together across the bottom of your window box, container, or raised bed frame, covering roughly 60% to 70% of the base surface area.
- Tip: Pack them closely so they form a stable structural platform for the soil above.
Step 3: Install the Fill Tube
Insert a vertical fill tube (such as a 1-inch PVC pipe or the neck of an inverted funnel bottle) so that the bottom of the tube rests near the base of the container, while the top pokes just above the final soil line. This is the port where you will pour water directly into the underground reservoir without disturbing your plants.
Step 4: Lay the Capillary Separation Barrier
Cover the entire layer of plastic bottles with your landscape fabric or burlap. Cut the fabric to fit snugly against the interior walls of your container.
- Why This Matters: This barrier is crucial. It allows moisture to wicked upward into the soil while preventing soil particles from washing downward and silting up your water reservoir.
Step 5: Add Rich Organic Soil and Plant
Dump your nutrient-rich organic potting mix directly on top of the fabric barrier. Ensure your soil layer is at least 6 to 8 inches deep to give plant roots ample room to forage. Water the soil thoroughly from the top once to settle the media, and thereafter, fill your reservoir exclusively through your PVC fill tube.
4. Regional Adaptations: Self-Watering Across U.S. Climates
Regional environmental factors influence how your self-watering system performs:
California & San Francisco
- Climate Challenge: Intense summer drought and water conservation mandates make maximizing every drop of irrigation essential.
- Application Strategy: Container and raised bed setups using bottle reservoirs cut outdoor water usage by over 60%, shielding urban gardeners in San Francisco and southern inland valleys from evaporation losses during dry spells.
Texas
- Climate Challenge: Searing heat waves can cause small containers to dry out in a matter of hours.
- Application Strategy: Ensure your bottle reservoir capacity is large enough to sustain high-demand summer plants like peppers and tomatoes. Use light-colored outer containers or shade the sides to keep reservoir water cool.
New York
- Climate Challenge: Heavy summer thunderstorms can oversaturate traditional containers, causing root rot.
- Application Strategy: Drill an overflow drainage hole on the side of your container just below the top of your plastic bottle reservoir level. This ensures excess rainwater from heavy New York storms drains away safely without waterlogging your plants.
Washington State
- Climate Challenge: Cool, damp springs require careful monitoring of soil moisture to prevent fungal saturation.
- Application Strategy: Utilize the sub-irrigation system primarily during dry summer months, allowing natural rainfall to handle spring moisture needs.
5. Frequently Asked Questions (FAQ)
1. Will the plastic bottles degrade or leach chemicals into my vegetable soil?
Standard plastic soda bottles (PET plastic) are stable and do not leach harmful plasticizers like BPA under normal garden temperatures. Because they are buried underground away from direct ultraviolet sunlight, they will remain structurally intact for many years.
2. Can mosquito larvae breed inside the underground water reservoir?
If your reservoir is completely enclosed within buried bottles and sealed off by soil and landscape fabric, mosquitoes cannot access it to lay eggs. Always ensure your vertical fill tube is capped with a mesh screen or plug when not in use to keep insects out.
3. How do I know when to refill the underground reservoir?
You can insert a wooden dowel or a dipstick down your PVC fill tube. When you pull it out, the wet portion of the stick will show you the exact water level remaining in the reservoir. Alternatively, you can install a simple floating bobber indicator.
4. What types of plants grow best in self-watering DIY beds?
Heavy-drinking, fruiting annuals—such as tomatoes, peppers, cucumbers, squash, and leafy greens—thrive in self-watering systems because they appreciate a consistent, steady supply of moisture without drought stress.
5. Can I use regular garden dirt instead of organic potting mix?
No. Native garden soil or heavy clay contains too much fine silt and lacks adequate porosity, which disrupts capillary action and prevents water from wicking upward from your bottle reservoir. Always use a loose, fluffy organic potting mix combined with compost and perlite.
6. How do I prevent root rot in a self-watering bed?
Root rot occurs when roots sit in stagnant, oxygen-deprived water. Ensure your system includes an overflow drainage hole located right at the top of your bottle layer so excess water can never submerge the root zone entirely.
7. Can I add liquid organic fertilizers to the water reservoir?
Yes! Adding a diluted dose of liquid kelp, fish hydrolysate, or worm casting tea directly into your fill tube delivers dissolved nutrients straight to the roots via fertigation, maximizing nutrient uptake.
8. How long will a filled water reservoir last before needing a refill?
Depending on plant size, ambient temperature, and humidity, a 2-liter bottle matrix reservoir typically provides 3 to 7 days of consistent moisture, freeing you up from daily watering chores and brief vacations.
9. Do I need to water from the top at all after planting?
You only need to water from the top during initial planting to settle the soil around your new transplants. Once the root system establishes downward toward the moisture gradient, you should water exclusively through the underground fill tube.
10. Can I scale this system up for a large in-ground garden bed?
While bottle reservoirs are most efficient in containers, raised beds, and trough planters, you can scale them up for in-ground beds by burying rows of perforated bottles horizontally beneath long crop rows, though commercial drip tape is often preferred for massive field scale.
Conclusion
Creating a self-watering garden bed system using recycled plastic bottles and rich organic soil is the ultimate intersection of environmental sustainability, zero-waste DIY ingenuity, and smart gardening horticulture. By turning waste into an efficient sub-irrigation reservoir, you conserve precious water, eliminate surface evaporation, and provide your plants with the steady, consistent hydration they need to produce bumper harvests.
Whether you are designing urban balcony containers in San Francisco, managing drought-resistant beds in Texas, or optimizing garden space across New York, Washington, and California, this simple DIY project guarantees a thriving, water-wise growing season.
What creative recycled materials have you experimented with in your garden, and how do you manage irrigation during hot summer months?