How to Repot a Root-Bound Indoor Snake Plant Without Damaging Its Thick Underground Rhizome Structures
Snake plants (formerly classified under Sansevieria, now formally Dracaena species) are legendary in the indoor gardening world for their architectural beauty, air-purifying capabilities, and near-mythical resilience. Whether styling a minimalist urban apartment in New York or San Francisco, brightening a sunlit living room in Texas, or curating indoor plant displays across California and Washington, snake plants are a go-to favorite for both novice and master gardeners.
Because they grow relatively slowly compared to tropical aroids, snake plants can comfortably inhabit the same container for years. However, eventually, their vigorous subterranean root systems will completely fill the pot. When a snake plant becomes severely root-bound, its thick, underground horizontal stems—known as rhizomes—can warp plastic pots, crack ceramic containers, and exhaust the surrounding soil of all nutrients.
Brought to you by kcplants.com, this comprehensive, expert-led masterclass provides your ultimate blueprint for safely repotting a root-bound snake plant without damaging its vital rhizome structures.
Part I: Understanding the Snake Plant’s Underground Anatomy
Before you reach for your gardening trowel, it is critical to understand the unique biological architecture hiding beneath the soil surface. Unlike many common houseplants that rely strictly on a centralized taproot or fine, fibrous root ball, snake plants possess specialized storage organs:
- What is a Rhizome? A rhizome is a modified underground stem that grows horizontally just beneath or at the soil surface. Rhizomes store water and vital starches, allowing the plant to survive extended periods of drought.
- The Origin of New Pups: New vertical shoots (often called “pups”) sprout directly from the nodes along these horizontal rhizomes. If you damage or crush the main rhizome during repotting, you risk severing the lifeline between the established mother plant and developing offshoots.
- Thick, Succulent Roots: Snake plant roots are thick, cord-like, and fleshy. They function primarily to anchor the heavy, upright leaves and absorb moisture. Because they store water, they are highly susceptible to snapping or rotting if mishandled or exposed to overly wet conditions.
Part II: Signs Your Snake Plant Desperately Needs Repotting
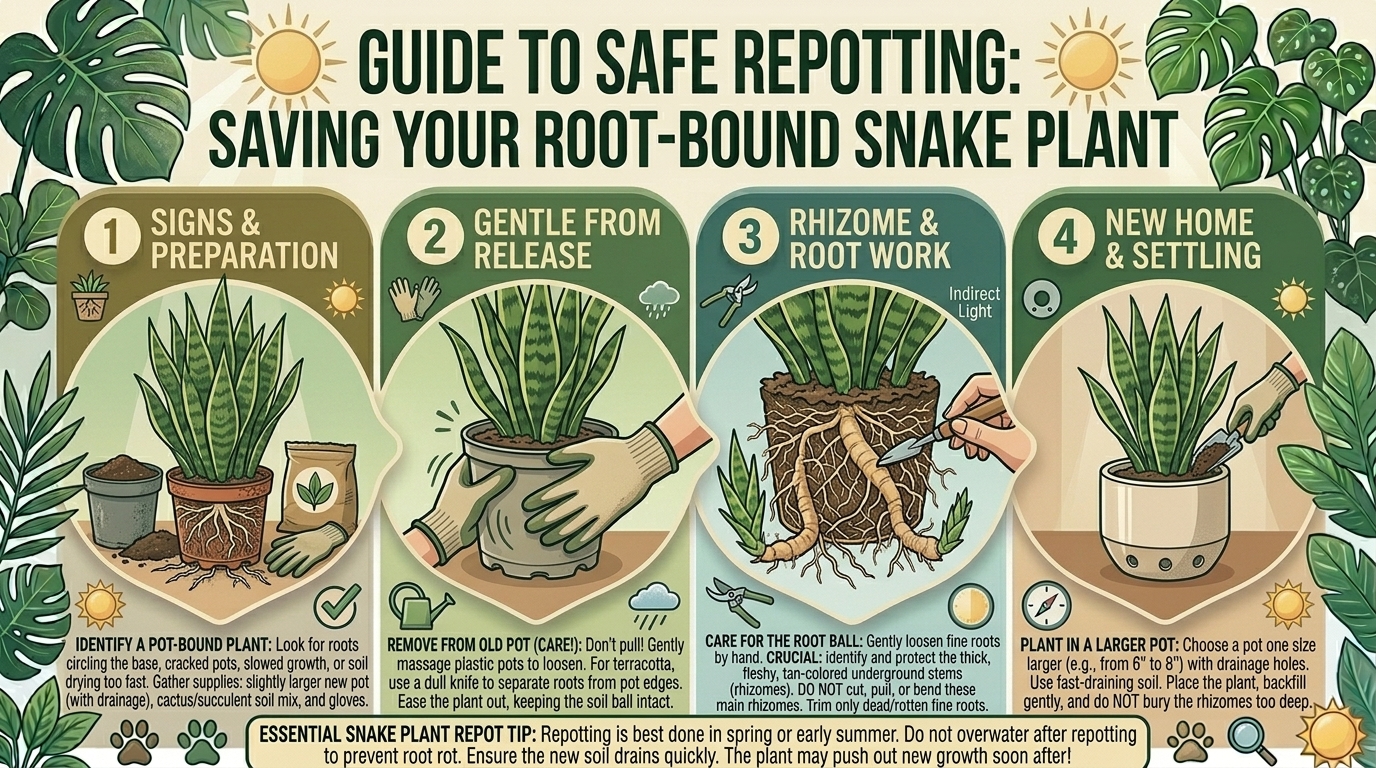
How do you know when your snake plant has outgrown its current home? Look for these distinct warning signs:
- Container Distortion or Cracking: The sheer expansion pressure of thick rhizomes and roots can literally bulge out the sides of plastic nursery pots or crack heavy terracotta and ceramic planters.
- Roots Emerging From Drainage Holes: If thick, fleshy roots are spiraling out of the bottom drainage holes, the root ball has completely run out of space.
- Stunted Growth and Toppling Over: When a plant becomes too top-heavy because its root base is restricted, the entire plant may lean dangerously or topple over easily.
- Rapid Soil Dry-Down: If water immediately runs straight through the pot without soaking in, or if you find yourself watering every few days because the pot is 90% roots and 10% soil, it is time for an upgrade.
Part III: Essential Tools and Materials Checklist
Preparation is the secret to a stress-free repotting session. Gather the following items before you begin:
- A Slightly Larger Pot: Choose a pot that is only 1 to 2 inches larger in diameter than your current pot. Sizing up too drastically leaves too much wet soil around the roots, greatly increasing the risk of root rot. Ensure the new pot has a functioning drainage hole.
- Specialized Succulent/Cactus Soil Mix: Standard potting soil holds too much moisture. Opt for a fast-draining mix formulated for cacti and succulents, or create your own blend using regular potting soil mixed with heavy amounts of perlite, coarse pumice, and orchid bark.
- Clean, Sharp Cutting Tools: A pair of pruning shears or a clean serrated knife sterilized with rubbing alcohol.
- Protective Gear: A clean workspace, gardening gloves, and a drop cloth or tarp to catch loose soil.
Part IV: Step-by-Step Guide to Repotting Without Damaging Rhizomes
Follow this careful procedure to unpot, inspect, divide, and repot your snake plant safely:
Step 1: Loosen the Root Ball
Do not yank the leaves of your snake plant to pull it out; you risk snapping the leaves or tearing the rhizomes. Instead, gently squeeze the sides of a plastic nursery pot to loosen the soil grip. If the plant is stuck in a rigid ceramic container, run a dull butter knife or a thin trowel around the inner perimeter of the pot to break the suction and soil adhesion.
Step 2: Gently Free and Clean the Roots
Tilt the pot sideways and ease the plant out. Once free, use your fingers to gently tease away compacted soil from the root mass. Avoid ripping or forcefully pulling tangled roots. If soil is heavily impacted, you can submerge the root ball in a bucket of tepid water to wash away old soil without breaking the fleshy rhizomes.
Step 3: Inspect and Sanitize
Examine the root system closely. Look for any mushy, discolored, or foul-smelling roots—these are rotting and must be snipped off immediately using your sterilized shears. Healthy roots should be firm, plump, and white or light yellow.
Step 4: Strategic Division (Optional)
If your rhizome network has grown massive and produced multiple distinct clusters of leaves, you can use a clean, sharp knife to cut through the connecting rhizome, separating the plant into two or three independent divisions. Ensure each division retains its own healthy section of roots and leaves.
Step 5: Repotting at the Correct Depth
Place a mesh screen or coffee filter over the drainage hole of your new pot to prevent soil loss. Add a base layer of fresh, dry cactus mix. Position the snake plant in the center, ensuring that the base of the leaves and the main rhizomes sit at or just slightly above the soil line. Crucial Rule: Never bury snake plant leaves or rhizomes too deep below the soil surface, as buried stems are prone to rotting.
Step 6: Backfilling and Settling
Fill in around the root ball with your dry succulent mix, tapping the sides of the pot gently to settle the soil. Press down lightly around the base to stabilize the heavy leaves.
Step 7: The Post-Repotting Watering Rule
Resist the urge to water immediately! Because handling and teasing root-bound roots inevitably causes micro-tears in the plant tissue, watering right away invites fungal pathogens into those open wounds. Wait 4 to 7 days before giving your repotted snake plant its first deep watering, allowing all cuts and abrasions to callus over safely.
Part V: Pro Tips for Long-Term Snake Plant Vigor
- Prioritize Drainage: Never let a snake plant sit in standing water in a saucer. Empty saucers 15 minutes after watering.
- Lighting Adjustments: While snake plants tolerate low-light conditions, they grow much stronger, thicker rhizomes and brighter leaf variegation when placed in bright, indirect light.
- Fertilize Sparingly: Only feed your snake plant once or twice during the active growing season (spring and summer) using a diluted, balanced houseplant fertilizer.
10 Frequently Asked Questions (FAQ)
1. How do I know if my snake plant is truly root-bound?
Signs include roots growing out of the drainage holes, soil drying out within a day or two of watering, bulging or cracked pots, and slowed top growth despite proper care.
2. Can a snake plant pot break if it gets too root-bound?
Yes! The expansive pressure generated by thick, growing rhizomes and fleshy roots can easily crack brittle terracotta, ceramic, or thin plastic pots.
3. What happens if I accidentally cut or damage a rhizome while repotting?
If a rhizome is accidentally cut, let the wound dry and callus over for a day or two in the open air before planting. Apply a dusting of cinnamon (a natural antifungal) to the cut edge to prevent rot.
4. What is the best soil mix for a repotted snake plant?
A fast-draining cactus and succulent mix containing perlite, coarse sand, and organic matter is ideal. Avoid heavy, moisture-retaining garden soils.
5. Why should I wait a few days before watering a repotted snake plant?
Waiting 4 to 7 days allows any microscopic tears or cuts on the roots and rhizomes incurred during handling to callus over, preventing fungal rot from entering the plant.
6. Can I divide my snake plant into multiple pots during repotting?
Yes! If the rhizome has grown large with multiple distinct leaf clusters, you can slice through the connecting rhizome with a sterilized knife to create several separate plants.
7. How much larger should the new pot be?
Select a new container that is only 1 to 2 inches larger in diameter than the previous pot. Oversizing leaves too much wet soil around the roots, causing rot.
8. Why are the lower leaves of my snake plant turning yellow after repotting?
A little lower leaf yellowing or drop can happen due to transplant shock. Ensure you aren’t overwatering, and give the plant a few weeks to adjust to its new container.
9. Should I fertilize my snake plant right after repotting?
No. Fresh soil already contains trace nutrients, and fertilizing fresh or disturbed roots can cause chemical burn. Wait at least 2 to 3 months before fertilizing.
10. Do snake plants like being root-bound?
Snake plants tolerate being root-bound better than almost any other houseplant, often putting out more pups when constrained. However, if left root-bound indefinitely, they will eventually exhaust the soil nutrients and stop growing.
Conclusion
Repotting a root-bound indoor snake plant is a straightforward process when you respect its unique underground rhizome structure. By handling the thick roots with care, avoiding deep planting, and providing a fast-draining soil blend, you ensure your hardy botanical companion will continue to thrive, purify your air, and anchor your indoor space for years to come. Visit kcplants.com for more expert guides, plant care tips, and inspiration to help your indoor jungle flourish!