Why Yellow Tips on Spider Plant Leaves Happen and How to Fix Your Watering Routine Naturally
Spider plants (Chlorophytum comosum) are among the most beloved, resilient, and enduring houseplants in the world. Whether you are styling a bright minimalist apartment in San Francisco, an urban loft in New York, a spacious sunlit home in Texas, or vibrant residential spaces across California and Washington, spider plants are a staple of indoor green spaces. Famed for their arching green-and-white striped foliage and prolific baby “pups,” they are also celebrated champions of indoor air purification.
However, even the hardiest indoor plants can show signs of distress. One of the most common cosmetic and health complaints plant parents encounter is the dreaded appearance of crispy yellow or brown tips on the delicate leaf blades. When your lush spider plant starts showing discoloration at the ends, it is trying to communicate that something in its environmental or watering routine is out of balance.
Brought to you by kcplants.com, this comprehensive, expert-led masterclass explores the exact botanical reasons behind yellow tips on spider plant leaves and provides actionable, natural steps to correct your watering routine and restore your plant to vibrant health.
Part I: The Physiology of Leaf Tip Necrosis
To solve leaf tip yellowing (clinically known as tip necrosis), we must first understand how a spider plant’s vascular system works.
- The Transportation Highway: Spider plants pull water and dissolved minerals up from the soil through their roots, transporting them all the way to the very tips of their long, narrow leaves via microscopic xylem vessels.
- The Accumulation Zone: When minerals, salts, or chemical additives present in water or fertilizers travel up the leaf, the pure water evaporates through transpiration, leaving those mineral residues behind. Because the leaf tips are the furthest point from the roots, mineral salts concentrate heavily at the very ends of the blades. Over time, toxic levels of these salts burn the delicate plant tissue, turning the tips yellow, brown, and crispy.
- A Cry for Help: While tip necrosis is rarely fatal on its own, it serves as an early warning sign that root health, water quality, or soil chemistry is compromised.
Part II: The Primary Culprits Behind Yellow Tips on Spider Plants
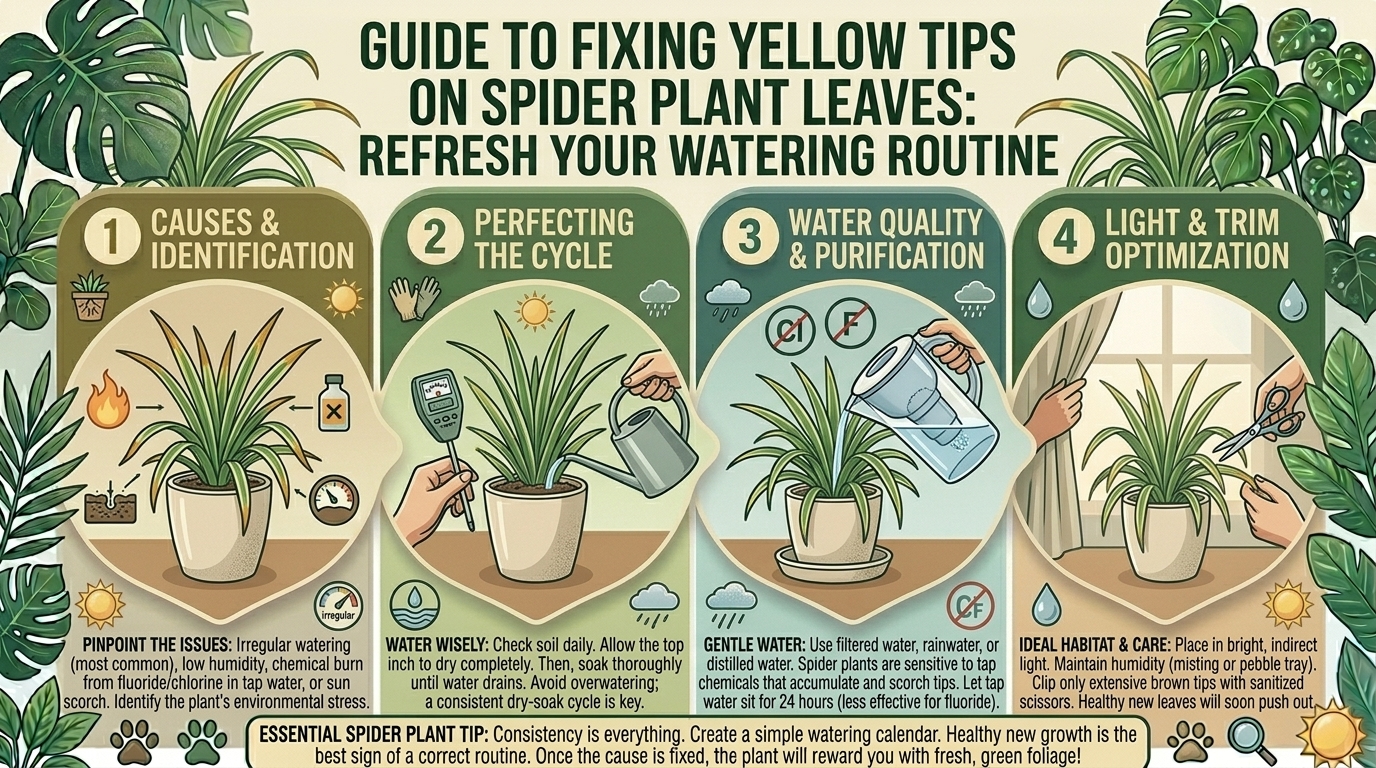
While watering errors are the most frequent cause, yellow and brown leaf tips are usually triggered by one of four environmental factors:
1. Tap Water Sensitivity (Fluoride and Chlorine)
- Municipal tap water in many metropolitan regions contains additives like fluoride, chlorine, and chloramines to make water safe for human consumption.
- Unfortunately, spider plants are exceptionally sensitive to fluoride. Even trace amounts accumulate in the leaf tips over time, causing cell death and characteristic yellow-to-brown scorching.
2. Underwatering vs. Overwatering Inconsistencies
- Underwatering: If you let your spider plant dry out completely for weeks, the leaf tips are the first to dehydrate, shrivel, turn yellow, and crisp up.
- Overwatering and Root Rot: Conversely, if the soil remains waterlogged, oxygen is squeezed out of the root zone. Damaged or rotting roots can no longer effectively transport moisture and nutrients upward, causing systemic stress that manifests as yellowing foliage and weak tips.
3. Fertilizer Salt Buildup
Over-fertilizing your spider plant deposits excess chemical salts (nitrogen, phosphorus, potassium) directly into the potting soil. As these salts accumulate, they burn the root tips, mirroring the exact same yellow-tip symptoms caused by fluoridated water.
4. Low Humidity and Dry Indoor Air
Spider plants are native to tropical and subtropical regions of South Africa. Modern indoor heating and air conditioning systems—common in homes across Texas, California, Washington, and New York—drastically drop indoor humidity, causing moisture to evaporate from the leaves faster than the roots can replace it.
Part III: Step-by-Step Guide to Fixing Your Watering Routine Naturally
Correcting your watering habits and resetting your plant’s environment will halt the progression of yellow tips and encourage fresh, flawless new growth.
Step 1: Upgrade Your Water Source
- Switch away from unfiltered municipal tap water.
- The Best Alternatives: Use rainwater, distilled water, or reverse-osmosis (RO) water. If you must use tap water, let an open pitcher of water sit out on your counter for 24 to 48 hours; while this allows chlorine to evaporate, note that it does not remove fluoride. Investing in a simple under-sink water filter or countertop pitcher filter drastically reduces fluoride and prevents tip burn.
Step 2: Master the “Soak and Dry” Watering Technique
- Never give your spider plant frequent, shallow sips of water, which only moistens the topsoil and leaves the lower root ball dry.
- Instead, water thoroughly until it runs freely out of the bottom drainage holes, ensuring the entire root mass is saturated.
- The Finger Test: Allow the top 1 to 2 inches of soil to dry out completely before watering again. In winter months, plants go dormant and require less frequent watering.
Step 3: Flush the Soil to Remove Mineral Buildup
- If your plant has been watered with tap water for months, mineral salts are likely caked in the soil.
- Take your spider plant to the sink and slowly pour a large volume of distilled or filtered water through the pot, letting it drain completely for several minutes. This leaches out accumulated salt crystals.
Step 4: Grooming Damaged Leaves
- Yellow and brown leaf tips do not turn green again.
- Use a pair of clean, sterilized scissors to carefully trim away the dead or yellowed tips. Pro Tip: Cut at a natural 45-degree angle following the contour of the leaf blade so it looks neat and natural.
Part V: Pro Tips for Lush, Spotless Spider Plant Foliage
- Boost Ambient Humidity: Place your spider plant on a pebble tray filled with water, or group it near other houseplants to naturally elevate local humidity levels.
- Fertilize Diluted and Infrequently: Only feed your spider plant once a month during spring and summer, and dilute the liquid houseplant fertilizer to half-strength to prevent chemical burn.
- Ensure Excellent Drainage: Always plant your spider plant in a container with a functioning drainage hole and use a well-draining, lightweight potting mix containing perlite.
10 Frequently Asked Questions (FAQ)
1. Can I turn yellow or brown spider plant tips back to green?
No. Once leaf tissue has turned yellow or brown and died, it cannot regenerate chlorophyll. The best approach is to carefully trim the dead tips off with clean scissors.
2. Is tap water really bad for spider plants?
Yes, many spider plants are sensitive to the fluoride and chlorine added to municipal tap water. These chemicals accumulate in the leaf tips, causing chemical burn and yellowing.
3. How often should I water my spider plant?
As a general rule, water thoroughly when the top 1 to 2 inches of soil feel dry to the touch. This usually translates to every 7 to 10 days in spring/summer and every 2 weeks in winter.
4. How do I know if yellow tips are caused by overwatering or underwatering?
Underwatering usually results in dry, crispy, papery brown or yellow tips paired with bone-dry soil. Overwatering causes limp, mushy yellow leaves, damp soil, and sometimes a musty odor.
5. Does low humidity cause yellow tips on spider plants?
Yes. Dry indoor air causes the leaves to lose moisture faster than the roots can absorb it, leading to tip desiccation, curling, and yellowing.
6. Can too much fertilizer cause yellow leaf tips?
Yes. Excessive fertilizer creates a high concentration of mineral salts in the soil, which burns the roots and leads directly to tip necrosis.
7. Should I cut off the entire leaf if only the tip is yellow?
No, cutting the entire leaf harms the plant unnecessarily. Simply trim off the discolored tip at an angle, leaving the healthy green section of the leaf intact to continue photosynthesizing.
8. What kind of water should I use instead of tap water?
Rainwater, distilled water, or reverse-osmosis (RO) water are ideal because they are completely free of harmful mineral additives and fluoride.
9. Why are the inner leaves of my spider plant turning yellow?
If interior leaves are turning yellow alongside the tips, it may indicate root rot from overwatering or natural aging where older bottom leaves yellow and die off as new pups form.
10. Do spider plants need bright light to stay healthy?
Spider plants thrive best in bright, indirect sunlight. While they tolerate lower light levels, insufficient light weakens their metabolism, making them more susceptible to watering stress and tip browning.
Conclusion
Yellow tips on spider plant leaves are a common frustration, but they serve as a helpful diagnostic tool pointing toward water sensitivity, mineral buildup, or inconsistent watering habits. By switching to filtered or distilled water, adopting a thorough soak-and-dry watering routine, flushing your soil, and trimming away damaged ends, you can easily restore your spider plant to lush, flawless health. Visit kcplants.com regularly for expert plant care tips, guides, and inspiration to help your indoor jungle thrive!