Why Bottom Watering Is Better for Most Indoor Potted Plants Than Traditional Top Watering Methods
Caring for indoor houseplants is a deeply rewarding practice that brings life, vibrant color, and purified air into our homes. Whether you are curating an urban plant jungle in a high-rise apartment in San Francisco or New York, managing a sunlit indoor oasis in Texas, or styling residential spaces across California and Washington, mastering your watering routine is the single most important factor in keeping your plants alive and thriving.
Ask ten different plant owners how they water their houseplants, and most will describe the traditional method: walking around with a watering can and pouring water over the top of the soil until it runs out the bottom drainage holes. While this method is quick and familiar, it is frequently the hidden culprit behind common plant ailments like root rot, dry soil pockets, gnats, and mineral crusts.
Enter bottom watering—the superior hydration technique favored by professional horticulturists, greenhouse growers, and master plant collectors worldwide.
Brought to you by kcplants.com, this comprehensive, expert-led masterclass explores the botanical science of bottom watering, compares it directly to traditional top watering, and provides a step-by-step guide to transforming your indoor plant care routine.
Part I: The Hidden Flaws of Traditional Top Watering
To understand why bottom watering is superior, we must first examine what actually happens beneath the soil surface when you water from the top:
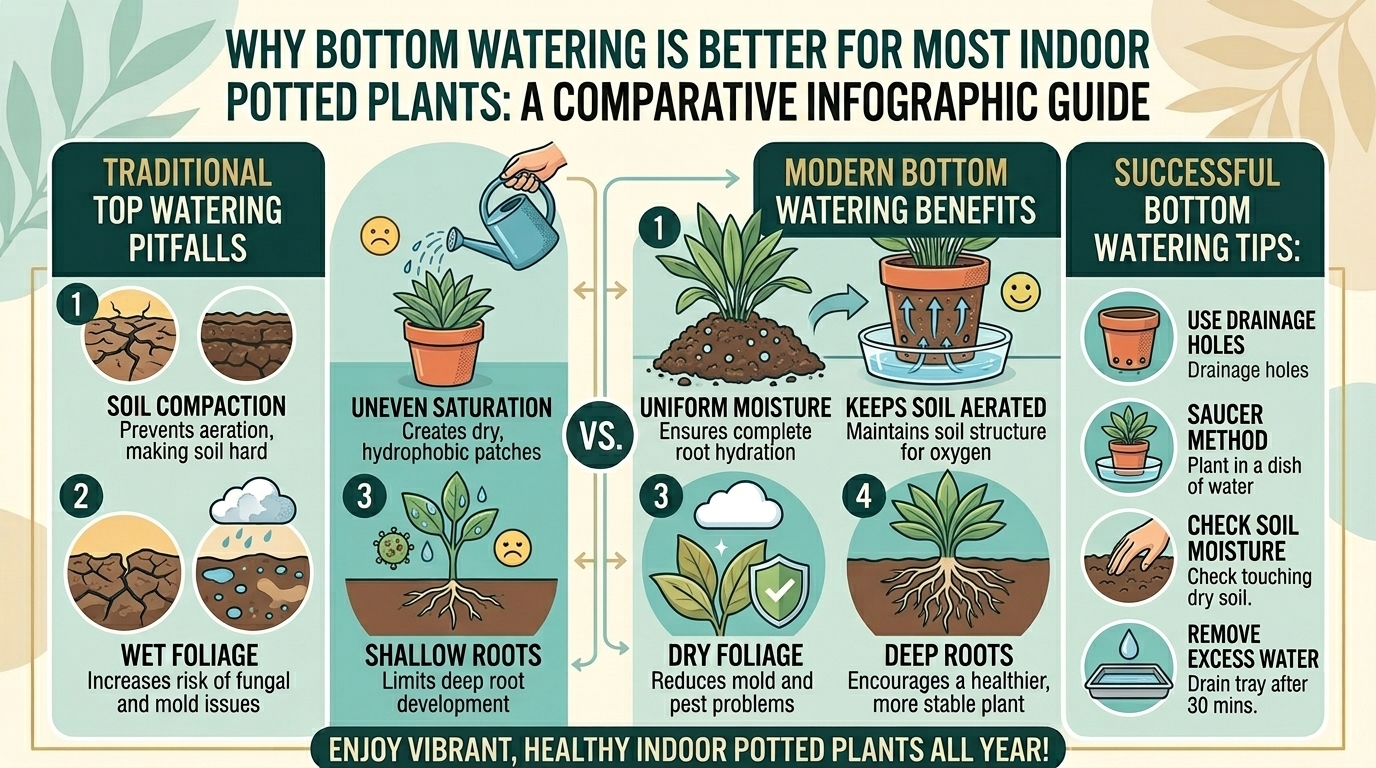
- Hydrophobic Soil Pockets: When a potting mix dries out completely—especially mixes containing peat moss or coco coir—it becomes hydrophobic (water-repelling). When you pour water quickly over the top, the water channels down the inner walls of the pot via the path of least resistance, bypassing the root ball entirely. You might think you watered thoroughly because water ran out the bottom, but the core root ball remains bone-dry.
- Surface Compaction and Crust Formation: Pouring heavy streams of water directly onto topsoil compacts the surface layer over time, choking off oxygen flow to the roots. Furthermore, mineral salts from tap water and fertilizers accumulate in the top layer of soil, creating a white crust that burns plant stems.
- The Fungus Gnat Menace: Top watering leaves the top 1 to 2 inches of soil consistently damp for days. This damp surface organic matter serves as the ultimate breeding ground for fungus gnats, whose larvae feast on organic debris and delicate root hairs.
Part II: The Science and Benefits of Bottom Watering
Bottom watering harnesses the natural laws of physics—specifically capillary action (or wicking)—to hydrate your potted plants from the ground up.
- How Capillary Action Works: Just like a paper towel dips into a spill and draws liquid upward against gravity, the dry potting medium and plant roots pull water upward through the drainage holes at the base of the pot. The soil drinks only as much water as it naturally needs to reach saturation.
- 100% Even Soil Saturation: Because the water moves upward through the entire root zone, every single pocket of soil is evenly moistened. There are no dry pockets hiding in the center of the pot.
- Encouraging Strong, Deep Root Systems: When you top-water frequently with small amounts of water, roots tend to stay near the surface where moisture is readily available. Bottom watering forces roots to stretch downward in search of moisture, resulting in a robust, deeply anchored root system.
- Keeping the Topsoil Dry and Pest-Free: With bottom watering, the top inch of soil remains completely dry. This denies fungus gnats the wet breeding environment they require, drastically reducing pest populations naturally without chemical insecticides.
Part III: Step-by-Step Guide to Bottom Watering Your Houseplants
Bottom watering is remarkably simple, but executing it correctly ensures optimal results for your indoor plants.
Step 1: Choose the Right Vessel
Find a clean basin, sink, deep saucer, or storage tub large enough to hold your potted plant. Ensure the container you are using has a flat bottom.
Step 2: Check for Drainage Holes
Crucial Rule: Bottom watering only works if your inner pot has functional drainage holes at the bottom. If a pot lacks drainage holes (like a solid decorative ceramic cachepot), bottom watering is impossible because water cannot enter from below.
Step 3: Fill with Tepid Water
Fill your basin or sink with lukewarm (tepid) water until it reaches a depth of 1 to 3 inches (roughly one-quarter to one-third up the height of your plant pot). Avoid ice-cold water, which can shock tropical root systems.
Step 4: Place the Pot in the Water
Lower your potted plant directly into the water basin. The dry soil will immediately begin drawing moisture upward through the drainage holes.
Step 5: Monitor and Soak (15 to 45 Minutes)
Let the plant sit undisturbed for 15 to 30 minutes (larger pots may require up to 45 minutes). Touch the top surface of the soil periodically. Once the topsoil feels damp to the touch, the plant has fully saturated its root ball. Do not leave the plant sitting in water for hours past saturation, as waterlogged soil can suffocate roots.
Step 6: Drain Thoroughly
Lift the pot out of the basin and let it drain completely for 10 to 15 minutes in your sink. Never place a dripping-wet pot back into its decorative outer cachepot without letting excess water escape first.
Part IV: Which Plants Benefit Most (and Which to Avoid)
While 90% of indoor houseplants thrive under bottom watering, a few exceptions exist:
- The Star Performers: Aroids (Monsteras, Pothos, Philodendrons), ferns, calatheas, prayer plants, spider plants, and peace lilies adore bottom watering because it ensures even moisture distribution without over-saturating stems.
- Exceptions (Top Watering is Better):
- Very large, heavy potted plants (like towering Ficus trees or large Palms) that cannot be easily lifted to a sink require top watering using a long-spout watering can.
- Succulents and Cacti: While succulents can be bottom watered occasionally, you must ensure the soak time is very short (10 minutes max) so they do not absorb excessive water into their thick, water-storing leaves and rot.
Part V: Pro Tips to Master Bottom Watering
- Flush the Soil Periodically: Because bottom watering moves water upward, mineral salts can occasionally accumulate near the top surface of the soil. Once every 2 to 3 months, top-water your plants thoroughly with distilled or filtered water, letting it run out the bottom to flush away accumulated salts.
- Prevent Disease Transmission: If you have a plant showing signs of fungal infection or pests, do not bottom water multiple plants in the same communal basin of water, as this can transmit pathogens between pots. Water sick plants individually.
10 Frequently Asked Questions (FAQ)
1. How long should I leave my plant sitting in water during bottom watering?
Typically, 15 to 30 minutes is sufficient for small-to-medium pots. Larger pots (8 inches or wider) may need 45 minutes. Always check if the topsoil has become damp to confirm saturation.
2. Can I use bottom watering for plants in heavy, non-porous ceramic pots?
Yes, as long as the pot features at least one functional drainage hole at the bottom to allow water to enter via capillary action.
3. Does bottom watering help eliminate fungus gnats?
Yes! Keeping the top 1 to 2 inches of soil completely dry deprives fungus gnat larvae of the moisture and organic matter they need to survive, naturally breaking their reproductive cycle.
4. What happens if I leave my plant in the water basin for too long?
If left submerged for hours, the potting mix can become waterlogged, cutting off oxygen to the root zone and dramatically increasing the risk of root rot.
5. Do I still need to use filtered water when bottom watering?
Using filtered, distilled, or rainwater is still recommended—especially for sensitive plants like calatheas or spider plants—to prevent mineral salt accumulation in the root zone.
6. Can I add liquid fertilizer to the water when bottom watering?
Yes! Bottom watering is an incredible way to fertilize evenly. Mix your liquid fertilizer into the basin water at the recommended dilution, and the roots will absorb the nutrients directly.
7. Why isn’t my soil getting wet on top when I bottom water?
If the soil is extremely hydrophobic (old, compacted peat moss), it may take longer for capillary action to reach the surface. Let it soak a bit longer, or top-water once lightly to break the hydrophobic barrier before bottom watering.
8. Is bottom watering suitable for succulents and cacti?
It can be, but keep the soak time very short (under 10 minutes) and ensure you are using a fast-draining cactus soil mix so the succulent doesn’t absorb too much water.
9. How often should I bottom water my indoor houseplants?
Watering frequency depends on the plant species, pot size, and indoor humidity. Always test the soil moisture (using your finger or a moisture meter) rather than following a strict calendar schedule.
10. Can I bottom water all my plants in the same sink of water at the same time?
It is safe for healthy plants, but you should avoid communal soaking if any of your plants have pest infestations (like spider mites or root aphids) or fungal diseases to prevent cross-contamination.
Conclusion
Switching from traditional top watering to bottom watering is a game-changing upgrade for any indoor gardener. By leveraging capillary action, you ensure 100% even soil saturation, encourage deep root growth, prevent dry hydrophobic pockets, and naturally deter fungus gnats without harsh chemicals. Visit kcplants.com regularly for expert plant care guides, tips, and inspiration to help your indoor jungle flourish!