Transforming your backyard into a thriving, self-sustaining sanctuary—whether you are working with a spacious suburban plot in Texas, a fertile yard in Washington state, or a sunny backyard in California—starts with one revolutionary shift: closing the loop on your household and garden waste.
Instead of bagging up fallen leaves, yard clippings, and kitchen vegetable trimmings for municipal pickup, savvy gardeners convert that organic waste into “black gold”: nutrient-dense, microbe-rich organic compost.
However, you don’t need to spend a fortune on high-end, commercial plastic tumbling bins. One of the most classic, cost-effective, and environmentally friendly DIY projects you can undertake is building a heavy-duty, three-bin composting system using untreated wooden pallets.
Pallets are widely available (often free or very cheap), incredibly sturdy, and provide the ideal airflow required for fast, efficient aerobic composting. This comprehensive, expert-backed guide walks you through every single step to build your own backyard pallet compost bin system from scratch.
1. Why Use Wooden Pallets for Composting?
Before grabbing your tools, it is worth understanding why wooden pallets are the gold standard for DIY compost bins:
- Exceptional Airflow: Composting is an aerobic process driven by oxygen-loving microbes. The natural gaps between pallet slats allow air to circulate freely into the center of the pile, preventing the bin from going anaerobic and stinking.
- Incredible Cost Savings: You can often source wooden pallets for free from local hardware stores, construction sites, or distribution centers, making this an ultra-budget-friendly homesteading project.
- Modular Capacity: By linking three pallets together in a U-shape (or building a three-bin turning system), you create the ideal 3-foot by 3-foot minimum volume required to generate and trap internal composting heat.
2. Safety First: Sourcing the Right Pallets
This is the most critical step of the entire project. Not all wooden pallets are safe to use for gardening or composting. Some pallets are treated with toxic chemicals or harsh pesticides that will leach directly into your compost and contaminate your vegetable garden soil.
How to Identify Safe (Untreated) Pallets:
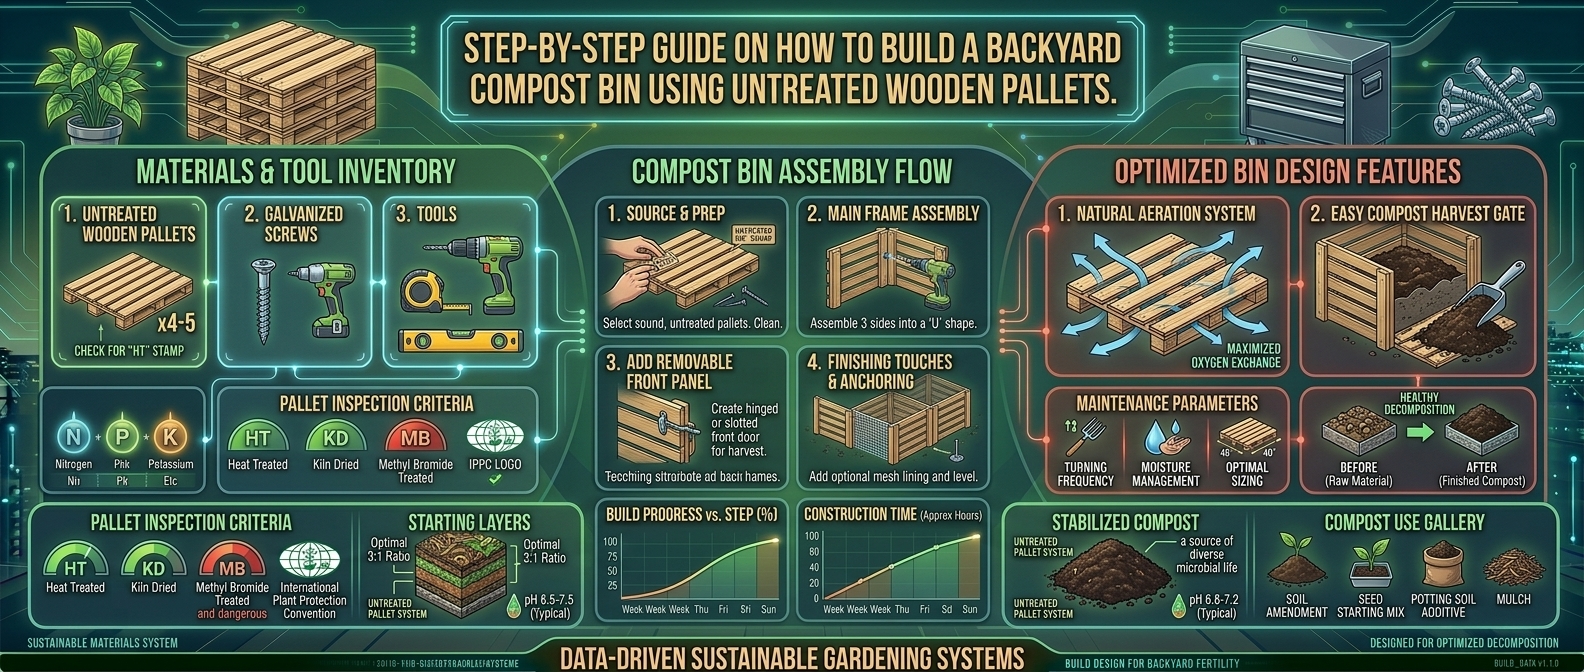
- Look for the HT Stamp: Check the pallet blocks or stringers for the IPPC stamp. Look specifically for “HT”, which stands for Heat Treated. This means the wood was baked in a kiln to kill pests without using chemical preservatives. Never use pallets stamped “MB” (Methyl Bromide), as this indicates toxic chemical fumigation.
- Avoid Chemical Spills: Never use pallets that have visible oil stains, chemical discoloration, or mysterious grease spots. Look for clean, dry, untreated pine, oak, or hardwood pallets.
- Check for Paint or Pressure Treatment: Avoid brightly colored, stained, or heavy pressure-treated lumber pallets.
3. Tools and Materials Needed
Gather your materials before you begin construction to ensure a smooth, weekend-ready DIY project.
Materials:
- 4 to 5 Standard Wooden Pallets (Ideally identical in size, typically 48×40 inches).
- Heavy-Duty Outdoor Screws (3-inch exterior wood screws) or sturdy galvanized zip-ties/wire.
- Metal Corner Braces or L-Brackets (Optional, for extra structural stability).
- Landscape Fabric or Hardware Cloth (Optional, to line the inside if you want to keep rodents out or contain fine materials).
Tools:
- Power drill and driving bits
- Hammer and crowbar (for breaking down pallets if modifications are needed)
- Measuring tape and a pencil
- Safety glasses and work gloves
4. Step-by-Step Construction Guide: The Single-Bin Pallet Composter
If you want a simple, highly effective starter compost bin, a 4-pallet square box is the easiest setup to build.
Step 1: Select Your Location
Choose a level, well-draining spot in your backyard that gets partial sun or shade. Avoid placing it directly against your home’s wooden siding or wooden fences, as moisture and insects from the compost can cause rot over time. Placing it on bare earth (rather than concrete) allows beneficial earthworms and soil microbes to easily migrate up into the pile.
Step 2: Set Up the Three Walls (The U-Shape)
- Take your first three pallets and stand them on their edges vertically to form a U-shape (one back wall and two side walls).
- Ensure the open face of the “U” faces outward for easy access with a pitchfork or shovel.
Step 3: Secure the Corners
- Drill pilot holes through the intersecting vertical end-boards of the side pallets into the edges of the back pallet.
- Drive 3-inch exterior wood screws deeply into the framing members.
- For maximum rigidity, attach heavy-duty metal L-brackets to the inside top and bottom corners of the joints.
Step 4: Install the Front Gate (Optional 4th Pallet)
- To keep your pile neat, use the 4th pallet as a removable front gate.
- Instead of screwing it permanently in place, secure it using heavy-duty sliding barrel bolts or heavy galvanized wire loops so you can easily lift or swing the front open when turning your compost or harvesting finished humus.
5. Advanced Setup: The Three-Bin Rotation System
If you have a larger backyard (common in suburban Texas or rural Washington) and generate a steady stream of yard and kitchen waste, upgrading to a Three-Bin System is a game-changer.
- Bin 1 (The Raw Input Pile): Where you dump fresh kitchen scraps, garden trimmings, and carbon “browns” as you collect them.
- Bin 2 (The Active Hot Pile): Once Bin 1 is full, you fork the entire contents over into Bin 2. This thoroughly mixes the materials, introduces fresh oxygen, and triggers a high-temperature microbial heat cycle.
- Bin 3 (The Curing & Finished Compost): After the active pile cools down, you move it into Bin 3 to cure and stabilize into dark, crumbly humus ready for your garden beds.
6. Frequently Asked Questions (FAQ)
1. How do I know if a wooden pallet is safe for organic gardening?
Always look for the “HT” (Heat Treated) stamp on the pallet block. Avoid any pallet marked “MB” (Methyl Bromide), pallets with unknown origins, or those stained with oils, grease, or chemical spills.
2. Do I need to line the inside of my pallet compost bin with wire mesh?
If you live in an area with high rodent populations (such as urban centers or rural edges), lining the inside and bottom of your pallet bin with 1/4-inch galvanized hardware cloth stops mice and rats from burrowing into your compost while still allowing beneficial earthworms to enter.
3. How long will untreated wooden pallets last before rotting?
Because untreated wood is exposed to moisture and microbial activity in compost, a pallet bin typically lasts 3 to 5 years before the bottom boards begin to soften and break down. Because pallets are cheap or free, replacing a rotting side wall every few years is an easy maintenance task.
4. Can I paint or seal my pallet compost bin to make it last longer?
It is strongly recommended not to paint, stain, or chemically seal your compost bin. The toxic chemicals in paints and synthetic sealers will leach into your compost pile and contaminate your garden soil. Let the natural wood weather safely.
5. Why is my pallet compost bin smelling bad or attracting flies?
If your bin smells like sulfur or ammonia, it means your pile has too much wet kitchen waste (“Greens”) and lacks oxygen or carbon. Fix this immediately by tossing in dry autumn leaves, shredded cardboard (“Browns”), and turning the pile with a fork to reintroduce air.
6. What is the ideal size for a pallet compost bin?
The classic rule of thumb for composting is a 3-foot by 3-foot by 3-foot minimum volume. This specific volume is large enough to trap internal microbial heat (reaching 130°F to 160°F) to break down waste quickly, yet small enough to manage easily.
7. Should my compost bin have a lid or cover?
In regions with heavy seasonal rainfall (like Washington state), an uncovered pallet bin can easily become waterlogged and soggy during heavy storms. Placing a sheet of heavy-duty black tarp, corrugated plastic, or an old piece of plywood over the top helps regulate moisture levels.
8. How often should I turn my pallet compost pile?
To speed up decomposition, turn your pile every 2 to 3 weeks using a pitchfork or shovel, moving material from the outside edges into the center. If you prefer a “passive” low-maintenance pile, you don’t have to turn it at all; it will simply take longer (6 to 12 months) to break down.
9. Can I place my pallet compost bin directly on concrete?
While you can place it on a patio or concrete slab, it is much better to place it directly on bare soil. Placing it on earth allows earthworms, beetles, and beneficial soil microbes to crawl up into the bin and accelerate the composting process.
10. How do I know when the compost in my pallet bin is ready?
Finished compost is ready when it looks dark brown, crumbly, and uniform like rich forest floor humus. It should smell sweet and earthy, individual food scraps should no longer be recognizable, and the pile should have cooled down to ambient air temperature.
Conclusion
Building a backyard compost bin using untreated wooden pallets is a rewarding, eco-friendly weekend project that transforms your household waste into powerhouse garden fertilizer for free. By carefully sourcing heat-treated (“HT”) pallets, constructing a sturdy U-shape or three-bin system, and balancing your carbon and nitrogen materials, you will establish a sustainable cycle that enriches your home garden for years to come.