How to Start Your Own Vegetable Seeds Indoors Using Recycled Egg Cartons and Organic Soil
There is a profound, almost magical satisfaction in watching a tiny, lifeless-looking seed crack open, push a pale green shoot upward toward the light, and eventually transform into a flourishing, food-producing plant. For many home gardeners, the gardening season begins long before the final winter frost melts outside. It starts indoors on a warm windowsill, a kitchen counter, or a dedicated rack under grow lights.
For gardeners living across the diverse landscapes of Texas, urban high-rises in New York, sunny patios in California, damp springs in Washington, or microclimate-heavy balconies in San Francisco, starting seeds indoors is the ultimate way to gain a massive head start on the growing season.
However, you do not need to spend a fortune on expensive plastic seed trays, complex heating mats, and synthetic fertilizers. One of the most sustainable, clever, and cost-effective ways to kick off your garden is by using recycled paper pulp egg cartons and custom-blended natural organic soils.
This comprehensive, ultra-informative guide walks you through every single step required to successfully start your vegetable seeds indoors using everyday household recycling and pure organic methods.
Table of Contents
- Introduction to Indoor Seed Starting
- Why Recycled Egg Cartons Are the Ultimate Seed-Starting Containers
- The Science of Germination: What Seeds Need to Wake Up
- Crafting the Perfect Indoor Organic Soil Mix
- Step-by-Step Guide: Preparing and Sowing in Egg Cartons
- Lighting, Moisture, and Warmth Management
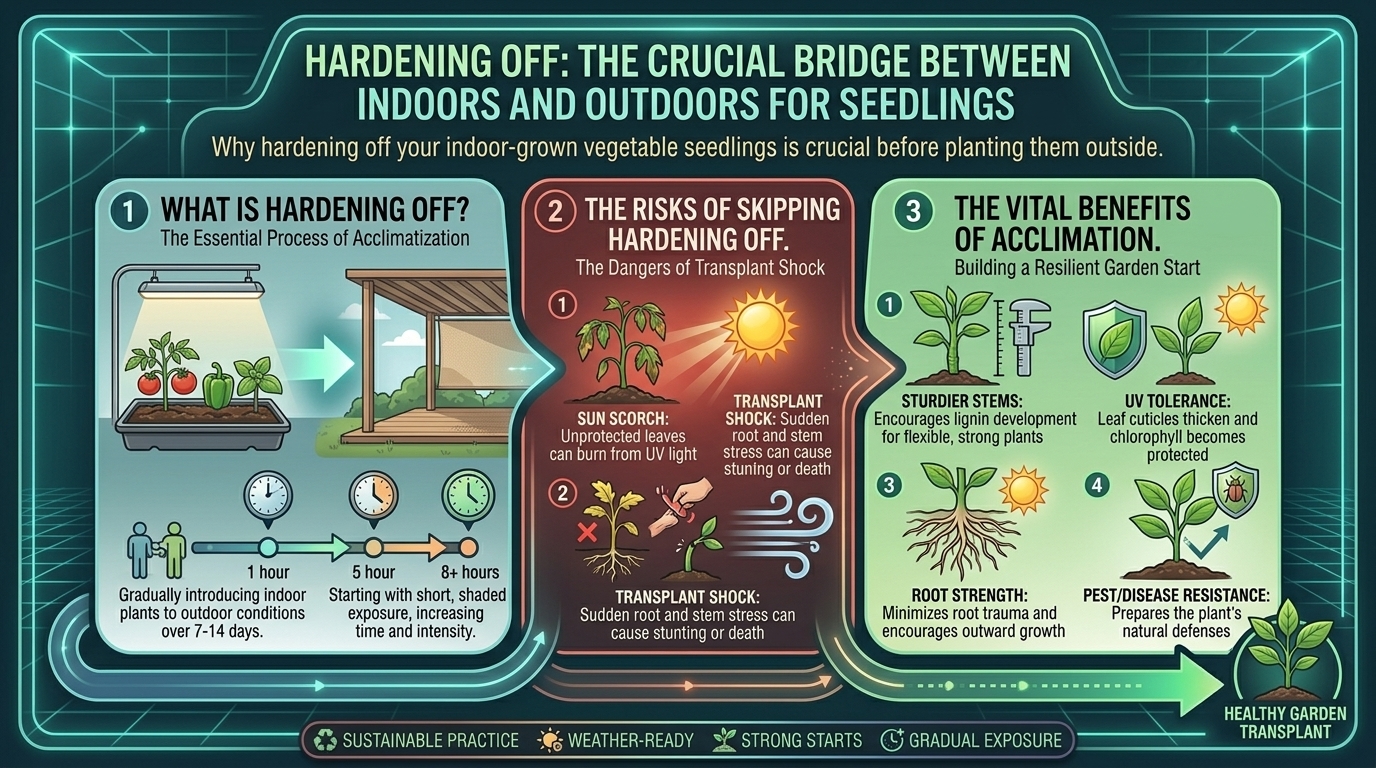
- The Transition Phase: Hardening Off Your Seedlings
- Regional Planting Timelines (TX, NY, CA, WA, SF)
- Pro Tips for Strong, Disease-Free Seedlings
- Frequently Asked Questions (10 FAQs)
- Conclusion
1. Introduction to Indoor Seed Starting
Starting seeds indoors allows you to bypass the limited, expensive selection of generic starter plants available at commercial garden centers. It gives you access to thousands of heirloom, non-GMO, and rare vegetable varieties tailored precisely to your culinary preferences.
When you combine indoor seed starting with recycled household waste (like paper egg cartons) and living organic soils, you embrace an entirely closed-loop, sustainable approach to gardening. You reduce household trash, save money, and ensure that your young plants begin their lives free from synthetic chemical residues.
2. Why Recycled Egg Cartons Are the Ultimate Seed-Starting Containers
Before purchasing rows of flimsy plastic seedling trays, take a look at your kitchen recycling bin. Paper pulp egg cartons are arguably one of the best beginner seed-starting vessels ever invented.
- Biodegradable Nature: Paper pulp cartons can be cut apart and planted directly into your outdoor garden beds or larger containers when the seedlings outgrow them. The paper decomposes naturally in the soil, preventing transplant shock.
- Built-In Compartments: Each individual egg cup acts as a pre-sectioned individual pot, keeping root systems separated so they do not tangle together.
- Breathability: Unlike plastic containers that trap excess moisture and invite fungal rot, porous paper egg cartons allow air to circulate around the developing root zone (known as “air pruning”).
- Eco-Friendly Upcycling: Diverts waste away from landfills and transforms it into productive agricultural infrastructure.
3. The Science of Germination: What Seeds Need to Wake Up
A dry seed is a dormant embryo packaged with a small supply of food (endosperm) and protected by a hard outer coat. To trigger germination, three environmental conditions must be met simultaneously:
- Moisture: Water penetrates the seed coat, softening it and activating internal enzymes that convert stored starches into usable energy.
- Warmth: Internal chemical reactions speed up with heat. Most vegetable seeds germinate best when ambient temperatures range between 65°F and 75°F (18°C to 24°C).
- Oxygen: Developing embryos respire heavily. This is why heavy, waterlogged mud suffocates seeds, while light, aerated organic soil allows them to breathe.
Note: Most seeds do not need light to germinate initially. In fact, many prefer total darkness until they break through the soil surface and push their first green leaves (cotyledons) toward the sun.
4. Crafting the Perfect Indoor Organic Soil Mix
Never use heavy dirt straight from your backyard for indoor seed starting. Backyard dirt is often too compact, heavy, and full of dormant weed seeds, insect eggs, or fungal spores that can cause “damping off” (a fungal disease that kills young seedlings overnight).
The Ideal Indoor Organic Seed-Starting Formula:
- Fine Organic Compost or Worm Castings (30%): Provides gentle, bioavailable micro-nutrients to feed the seedling once its true leaves emerge.
- Coconut Coir (50%): Finely sifted coconut coir holds moisture evenly without packing down, creating a fluffy texture that delicate roots can easily penetrate.
- Horticultural Perlite or Vermiculite (20%): Creates microscopic air channels, ensuring oxygen reaches the germinating roots and preventing water stagnation.
Pro Tip: Moisten your custom soil mix in a bucket before filling your egg carton cups so that it feels like a damp, wrung-out sponge.
5. Step-by-Step Guide: Preparing and Sowing in Egg Cartons
Transforming an ordinary egg carton into a thriving nursery requires careful preparation and gentle execution.
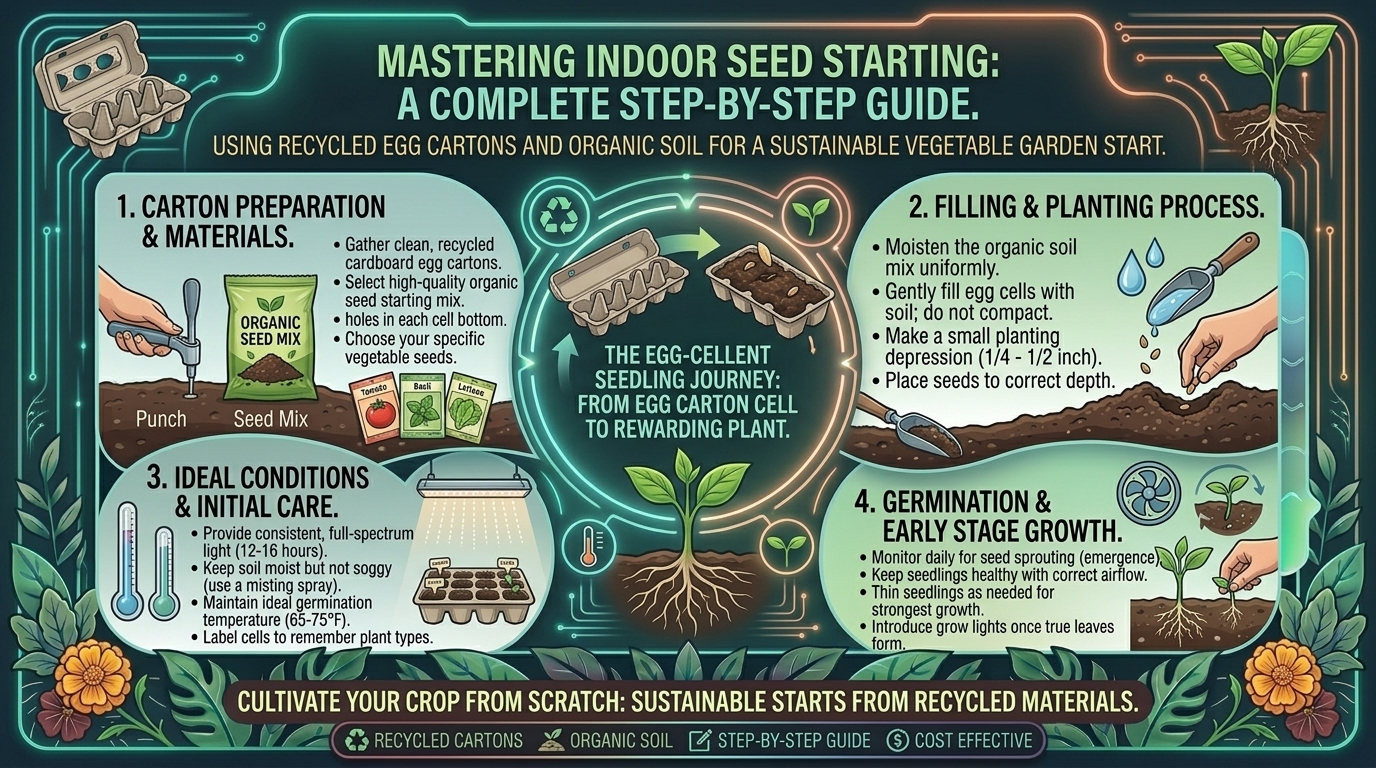
Step 1: Prep the Carton
- Use paper pulp (cardboard) cartons, not plastic or styrofoam cartons (plastic and styrofoam do not biodegrade and lack proper drainage).
- Poke a small drainage hole in the bottom of each individual egg cup using a pushpin or skewer. This prevents trapped water from rotting your seeds.
- Cut off the lid of the carton entirely. You can slide the detached lid underneath the bottom base to act as a drip tray catching excess water.
Step 2: Fill with Organic Soil
- Spoon your pre-moistened organic soil blend into each egg cup, filling them up to about a half-inch below the rim. Gently tap the carton on your table to settle the soil, avoiding hard packing.
Step 3: Sow the Seeds
- Check your seed packet for proper planting depth (as a general rule, plant seeds at a depth equal to two to three times their width).
- Drop 1 to 2 seeds into each cup. Planting two seeds ensures insurance against a dud, though you can later snip the weaker seedling if both sprout.
Step 4: Cover and Mist
- Gently cover the seeds with a fine dusting of dry organic soil or vermiculite. Use a spray bottle filled with room-temperature water to gently mist the surface so it is moist without washing the seeds away.
6. Lighting, Moisture, and Warmth Management
Humidity Control During Germination
- To keep moisture locked in while seeds germinate, cover your egg carton with a sheet of clear plastic wrap or a clear dome lid. Check daily; the moment you see tiny green loops breaking the soil surface, remove the cover immediately to ensure adequate airflow and prevent mold.
The Lighting Requirement
- The instant your seedlings emerge, they require intense light. If placed on a dim indoor windowsill, they will stretch out rapidly, becoming pale, weak, and “leggy” (leaning dangerously toward the light source).
- Place your egg cartons directly under a full-spectrum LED grow light suspended 2 to 3 inches above the plants, keeping the lights on for 12 to 16 hours a day. If using a windowsill, choose a bright, unobstructed south-facing window and rotate the carton daily.
7. The Transition Phase: Hardening Off Your Seedlings
Indoor-grown seedlings live a sheltered life protected from wind, UV rays, and temperature swings. If you plant them directly into an outdoor garden bed without warning, they will experience severe shock and likely perish. This requires a 7-to-10-day process called hardening off.
- Day 1–3: Move your egg carton outdoors for 1 to 2 hours in a sheltered, shady spot out of direct wind. Bring them back inside before evening.
- Day 4–7: Gradually increase their outdoor exposure time each day, introducing them to filtered morning sunlight.
- Day 8–10: Leave them outside overnight (if nighttime temperatures are safe for your specific vegetable variety).
- Planting Day: Cut apart the individual egg carton cups with scissors and plant the entire biodegradable cup directly into your prepared organic garden bed or larger container. The paper wall will break down naturally in the soil.
8. Regional Planting Timelines (TX, NY, CA, WA, SF)
Knowing when to start your seeds indoors depends entirely on your local frost-free dates:
Texas (Early Spring & Late Summer Windows)
- Timing: Start warm-season crops (tomatoes, peppers, eggplants) indoors in January or February to get them established before extreme summer heat arrives. Fall garden seeds can be started indoors in July.
New York (Beating the Long Winter)
- Timing: Start cool-season crops in March, and warm-season crops in April (roughly 6 to 8 weeks before the average last frost date in mid-to-late May).
California (Mediterranean Timing Flexibility)
- Timing: California’s mild climate allows indoor seed starting as early as February for spring planting, with second-crop sowings in mid-summer for autumn harvests.
Washington (Cool, Overcast Spring Preparation)
- Timing: Start seeds indoors in March and April. Because outdoor spring soils take longer to warm up in Washington, robust indoor-started root and fruit systems give your plants a critical head start.
San Francisco (Microclimate Mastery)
- Timing: SF’s mild year-round temperatures mean you can start seeds indoors nearly anytime, but February through March aligns best with lengthening spring daylight hours.
9. Pro Tips for Strong, Disease-Free Seedlings
- Bottom Water to Prevent Mold: Instead of pouring water over the top of delicate seedlings (which can flatten them or trigger stem rot), pour a small amount of water into the tray beneath your egg carton and let the paper pulp wick moisture upward.
- Provide Gentle Air Movement: Set a small oscillating fan on its lowest speed to blow gently across your indoor seedling setup for an hour a day. This slight breeze stimulates seedlings to grow thicker, sturdier, woodier stems.
- Label Your Cartons: Use a waterproof marker or popsicle sticks to label rows. It is shockingly easy to forget whether cup column three holds broccoli or kale!
10. Frequently Asked Questions (10 FAQs)
Q1: Can plastic or styrofoam egg cartons be used for seed starting?
A: No. Plastic and styrofoam do not breathe, lack biodegradability for direct planting, and trap standing water that causes root rot. Always use paper pulp (cardboard) cartons.
Q2: Do I need to poke drainage holes in the bottom of paper egg cartons?
A: Yes, absolutely. Even though paper pulp absorbs some moisture, unpunched cups pool water at the bottom, creating a swampy, anaerobic environment that kills germinating seeds.
Q3: Why are my indoor seedlings growing tall, thin, and falling over?
A: This is called “leggy” growth. It happens when seedlings do not receive enough light, forcing them to stretch frantically toward the nearest light source. Move them closer to a grow light or a bright south-facing window immediately.
Q4: Can I plant the entire egg carton straight into the garden soil?
A: Yes! That is the primary benefit of paper pulp cartons. When transplanting, cut the individual cups apart with scissors and tear the top rim slightly down the sides to encourage roots to expand outward into the surrounding soil.
Q5: What is “damping off” and how do I prevent it?
A: Damping off is a fungal disease that causes young seedling stems to pinch and collapse at the soil line. Prevent it by using sterile indoor organic soil, avoiding overwatering, and ensuring good air circulation with a small fan.
Q6: Do I need to fertilize my seedlings while they are in the egg carton?
A: Not initially. Seeds contain all the stored food energy needed for germination. Once their first true leaves appear, you can feed them a half-strength organic liquid seaweed or worm-casting tea.
Q7: How many seeds should I put in each egg cup?
A: Place 1 to 2 seeds per cup. If both germinate successfully, snip the weaker seedling with small scissors at the soil line rather than pulling it out, which disturbs the neighboring root system.
Q8: How long do vegetable seeds take to germinate indoors?
A: It varies by crop! Fast sprouts like radishes and lettuce take 3 to 5 days, while tomatoes and peppers take 7 to 14 days, and slower herbs like parsley or rosemary can take up to 21 days.
Q9: Can I reuse paper egg cartons for a second round of seeds?
A: It is generally not recommended. After one round of damp soil and root growth, paper pulp weakens, softens, and may harbor residual mold spores. Start fresh with new egg cartons for your next batch.
Q10: What are the best vegetables for beginners to start in egg cartons?
A: Lettuce, spinach, basil, tomatoes, and squash are exceptionally forgiving, fast-germinating, and thrive in small indoor containers before outdoor transplanting.
Conclusion
Starting your own vegetable seeds indoors using recycled paper pulp egg cartons and custom organic soil is an empowering, eco-friendly, and deeply rewarding gardening practice. By upcycling household waste, bypassing expensive plastic trays, and providing your seedlings with the right balance of moisture, warmth, and intense light, you set the stage for a resilient, highly productive harvest.