Why Hardening Off Your Indoor-Grown Vegetable Seedlings Is Crucial Before Planting Them Outside
There is a profound sense of accomplishment that comes with nurturing a collection of delicate vegetable seedlings from tiny specks on a kitchen windowsill or beneath indoor grow lights. For months, you have monitored moisture levels, mixed custom organic soils, and watched as tender green shoots unfurled. Your plants look healthy, vibrant, and eager to grow.
However, many enthusiastic home gardeners make a heartbreaking mistake right at the finish line: they bypass the transition phase and transplant their pampered indoor seedlings directly into the harsh outdoor garden. Within hours, the leaves bleach white in the sun, the stems buckle under a sudden gust of wind, and the plants wither away.
For gardeners growing across the scorching plains of Texas, urban terraces in New York, sprawling backyard beds in California, the damp, variable microclimates of Washington, or the foggy, breezy hills of San Francisco, protecting your investment of time and effort requires mastering one non-negotiable process: hardening off.
This comprehensive, ultra-informative guide explores the biological science behind seedling stress, why hardening off is essential, and how to execute a foolproof outdoor transition using natural organic methods.
Table of Contents
- Introduction to the Seedling Transition Crisis
- What Is “Hardening Off” and Why Does It Matter?
- The Three Environmental Shocks: Sun, Wind, and Temperature
- The Plant Biology: How Stems and Leaves Adapt to Stress
- Step-by-Step 10-Day Hardening-Off Schedule
- Building and Preparing the Outdoor Organic Soil Base
- Regional Hardening Strategies (TX, NY, CA, WA, SF)
- Common Hardening-Off Mistakes to Avoid
- Pro Tips for Seamless Transplant Success
- Frequently Asked Questions (10 FAQs)
- Conclusion
1. Introduction to the Seedling Transition Crisis
Indoor-grown seedlings live a life of absolute luxury. Indoors, temperatures remain stable, humidity is controlled, air movement is minimal, and window glass or standard LED lights filter out the harsh, damaging bands of ultraviolet (UV) radiation found in natural sunlight.
When you move these sheltered plants outdoors, they are suddenly thrust into a chaotic natural world. The sun acts like a magnifying glass, the wind exerts physical torque on thin stems, and daily temperature swings force rapid cellular adjustments. Hardening off is simply the gradual process of conditioning your indoor seedlings to outdoor environmental pressures so they do not experience fatal shock.
2. What Is “Hardening Off” and Why Does It Matter?
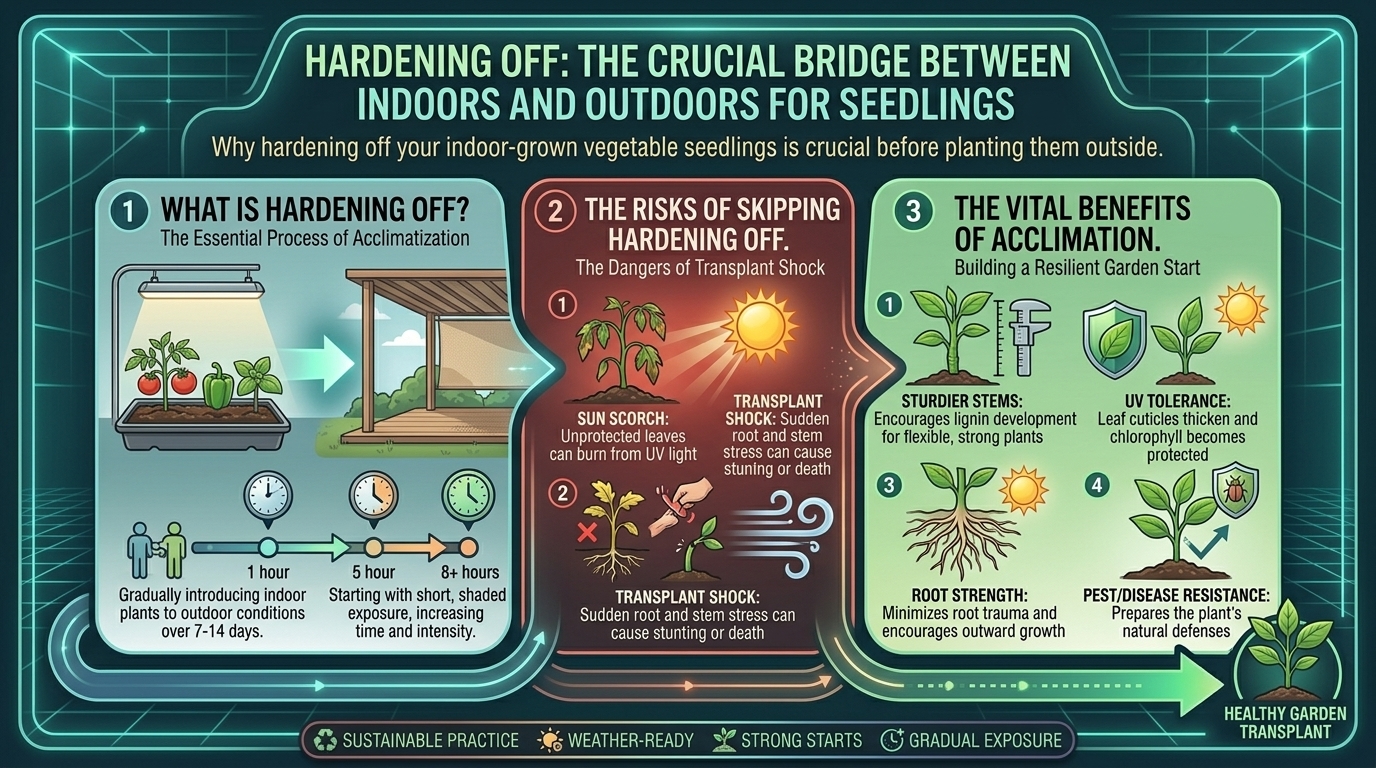
Hardening off is a systematic, multi-day acclimatization protocol. By exposing young plants to incremental doses of outdoor wind, direct sunlight, and fluctuating temperatures over 7 to 14 days, you trigger the plant’s natural defense mechanisms.
Why Skipping This Step Fails:
- Sunscald (Leaf Bleaching): Indoor glass blocks UV-B rays. Without gradual exposure, direct sunlight destroys chloroplasts instantly, turning leaves papery, white, and dead.
- Stem Lodging (Wind Breakage): Indoor air is static. Stems grow soft and thin. A single afternoon breeze will snap an unconditioned stem clean off at the base.
- Stagnant Root Shock: Sudden cold soil temperatures cause root systems to lock up, halting water uptake and causing instant wilting.
3. The Three Environmental Shocks: Sun, Wind, and Temperature
To understand why hardening off works, you must break down the three primary stressors seedlings face when moving outside:
1. Ultraviolet (UV) Radiation
Natural sunlight contains intense UV rays. To protect themselves, plants synthesize natural “sunscreen” compounds—specifically anthocyanins and thicker cuticular waxes—which give hardened leaves a tougher, slightly darker, or purplish-green sheen. This process takes time and cannot be rushed.
2. Mechanical Wind Stress
Wind is not just air movement; it is a physical force. As wind blows against a plant, the friction triggers micro-abrasions in cell walls. In response, the plant floods the stem with lignin and cellulose, actively thickening and strengthening its trunk to withstand the pressure.
3. Thermal and Moisture Fluctuations
Indoors, moisture loss is predictable. Outdoors, sun and wind accelerate transpiration (water evaporation through leaves) dramatically. If a seedling’s roots are not yet robust enough to pump water rapidly, the plant dehydrates and collapses within minutes.
4. The Plant Biology: How Stems and Leaves Adapt to Stress
When you subject a seedling to controlled, incremental stress during hardening off, cellular changes occur rapidly:
- Cuticle Thickening: The outer waxy layer of the leaf thickens to prevent excessive water loss.
- Lignification: Soft herbaceous plant tissue converts into stronger, woody-like cellulose structures.
- Osmotic Adjustment: Cell sap concentrations adjust to tolerate cooler night temperatures without freezing intracellular fluid.
5. Step-by-Step 10-Day Hardening-Off Schedule
A successful hardening-off schedule requires patience. Never rush this process. Keep your seedlings well-watered throughout, as stressed, dry plants burn and break much faster.
Days 1 to 3: The Shaded Porch Phase
- Action: Choose a sheltered, completely shaded spot outdoors (like a covered porch or under a table).
- Duration: Place your trays outside for 1 to 2 hours only during the warmest part of the day. Protect them from strong wind. Bring them back indoors before evening.
Days 4 to 7: Filtered Light and Breezes
- Action: Move the plants into dappled shade or morning sunlight (avoiding harsh afternoon rays). Allow them to experience gentle morning breezes.
- Duration: Increase outdoor time to 4 to 6 hours daily. If nighttime temperatures remain safely above your crop’s threshold, you can leave them out on the final nights.
Days 8 to 10: Full Sun and Overnights
- Action: Expose the plants to full, direct sunlight for most of the day, followed by full overnight exposure.
- Duration: By Day 10, your seedlings are fully hardened off, toughened up, and ready to be planted permanently into your garden beds or large containers.
6. Building and Preparing the Outdoor Organic Soil Base
Even after hardening off your leaves and stems, transitioning a seedling into poor soil can cause root stagnation. Your outdoor garden beds or containers must be primed with a rich, living organic soil base.
The Ideal Outdoor Transition Soil Recipe:
- Aged Organic Compost (40%): Inoculates the soil with beneficial microbes and provides a slow-release nitrogen baseline.
- Native Topsoil or Coconut Coir (40%): Creates a balanced medium that bridges the gap between indoor potting mix and outdoor earth.
- Perlite or Pumice (20%): Guarantees that oxygen flows freely around newly expanding root zones.
- Organic Amendments: Mix in a handful of worm castings and organic bone meal to encourage immediate root anchorage.
7. Regional Hardening Strategies (TX, NY, CA, WA, SF)
Your local climate dictates how cautiously you must manage your hardening-off schedule:
Texas (Beating Intense UV and Heat)
- Strategy: Texas sun is merciless on tender spring seedlings. During your hardening-off phase, prioritize morning shade and ensure your seedlings never dry out. Use a 30% shade cloth during the first week outdoors to prevent instant leaf scorch.
New York (Navigating Late Frosts and Spring Gusts)
- Strategy: New York springs are notoriously windy and unpredictable. Protect your seedlings from gusty northerly winds during days 4 through 7. If a sudden late frost warning hits, bring your trays right back indoors immediately.
California (Managing Mediterranean Sunshine)
- Strategy: California’s brilliant sunshine accelerates the hardening process, but dry air can cause rapid wilting. Keep your seedling trays sitting on a tray of damp pebbles or water them thoroughly before taking them outside.
Washington (Coping with Cool, Overcast Spreads)
- Strategy: Washington’s overcast skies mean lower UV intensity initially, but damp air can encourage fungal issues. Ensure your hardening spot has good airflow so foliage dries quickly after morning dew.
San Francisco (Conquering Coastal Fog and Wind)
- Strategy: San Francisco microclimates present a unique challenge: intense chilling wind paired with fog. Position your hardening trays against a sunny, wind-blocking fence or brick wall to capture ambient radiant heat while protecting stems from snapping.
8. Common Hardening-Off Mistakes to Avoid
- Mistake 1: Leaving Seedlings Out in a Sudden Rainstorm or Hail.
- The Fix: Heavy downpours or hail can instantly shred delicate, unconditioned seedling leaves. Always check the weather forecast before setting your trays outside.
- Mistake 2: Forgetting to Water.
- The Fix: Outdoor wind and sun dry out small starter pots (especially paper egg cartons or small plastic cells) four times faster than indoor shelves. Check moisture levels twice a day during hardening off.
- Mistake 3: Rushing the Timeline in 3 Days.
- The Fix: You cannot cram a 10-day biological adaptation process into a single afternoon. Haste results in sunburned, stunted plants that take weeks to recover.
9. Pro Tips for Seamless Transplant Success
- Transplant on an Overcast Day: Choose a cloudy, overcast afternoon—or plant late in the evening just before dusk—to transplant your hardened seedlings into the garden. This gives the roots an entire night of cool calm to adjust before facing the blazing sun the next morning.
- Water Immediately After Planting: Settle the soil around the root ball with a deep, thorough watering mixed with organic liquid kelp or seaweed extract to minimize transplant shock.
- Mulch the Base: Surround your newly planted seedlings with a 1-inch ring of clean straw or shredded leaves to lock in moisture and protect delicate surface roots.
10. Frequently Asked Questions (10 FAQs)
Q1: What happens if I skip hardening off my vegetable seedlings?
A: Skipping hardening off almost always results in severe sunscald (bleached white leaves), stem breakage from wind, and extreme transplant shock that can stunt or kill your plants within 48 hours.
Q2: Do indoor seedlings need to be hardened off if they live on a sunny windowsill?
A: Yes! Even the brightest indoor windowsill filters out crucial UV-B rays and protects plants from wind and temperature swings. A windowsill plant is still “soft” compared to an outdoor plant.
Q3: Can I harden off my seedlings on a cloudy or rainy day?
A: Yes, overcast days are actually fantastic for the very first step of hardening off because the cloud cover filters out harsh UV radiation, allowing plants to adjust to outdoor wind and humidity safely.
Q4: What are the visible signs of sunscald on a seedling?
A: Sunscald appears as pale, bleached, paper-white, or translucent patches on the leaves. Severely burned leaves will dry up and fall off, though the plant may survive if its growing tip is undamaged.
Q5: How do I know when my seedlings are officially “hardened off”?
A: A fully hardened seedling will have slightly tougher, darker green or purplish-tinted leaves, a noticeably thicker, rigid stem that resists bending in the wind, and can survive 24 hours outdoors without wilting.
Q6: What nighttime temperature is safe for leaving hardened seedlings outside?
A: It depends on the crop! Cool-season crops (kale, lettuce, broccoli) tolerate temperatures down to 35°F to 40°F, while warm-season crops (tomatoes, peppers, cucumbers) must stay above 50°F to 55°F at night.
Q7: Should I fertilize my seedlings during the hardening-off phase?
A: Avoid heavy nitrogen fertilization right before or during hardening off. You want the plant to focus its energy on building tough cell walls and thick stems, not pushing rapid, weak, succulent green growth.
Q8: What should I do if a sudden frost warning is issued during hardening off?
A: Immediately bring your seedling trays back indoors, or cover them securely with heavy frost cloth or upturned buckets if they are already planted out in garden beds.
Q9: Can I use a cold frame instead of moving trays in and out daily?
A: Absolutely! A garden cold frame is the ultimate tool for hardening off. You can prop open the lid of the cold frame a little more each day to let outdoor air and sun in gradually.
Q10: How long after hardening off should I transplant them into the garden?
A: Plant your seedlings into your outdoor garden beds or containers within 24 to 48 hours after completing your 10-day hardening schedule so they do not become root-bound in their starter containers.
Conclusion
Hardening off your indoor-grown vegetable seedlings is the critical bridge between sheltered indoor propagation and a thriving outdoor harvest. By taking the time to gradually introduce your plants to natural ultraviolet light, wind resistance, and outdoor temperature rhythms, you transform delicate indoor sprouts into resilient, tough, high-yielding garden champions.