How to Build a Simple Hoop House Row Cover to Protect Spring Crops from Unexpected Frosts
Introduction: Beating the Unpredictable Spring Chill
Every eager gardener knows the exhilarating rush of the early spring season. The days grow longer, the sun finally carries a hint of warmth, and the temptation to drop seeds and tender transplants into the soil becomes overwhelming. Yet, spring is a notorious tease. Just as your young lettuce, spinach, broccoli, and brassica seedlings begin to establish themselves, an unexpected late-season frost or freezing night rolls in, threatening to turn your vibrant green sprouts into limp, blackened heartbreak.
Waiting until the absolute last possible frost date to plant can steal weeks of valuable growing time from your season. The ultimate solution used by professional market gardeners and savvy home growers alike is a simple, low-cost DIY hoop house row cover.
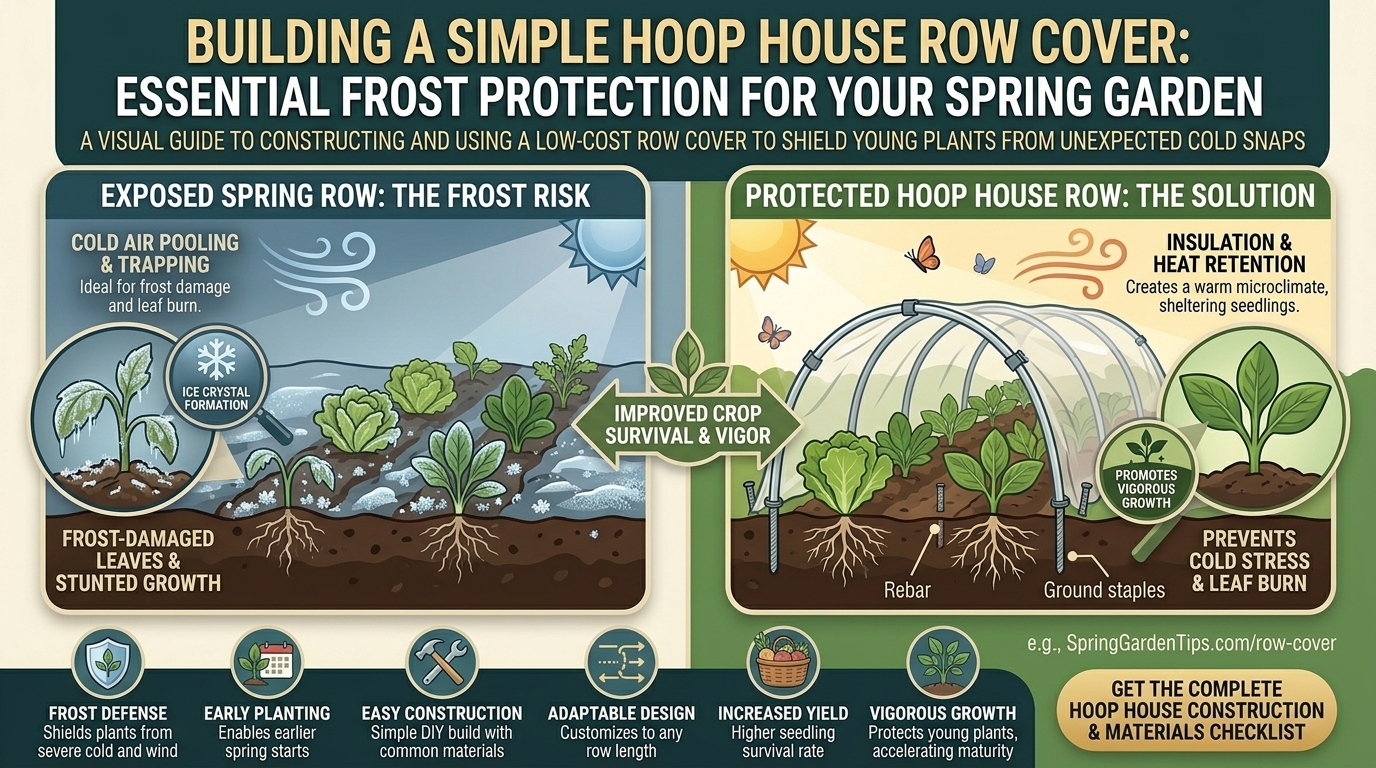
A hoop house row cover acts as an instant micro-climate shield. It captures solar heat during the day, traps radiant warmth from the soil overnight, and physically blocks biting winds and crystal-forming frost from touching your tender plants.
This comprehensive, highly informative guide walks you through the exact materials, step-by-step construction process, and regional strategies needed to protect your spring crops. Whether you are battling sudden spring freezes in Texas, managing abrupt weather shifts in New York, optimizing Mediterranean microclimates in California and San Francisco, or defending against damp, chilly mornings in Washington, this guide will help you secure a thriving, frost-free harvest tailored for kcplants.com.
The Science of Row Covers: How Hoops Save Your Crops
To understand why a hoop house is so effective, you must look at how frost forms. On clear, calm nights, the earth radiates the heat it absorbed during the day straight up into the open atmosphere. When the ground temperature drops below freezing, water vapor in the air and on plant leaves turns into ice crystals (frost), rupturing fragile plant cell walls and causing irreversible damage.
1. Radiant Heat Trapping
A low hoop house covered with agricultural fabric (frost blanket) or clear UV-resistant plastic creates a physical barrier. This barrier traps a pocket of warm air directly over your garden bed. On a freezing night, a good row cover can reliably keep the interior air temperature 4°F to 8°F warmer than the ambient outdoor air—often the exact margin between a dead crop and a thriving one.
2. Windbreak and Moisture Regulation
Spring is notoriously windy. High winds strip moisture rapidly from young leaves, causing windburn and stunting growth. Furthermore, fabric row covers protect against heavy spring downpours and hail while still allowing gentle rain and fresh air to permeate.
Regional Climate Strategies for kcplants.com Growers
Implementing a hoop house requires tailoring your approach to the specific weather patterns of your region.
Texas: Managing Rapid Weather Swings and Late Northers
- The Challenge: Texas spring weather swings wildly from warm, spring-like afternoons to sudden, plunging “blue northers” that drop temperatures well below freezing overnight.
- The Solution: Use lightweight (0.5 oz to 0.9 oz) spunbond polypropylene floating row cloth over sturdy PVC or wire hoops. This provides immediate frost protection during sudden drops without overheating your plants during warm Texas afternoons.
New York: Defending Against Late Spring Blizzards and Hard Freezes
- The Challenge: New York spring seasons feature prolonged cold snaps, unpredictable late snowfalls, and freezing ground conditions well into April or May.
- The Solution: Opt for heavier-duty row cover fabric (1.5 oz to 2.0 oz) combined with securely anchored hoops that can support the weight of unexpected spring snow flurries without collapsing.
California & San Francisco: Mitigating Coastal Chills and Radiant Frosts
- The Challenge: While interior California warms up quickly, San Francisco and coastal zones experience chilly marine layers, heavy morning dew, and cold nighttime radiation frosts.
- The Solution: Use clear plastic sheeting configured with roll-up sides during the day to prevent excessive heat buildup, switching to floating fabric covers on clear, cold nights to protect sensitive crops like basil and early tomatoes.
Washington: Protecting Against Chilly, Damp Pacific Northwest Springs
- The Challenge: Washington springs are damp, cool, and overcast. Crops grow more slowly, and excess moisture can invite fungal damping-off diseases under closed covers.
- The Solution: Utilize breathable woven row covers that allow trapped humidity to escape while keeping frost and cold spring rains off tender foliage.
Materials Needed to Build a Simple Low Tunnel Hoop House
Building a low hoop house does not require an engineering degree or expensive specialized tools. You can assemble a rugged, highly effective 10-foot garden tunnel in less than an hour using these accessible supplies:
- Hoop Ribs:
- Option A: 9-gauge or 10-gauge galvanized steel wire (cut into 6-to-8-foot lengths).
- Option B: 1/2-inch or 3/4-inch PVC electrical conduit pipes (flexible and durable).
- Option C: Flexible black poly irrigation tubing.
- Cover Material:
- Frost Cloth / Floating Row Cover: Spunbond polypropylene fabric (allows light, air, and water through while trapping heat).
- Clear Polyethylene Plastic: Best for maximum heat trapping, but requires manual ventilation on sunny days.
- Anchoring System:
- Heavy-duty landscape staples, bricks, stones, or bags of sand to pin the edges of the fabric tightly to the ground.
- Tools:
- Tape measure, wire cutters (if using steel wire), utility knife, and garden gloves.
Step-by-Step Guide: Building Your Low Tunnel Hoop House
Step 1: Prepare Your Garden Bed
Before erecting your hoops, prepare your spring crop bed. Ensure your cool-season crops (like spinach, lettuce, radishes, and brassicas) are planted, weeded, and watered. If the soil is dry, water it thoroughly; moist soil actually holds and radiates more heat overnight than dry soil.
Step 2: Install the Hoops
- Space your hoop frames 3 to 4 feet apart along the length of your garden bed.
- If using PVC or metal hoops, push both ends firmly 6 to 12 inches deep into the soil on either side of the bed to create a sturdy, evenly curved semi-circle arch.
- Ensure all hoops match in height (typically 2 to 3 feet high at the apex) so the covering fabric drapes evenly without creating deep sagging pockets where water or snow can pool.
Step 3: Add a Spine (Optional for Extra Stability)
If you live in a windy region (such as parts of Texas, Washington, or open New York fields), run a single straight piece of conduit, bamboo stake, or heavy twine horizontally across the top apex of all the hoops, tying it down at each arch. This prevents the hoops from flexing or leaning in high winds.
Step 4: Drape and Secure the Cover
- Unroll your row cover fabric or plastic sheeting directly over the top of the hoops, ensuring there is an extra 2 to 3 feet of slack hanging over both ends and along both sides of the bed.
- Secure one end of the fabric by gathering it tightly like a candy wrapper and staking it securely into the ground.
Step 5: Anchor the Edges
- Walk along the sides of the tunnel and pull the fabric taut.
- Bury the loose edges of the fabric in a shallow trench of soil, or weigh them down heavily using bricks, stones, or sandbags every 2 to 3 feet. Crucial Rule: The seal must be airtight at ground level; if cold wind sneaks underneath the cover, the frost protection fails entirely.
Best Practices and Pro Tips for Spring Management
- Monitor Daytime Temperatures: On a sunny spring day, the temperature inside a covered hoop house can skyrocket to 80°F or higher, even if the outdoor air is 45°F. On warm days, lift the edges of the cover or roll back one side to vent the tunnel and prevent cooking your crops.
- Keep Extra Stakes Handy: Spring storms bring sudden gusts. Check your perimeter weights and anchor stakes regularly to ensure your protective tunnel doesn’t turn into a wind sail.
- Combine with Mulch: Layer a thick bed of straw or shredded leaves around the base of your plants inside the hoop house. This doubles down on thermal protection by insulating the root zone.
- Pollination Access: If your hoop house remains closed during the period when spring crops (like strawberries or early peas) begin flowering, remember to roll back the covers during midday to allow bees and beneficial insects access to the blossoms.
Frequently Asked Questions (FAQs)
1. What is the difference between floating row cover fabric and clear plastic?
Floating row cover fabric (spunbond polypropylene) is breathable, allowing air, light, and water to pass through while trapping heat (raising temps by 4°F to 8°F). Clear plastic traps significantly more heat and blocks rain, but it does not breathe, requiring you to manually vent the tunnel on sunny days to prevent overheating.
2. How many degrees of frost protection does a hoop house provide?
A standard lightweight fabric row cover typically protects plants against light to moderate frosts down to about 28°F to 30°F. Heavy-duty frost blankets combined with well-anchored hoops can protect crops down to the mid-20s (°F).
3. Will my spring crops still get enough sunlight under a row cover?
Yes. High-quality agricultural frost cloth allows between 85% to 90% of ambient sunlight to pass right through the fabric, ensuring your seedlings continue active photosynthesis without getting scorched by harsh UV rays.
4. Do I need to remove the row cover when it rains?
If you are using breathable spunbond fabric, you do not need to remove it; rain will pass straight through and water your plants naturally. If you are using solid clear plastic sheeting, you will need to pull it back during rain events so your soil doesn’t dry out beneath the barrier.
5. How do I anchor my hoop house so it doesn’t blow away in high winds?
The most reliable method is burying the outer edges of the fabric 3 to 6 inches deep in a trench filled with soil. Alternatively, you can use heavy bricks, concrete pavers, or long sandbags spaced closely together along the entire perimeter.
6. Can I leave the hoop house on my crops permanently during spring?
You can leave breathable row covers on for weeks at a time while plants are in their vegetative stage (greens, brassicas, root crops). However, once crops begin producing flowers that require insect pollination, you must open or remove the covers during daylight hours.
7. What are the best materials to use for building the hoops?
PVC electrical conduit pipes (1/2-inch) and galvanized steel wire (9-gauge) are the top choices. PVC is rigid, cheap, and easy to bend, while steel wire is ultra-durable, thin, and easily pushed directly into firm soil.
8. Why are my plants wilting inside the hoop house on a sunny day?
This is almost always caused by heat buildup. Even in early spring, strong midday sun can turn a sealed hoop house into an oven. Always vent your tunnels during warm sunny days by opening the ends or lifting one side.
9. How does regional climate impact when I should put up my hoop house?
In mild zones like San Francisco or parts of California, hoop houses are deployed primarily for cool winter/early spring wind and moisture control. In colder regions like New York or Washington, they are essential lifelines used to push the planting season forward by 4 to 6 weeks.
10. Can a hoop house protect plants from pests as well as frost?
Yes! As a massive bonus, an intact, sealed hoop house acts as an impenetrable physical barrier against common spring pests like flea beetles, cabbage moths, aphids, and marauding rabbits or birds.
Conclusion: Extend Your Season and Secure Your Harvest
Building a simple hoop house row cover is one of the highest-return, lowest-cost projects a gardener can undertake. It bridges the dangerous gap between winter’s final grip and spring’s true arrival, giving you the freedom to plant weeks earlier without the constant anxiety of a midnight freeze.