What Are the Top Signs That Your Home-Grown Garlic Crop Is Ready to Be Harvested?
Welcome to the ultimate guide by KCPlants, tailored for growers across diverse American climates—from the warm sun of Texas and California to the crisp seasons of New York and Washington, and the unique microclimates of San Francisco.
Growing garlic is one of the most rewarding gardening experiences. You plant a single clove in the fall or winter, watch it survive the elements through freezing winters or mild coastal moisture, and months later, unearth a clustered bulb packed with flavor. However, the single most critical milestone in garlic cultivation isn’t planting, watering, or weeding—it is timing the harvest.
Harvest too early, and your bulbs will be small, underdeveloped, and wrap themselves in flimsy, translucent paper that deteriorates quickly. Harvest too late, and the wrappers will split open, exposing the individual cloves to soil, moisture, and pests, drastically reducing their storage life.
This comprehensive, SEO-optimized guide will walk you through the undeniable visual cues, timing metrics, and regional strategies to ensure your home-grown garlic harvest is nothing short of perfection.
Understanding Your Garlic: Hardneck vs. Softneck
Before diving into the harvest signs, it is vital to know which type of garlic you are growing, as this dictates both how it grows and when it is ready.
1. Hardneck Garlic (Allium sativum ophioscorodon)
- Characteristics: Hardneck varieties feature a stiff central stem (the scape) and tend to produce fewer, larger cloves arranged in a single ring around the stem. They thrive in colder climates with freezing winters, making them exceptionally popular in New York and Washington.
- Key Feature: They produce garlic scapes (curly flower stalks) in late spring, which must be snapped off to redirect the plant’s energy back into bulb growth.
2. Softneck Garlic (Allium sativum sativum)
- Characteristics: Softneck varieties do not produce a rigid flower stalk and feature pliable stems that make them ideal for traditional braiding. They contain more cloves per bulb, arranged in multiple layers.
- Key Feature: They thrive in milder winter regions, making them the staple choice for home gardeners in California, Texas, and San Francisco.
The Top 6 Signs Your Garlic Is Ready to Harvest
Determining the exact moment to pull your garlic requires a careful visual assessment of the plant’s foliage and structure. Nature provides clear indicators that the bulb has reached its maximum underground potential.
+-----------------------------------------------------------------+
                 THE 6 GOLDEN HARVEST INDICATORS
+-----------------------------------------------------------------+
| 1. The Leaf Dieback Rule (Lower 1/3 to 1/2 Brown)               |
| 2. Hardneck Scape Curls (Timing Cue)                            |
| 3. Stem Weakness and Lodging (The Neck Softens)                 |
| 4. Wrapper Paperyness (Examining Bulb Skin)                     |
| 5. Bulb Bulging and Soil Cracking                               |
| 6. The Calendar & Growing Degree Days (Regional Check)          |
+-----------------------------------------------------------------+
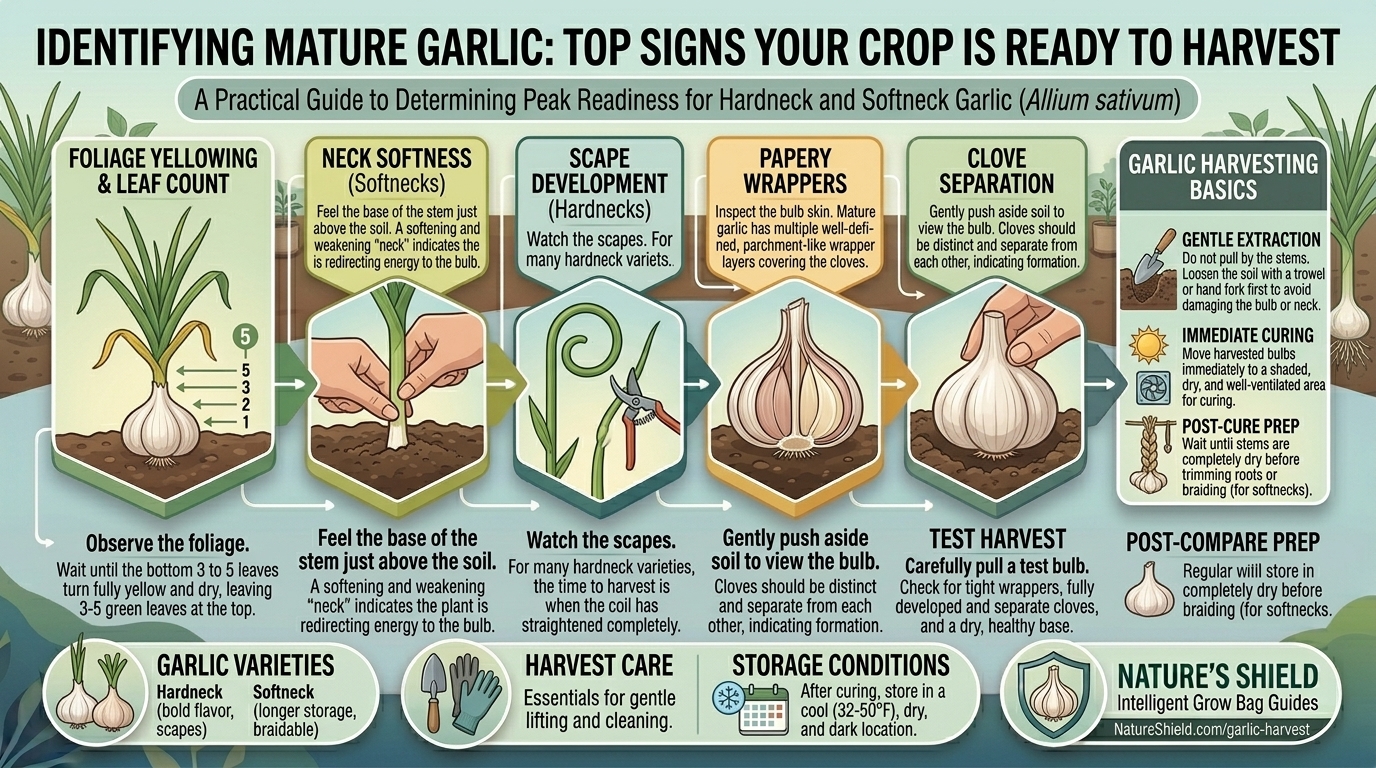
1. The Leaf Dieback Rule (The 30% to 50% Rule)
The most reliable sign of maturity is the browning of the plant’s leaves. Garlic leaves serve as solar panels feeding the underground bulb. As the bulb finishes growing, the plant begins to pull nutrients and energy back from the foliage.
- What to look for: Look at the total number of leaves on each plant. When roughly one-third to one-half (33% to 50%) of the lower leaves have turned brown, yellow, and dry, your garlic is entering the harvest window.
- The Golden Balance: Do not wait for all the leaves to turn brown. If every single leaf dies and falls off, the protective wrappers surrounding the bulb will rot away in the soil, leaving the cloves exposed and vulnerable to disease.
2. Hardneck Scape Curls (For Hardneck Varieties)
If you are growing hardneck garlic in cooler zones like New York or Washington, nature gives you a countdown timer in the form of the scape.
- The Process: In late spring, hardneck varieties shoot up a central stem that forms a dramatic double-loop curl. Gardeners usually snap these scapes off when they curl to boost bulb size.
- The Timeline: Count 3 to 4 weeks (approximately 20 to 30 days) from the time your scapes form or are cut to the harvest date. This window gives the bulb the final stretch of growth it needs to swell to its maximum capacity.
3. Stem Weakness and Pseudostem Softening
An immature garlic plant stands ramrod straight with a firm, turgid stem. As maturity approaches, the physiological structure of the plant changes.
- What to look for: Gently feel the base of the stem right above the soil line (the pseudostem). If the stem feels soft, pliable, or starts to lean over slightly, the bulb has stopped expanding and is signaling that its life cycle is complete.
4. Wrapper Paperyness and Skin Formation
The outermost layers of the garlic bulb transform from thick, fleshy layers into dry, papery wrappers that protect the cloves during storage.
- The Test Inspection: If you are unsure, gently brush away a small amount of topsoil from the side of one bulb with your fingers. Check if the outer skin has formed distinct, papery layers. If it still looks completely green, fleshy, and unformed, give it another week. If it feels crisp and papery, it is ready.
5. Bulb Bulging and Soil Cracking
As garlic bulbs reach their ultimate size underground, they push outward against the surrounding earth.
- What to look for: Walk your garden beds and look closely at the soil directly around the base of the stalks. Do you notice minor cracks, heaving, or subtle mounds forming? This physical displacement is a classic indicator that large, plump bulbs have finished swelling beneath the surface.
6. The Calendar and Growing Degree Days
While nature dictates the schedule, the calendar provides a baseline framework depending on when you planted:
- Fall-Planted Garlic: Typically harvested in late June through July across most of the US.
- Spring-Planted Garlic: Usually harvested in late summer (August to September).
Regional Harvest Strategies Across the US
Growing conditions vary dramatically across the United States. Climate zones dictate moisture levels, soil temperatures, and the exact window of opportunity. Here is how to adapt your harvest strategy based on your location:
🌞 Texas & California (Warm Climates & Mediterranean Zones)
- The Challenge: High temperatures and early summer heatwaves can trick the garlic plant into entering premature dormancy before the bulbs reach full size. Softneck varieties dominate here.
- Harvest Strategy: Monitor soil moisture closely. In regions like Central Texas or California’s Central Valley, harvest tends to occur slightly earlier (late May to mid-June). Ensure you harvest before extreme heat causes the wrapper to degrade rapidly in dry soil.
🌉 San Francisco (Microclimates & Coastal Cool)
- The Challenge: San Francisco is famous for its summer fog, marine layers, and cooler, damp air.
- Harvest Strategy: Coastal moisture means you must be vigilant about the leaf dieback rule. Because the air stays cool and damp, do not leave bulbs in the ground a single day past peak maturity, as lingering fog and damp soil can invite fungal issues like Botrytis or stem rot right at harvest.
🌲 Washington & New York (Cool Winters & Continental Climates)
- The Challenge: Hardneck varieties thrive here, facing freezing winters followed by crisp springs.
- Harvest Strategy: Harvest usually peaks in early to mid-July. Keep an eye on summer rain showers. If heavy, persistent summer rains are forecasted right when your garlic hits 40% leaf dieback, harvest immediately, even if it’s a few days early. Wet soil combined with mature bulbs is a recipe for mold.
Step-by-Step Guide: How to Harvest Your Garlic Correctly
Once you have identified the top signs and confirmed your crop is ready, proper harvesting technique is essential to prevent bruising and maximize shelf life.
- Stop Watering 1 to 2 Weeks Prior: Cease irrigation or watering roughly 7 to 14 days before you plan to harvest. This allows the soil to dry out, making the bulbs much easier to pull and cleaning off excess dirt significantly faster.
- Use a Garden Fork, Never Pull by Hand: Never grab the green tops and yank hard. The stem can snap off, leaving the bulb trapped underground, or damage the root plate. Instead, insert a garden fork or spade gently into the soil 4 to 6 inches away from the plant base, rocking it slightly to loosen the roots.
- Lift and Shake Gently: Lift the loosened plant out by the base of the stem and gently brush away large clumps of soil from the roots. Do not wash the bulbs with water at this stage, as trapped moisture promotes rot.
- Leave the Foliage Attached: Keep all leaves, roots, and stems intact during the initial post-harvest phase. As the plant dries, the remaining energy in the green leaves cures down into the bulb, supercharging flavor and wrapper strength.
Curing and Storing Your Harvested Garlic
Harvesting is only half the battle; proper curing ensures your home-grown garlic lasts for months in your pantry.
- The Ideal Environment: Move your harvested garlic plants to a shaded, dry, well-ventilated area—such as a covered porch, garage, or shaded shed. Direct sunlight will literally cook the bulbs and ruin their flavor.
- Setup: Lay them flat in single layers on wire screens, or tie them in bundles of 5 to 10 and hang them upside down.
- Duration: Let them cure for 2 to 4 weeks, depending on humidity. You will know they are fully cured when the roots feel like stiff brush bristles, the wrappers are completely dry and papery, and the main stalk snaps cleanly when bent.
- Trim and Store: Once cured, use clean shears to trim the roots to a quarter-inch and cut the stems off about 1 to 2 inches above the bulb (unless you plan to braid softneck varieties). Store them in mesh bags or open baskets in a cool, dark, dry place (55°F to 60°F is ideal). Never store raw garlic in the refrigerator, as the humidity and cold trigger premature sprouting.
Frequently Asked Questions (FAQ)
1. What happens if I harvest my garlic too early?
Harvesting too early results in small, underdeveloped bulbs. Furthermore, the outer wrappers will not have had time to form properly, remaining thick, fleshy, and translucent. This causes the garlic to shrivel quickly in storage and significantly shortens its shelf life.
2. What happens if I wait too long to harvest?
If left in the ground past peak maturity, the protective papery wrappers disintegrate and split open. This exposes the individual cloves directly to soil microbes and moisture, causing them to separate (“split bulb”), rot, or sprout prematurely.
3. Should I wash my garlic bulbs right after pulling them?
No! Never wash freshly harvested garlic with water. Excess moisture trapped between the layers or around the root plate creates an ideal breeding ground for mold and bacteria during the curing process. Simply brush off loose dry dirt by hand.
4. Can I eat the garlic right after harvesting it?
Absolutely! Freshly harvested garlic—often called “wet garlic” or “green garlic” depending on the stage—is completely edible. It has a milder, sweeter, and juicier flavor profile compared to cured supermarket garlic, though it will not store long-term.
5. Does climate change my garlic harvest window?
Yes, significantly. Gardeners in warmer southern climates like Texas and inland California often harvest in late May or early June, while northern growers in New York and Washington typically harvest in July due to cooler spring temperatures and later planting schedules.
6. How do I know if my garlic is a hardneck or softneck variety?
Check the center of the plant. Hardneck varieties feature a rigid, woody central stem (or the scar where a scape was removed), while softneck varieties have pliable, leafy stems that twist easily without snapping.
7. Why are my garlic leaves turning yellow in spring? Is it ready?
If your garlic leaves are turning yellow in early to mid-spring, it is usually not ready for harvest. Early yellowing is frequently caused by nitrogen deficiency, underwatering, or temperature stress. True harvest yellowing occurs exclusively in late spring/early summer when 33% to 50% of the lower leaves dry up while upper leaves remain green.
8. How long does cured home-grown garlic last?
Properly cured hardneck garlic typically stores well for 4 to 6 months, while softneck varieties can last anywhere from 6 to 9 months under optimal cool, dry, dark storage conditions.
9. Can I save cloves from my harvest to plant next season?
Yes! In fact, saving the largest, healthiest, and best-performing cloves from your current harvest to plant in the fall is the best way to breed a localized strain of garlic perfectly adapted to your specific regional microclimate.
10. Why are the cloves inside my harvested bulb splitting apart?
If the cloves are splitting or bursting through the outer wrapper, it usually means the garlic was left in the ground too long after reaching maturity, or it experienced erratic watering cycles (heavy rain followed by severe dry spells) late in the season.
Conclusion
Mastering the art of garlic harvest timing transforms your home garden from a guessing game into a dependable tradition. By keeping a close eye on lower leaf dieback, tracking your scapes, understanding your local climate—whether you are nurturing bulbs under the bright California sun, the coastal fog of San Francisco, or the cool breezes of New York—you will be rewarded with robust, aromatic, and long-lasting bulbs that supermarket produce simply cannot match.