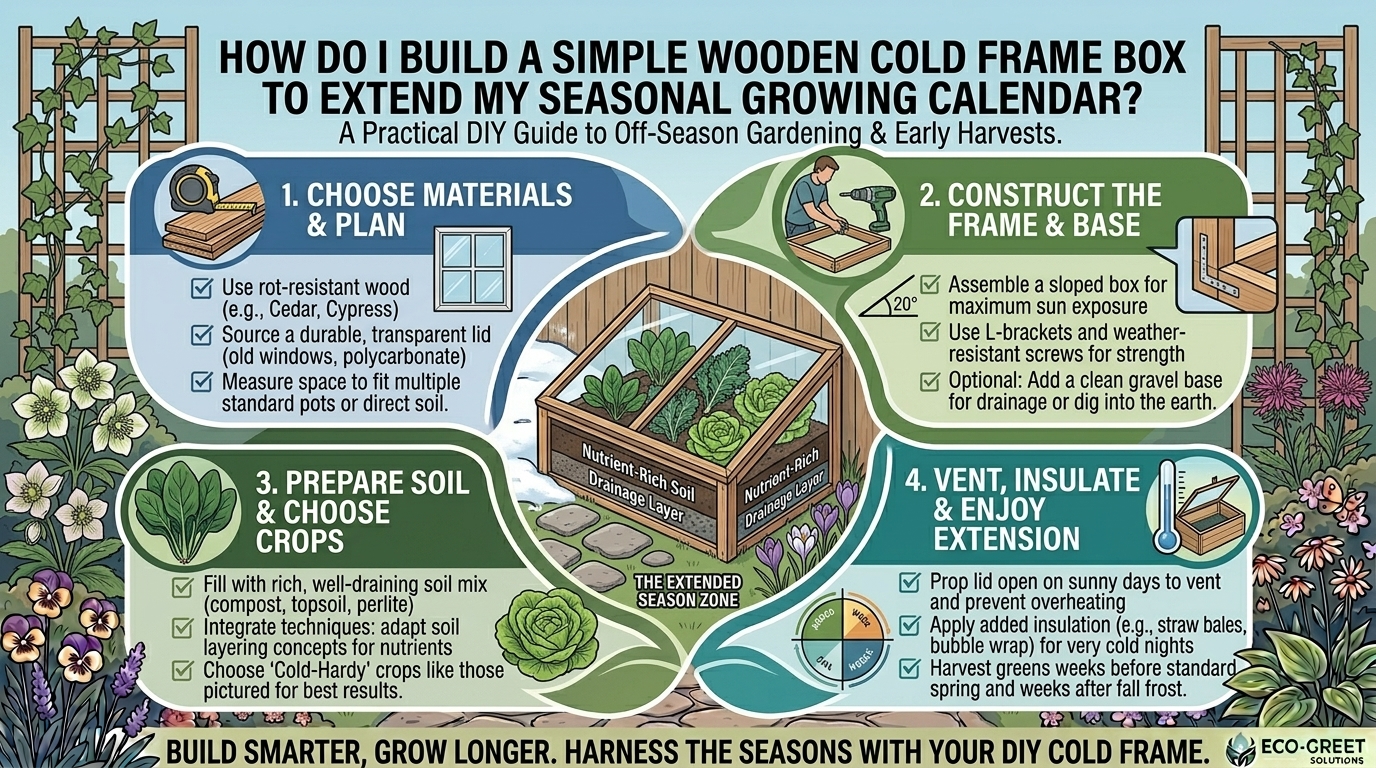
Introduction: Extend Your Growing Season with a Wooden Cold Frame
Every dedicated home gardener knows the bittersweet feeling of autumn’s final harvest and the eager anticipation of spring. The gap between seasons—when freezing temperatures threaten tender seedlings and stop summer crops in their tracks—can feel frustratingly long. Fortunately, you don’t need an expensive, heated greenhouse to beat the calendar.
A cold frame box is one of the most cost-effective, time-tested tools in horticulture. Acting as a miniature greenhouse, a simple wooden cold frame captures solar heat during the day and insulates your plants against frost, wind, and heavy rain at night.
Whether you are hardening off spring starts in the variable climate of New York, protecting winter greens in the damp Pacific Northwest of Washington, shielding plants from coastal breezes in San Francisco, or managing mild winter transitions in Texas and California, a DIY wooden cold frame is your gateway to year-round gardening. This comprehensive guide will walk you through building, positioning, and managing your own wooden cold frame to maximize your harvest.
1. What is a Cold Frame and How Does It Work?
At its core, a cold frame is a bottomless box placed directly over garden soil or raised beds, topped with a transparent or translucent lid (sash). It requires no artificial heating or electricity.
The Greenhouse Effect in Miniature
The magic of a cold frame relies on simple physics:
- Solar Radiation Capture: Sunlight passes through the transparent lid, warming the air, soil, and plants inside the box.
- Thermal Mass Retention: The interior surfaces and underlying soil absorb this heat during daylight hours.
- Wind and Frost Protection: The wooden walls and sealed lid prevent cold ambient winds from cooling the interior air and blocking frost crystals from settling on delicate foliage.
By maintaining temperatures 5°F to 15°F warmer than the outside air, a cold frame lets you plant cool-season crops weeks earlier in spring and harvest fresh greens months later into winter.
2. Benefits of Building a Wooden Cold Frame
While commercial plastic or aluminum frames exist, building a wooden cold frame offers unique advantages:
- Superior Insulation: Wood is a natural insulator compared to metal or thin plastic, keeping interior temperatures more stable during cold nights.
- Customizable Dimensions: You can build your frame to fit existing raised beds, scrap lumber, or salvaged windows.
- Aesthetic Appeal: A natural wood finish blends seamlessly into cottage gardens, suburban yards, and urban homesteads.
- Cost-Effective DIY Project: Using untreated lumber, basic fasteners, and a salvaged window makes this an affordable weekend build.
3. Materials and Tools Needed for the Build
Before heading to the hardware store, gather your supplies. To keep your cold frame eco-friendly and durable, select rot-resistant woods like cedar, redwood, or untreated exterior-grade pine (sealed with a non-toxic, plant-safe finish).
Shopping List
- Lumber: One 2×12 board (8 feet long) or two 2×6 boards stacked to create the back wall; cut down to create sloped side walls.
- The Lid: A salvaged old window, a glass storm window, or a wooden frame fitted with twin-wall polycarbonate sheeting.
- Hardware: Heavy-duty exterior wood screws (2.5 inches), two heavy-duty hinges for the lid, and a prop stick or adjustable window arm to vent air.
- Optional Insulation: Foam board insulation if you live in freezing northern climates like upstate New York.
Tool Kit
- Circular saw or hand saw
- Drill and driver bits
- Measuring tape and carpenter’s square
- Sandpaper (to smooth rough edges)
4. Step-by-Step Construction Guide
Building a simple wooden cold frame takes just a few hours. The key design feature is a sloped top, which ensures maximum sunlight interception during low winter sun angles and allows rainwater or melting snow to slide right off.
Step 1: Design the Sloped Dimensions
A standard, manageable size is 3 feet wide by 4 feet long (or sized to match your salvaged window).
- Cut the back wall to a height of 12 to 15 inches.
- Cut the front wall to a height of 6 to 9 inches.
- Cut the two side boards diagonally from the back height down to the front height to create a smooth, downward slope.
Step 2: Assemble the Wooden Box
- Pre-drill screw holes to prevent the wood from splitting.
- Join the front, back, and side panels using exterior wood screws.
- Check the frame with a carpenter’s square to ensure corners are square.
Step 3: Attach the Lid
- Mount your salvaged window or custom wooden sash to the top edge of the tall back wall using your heavy-duty hinges.
- Ensure the lid overhangs the frame slightly to prevent rainwater from dripping inside the cracks.
- Attach a notched prop stick or adjustable arm to the side wall so you can prop the lid open at various heights for ventilation.
5. Regional Placement and Climate Considerations
Where and how you use your cold frame depends heavily on your local regional environment:
Texas & California (Mild Winters, Intense Sun)
- Placement: Position in partial shade or morning sun. In southern zones, cold frames can overheat rapidly on sunny winter afternoons.
- Management: Venting is critical. You must prop the lid open on sunny days to prevent plants from cooking inside the box.
New York & Washington (Cold Winters, Frequent Rain/Snow)
- Placement: Face the sloped lid due South to capture maximum low-angle winter sunlight.
- Management: Ensure a steeper slope (at least 15 to 20 degrees) so snow slides off easily. In heavy freezing zones, insulate the exterior walls with straw bales or mulch bags.
San Francisco (Cool Coastal Microclimates)
- Placement: Place in an open, full-sun spot to combat foggy, overcast days.
- Management: Excellent for starting cool-season crops (like lettuce, spinach, and brassicas) nearly year-round due to the mild coastal temperatures.
6. What to Grow in Your Cold Frame
A cold frame excels at protecting cool-season crops that tolerate crisp weather but dislike hard freezes:
- Leafy Greens: Spinach, kale, arugula, Swiss chard, and leaf lettuce.
- Root Crops: Radishes, carrots, and beets.
- Spring Seedlings: Starting tomatoes, peppers, and squash early before transplanting them outdoors.
- Overwintering Herbs: Parsley, cilantro, and chives.
7. Essential Management Tips for Success
- Master the Venting Routine: This is the #1 rule of cold frames. On sunny days, even when outside temperatures are freezing, trapped solar heat can skyrocket past 85°F inside. Open your lid in the morning (around 9:00 AM) and close it in the afternoon (around 3:00 PM) to trap overnight warmth.
- Monitor Soil Moisture: Cold frames block natural rainfall. Check the soil regularly; water sparingly on cold days to prevent root rot.
- Watch for Pests and Disease: Slugs, snails, and aphids love the cozy environment of a cold frame. Clear out decaying leaves regularly and monitor humidity levels.
- Use Thermal Mass Helpers: Place dark-painted water jugs (plastic milk jugs filled with water) inside the back of the cold frame. They absorb heat during the day and slowly release it at night, buffering against sudden nighttime freezes.
10 Frequently Asked Questions (FAQ)
1. Do I need a heater inside a cold frame?
No. Cold frames are entirely passive solar structures designed to utilize natural sunlight and heat retention from the earth. No electricity or external heating is required.
2. What direction should a cold frame face?
In the Northern Hemisphere, your cold frame should always face due South to maximize exposure to sunlight during the short winter days.
3. How do I prevent my cold frame from overheating?
Monitor interior temperatures with a max/min thermometer. Prop the lid open using a stick or automatic vent opener whenever interior temperatures exceed 65°F to 70°F, even in winter.
4. Can I build a cold frame directly on top of lawn grass?
It is best to place it over cultivated garden soil or a raised bed. If placing over grass, dig out the sod first and loosen the underlying soil, adding compost and amendments for your plants.
5. What kind of wood should I use for a long-lasting frame?
Rot-resistant woods like western red cedar, redwood, or black locust are ideal. If using standard pine, apply a non-toxic, eco-friendly wood sealer to protect it from moisture.
6. Can I use clear plastic sheeting instead of glass?
Yes! Twin-wall polycarbonate panels or heavy-duty greenhouse plastic stretched over a wooden frame are lightweight, shatterproof, and provide excellent insulation.
7. When should I plant seeds inside a cold frame in spring?
You can typically plant cool-season crops in a cold frame 4 to 6 weeks earlier than your region’s standard last frost date.
8. How do I protect plants on freezing winter nights?
Lower and seal the lid tightly before sunset. If an extreme hard freeze is forecasted, drape an old blanket, burlap, or frost cloth over the top of the cold frame for extra insulation.
9. Will heavy snow break my cold frame lid?
A sloped design helps snow slide off naturally. If you use glass or lightweight plastic, brush heavy snow accumulations off the top promptly to maintain structural integrity and light penetration.
10. Can I use a cold frame in the summer?
Most gardeners remove or prop open the lid entirely during hot summer months, or use the frame as a shaded nursery bed (fitted with shade cloth) for starting tender summer seedlings.
Conclusion
Building a simple wooden cold frame is a rewarding weekend project that fundamentally transforms your gardening calendar. By harnessing passive solar energy, you can protect tender seedlings from sudden spring frosts, extend your autumn harvest deep into winter, and enjoy fresh homegrown greens year-round. Gather your lumber, select a sunny spot facing south, and take full control of your growing season today.