How to Propagate Heartleaf Philodendron Vines Using Simple Sphagnum Moss Layering Techniques
Welcome back to kcplants.com! If you are a passionate indoor gardener cultivating a green jungle across Texas, New York, California, Washington, or San Francisco, you have likely fallen in love with the classic, cascading beauty of the Heartleaf Philodendron (Philodendron hederaceum).
With its glossy, heart-shaped leaves and forgiving nature, it is one of the most beloved houseplants in the world. But what is even better than owning a gorgeous philodendron? Multiplying it for free!
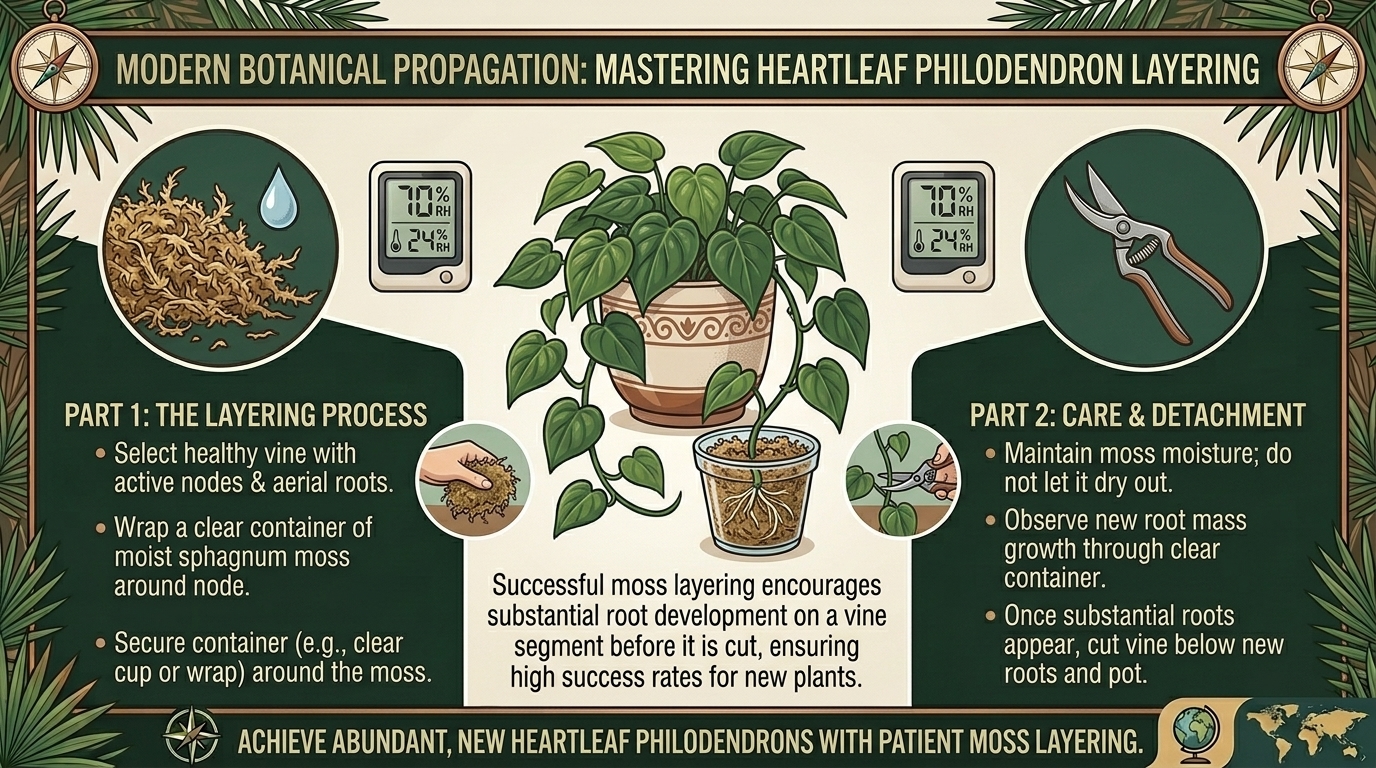
While you can propagate heartleaf philodendrons in plain water, water-grown roots can sometimes struggle with transplant shock when transferred to soil. The gold standard method used by professional horticulturists for robust, lightning-fast root development is sphagnum moss layering (air layering or moss-box propagation).
This comprehensive, highly informative guide explores the biology of philodendron nodes, why sphagnum moss works wonders, and step-by-step instructions for propagating your vines like an absolute pro across every US climate zone.
1. The Anatomy of a Philodendron: Understanding Nodes
Before diving into propagation techniques, you must understand the secret weapon of every vine: the node.
What is a Node?
If you look closely along your heartleaf philodendron vine, you will see a small, swollen bump or ridge where a leaf stem (petiole) meets the main vine. This is the node.
- Aerial Roots: Directly opposite or below the leaf petiole, nature embeds a tiny brown or green nub known as an aerial root primordium.
- The Growth Engine: Nodes contain dormant meristematic cells. When exposed to moisture, oxygen, and indirect light, these nodes instantly trigger the growth of brand-new roots and a shooting vine.
- The Golden Rule: You can never propagate a philodendron by cutting just a leaf or just a bare stem. Every cutting must include at least one healthy node.
2. Why Sphagnum Moss is the Ultimate Prop Medium
Many beginners start propagation in jars of tap water. While water propagation is fun to watch, sphagnum moss offers superior results:
- Natural Anti-Microbial Properties: High-grade New Zealand sphagnum moss contains natural compounds that inhibit fungal and bacterial growth, dramatically reducing the risk of stem rot.
- Oxygen-Rich Environment: Unlike dense water or heavy soil, fluffy sphagnum moss creates an airy matrix that allows oxygen to blanket the developing roots, encouraging aggressive root branching.
- Seamless Soil Transition: Roots grown in moist sphagnum moss develop tiny root hairs that adapt instantly to potting mix with zero transplant shock.
3. Regional Indoor Factors Across the US
Your local climate and indoor environment heavily influence how fast your sphagnum moss propagation succeeds:
New York & Washington (Winter Climate Control)
- The Challenge: If you propagate during autumn or winter, dry indoor heating can cause sphagnum moss to dry out within hours, stalling root growth.
- The Solution: Create mini-greenhouses using clear plastic bags or humidity domes over your moss propagations to lock in essential moisture.
San Francisco & California (Coastal Dampness & Mild Air)
- The Challenge: Coastal fog and moderate temperatures create an ideal baseline for propagation, but high indoor humidity can occasionally invite mold if airflow is restricted.
- The Solution: Squeeze your sphagnum moss thoroughly so it is damp like a wrung-out sponge, never soaking wet, and ensure your propagation setup receives good ambient air exchange.
Texas (AC Drafts and Rapid Evaporation)
- The Challenge: Continuous indoor AC running across Texas homes strips humidity out of the air, rapidly desiccating exposed propagation setups.
- The Solution: Monitor your moss daily, misting it lightly with a spray bottle whenever the top layer feels slightly dry to the touch.
4. Step-by-Step Guide: Sphagnum Moss Propagation Techniques
There are two primary sphagnum moss techniques for heartleaf philodendrons: Node Box Propagation and Air Layering (On the Mother Plant). Here, we cover the most popular method: The Moss Box / Propagator Tray Technique.
Step 1: Gather Your Materials
- A healthy mother heartleaf philodendron vine.
- High-grade long-fiber sphagnum moss.
- A clean plastic propagation container with a clear lid (like a Tupperware box or takeout container).
- Sharp, sterilized kitchen shears or pruning snips.
- A spray bottle filled with filtered or dechlorinated water.
Step 2: Preparing the Sphagnum Moss
- Place a handful of dry sphagnum moss in a bowl of warm water and let it rehydrate for 10 to 15 minutes.
- Remove the moss and squeeze it vigorously with your hands. You want it moist and damp—like a tightly wrung-out sponge—not dripping wet. If water streams out when squeezed, it is too wet and will cause stem rot.
Step 3: Taking Your Cuttings
- Inspect your philodendron vine and locate long sections featuring 3 to 4 leaves and healthy, swollen nodes.
- Using sterilized shears, cut the vine about half an inch below the node.
- Pro Tip: You can cut a long vine into multiple single-node cuttings (known as wet sticks or single-node propagations) to multiply your plant exponentially!
Step 4: Setting Up the Propagation Box
- Lay a 1-to-2-inch bed of damp sphagnum moss across the bottom of your clear plastic container.
- Place your philodendron cuttings horizontally onto the moss bed, gently pressing the nodes so they make direct contact with the damp moss. (You can also coil longer vines in a circle inside the box).
- Lightly drape a thin layer of damp moss over the top of the nodes, leaving the leaves exposed to light.
Step 5: Sealing and Lighting
- Place the clear lid securely on your container to create a high-humidity greenhouse environment.
- Place the container in a warm spot with bright, indirect ambient light (avoid direct scorching window sun, which will bake the container like an oven).
5. Maintenance and Transplanting to Soil
- Air Exchange: Open the lid of your propagation box for 10 minutes every 3 to 4 days to flush out stale air and prevent fungal issues. Mist the moss lightly if it feels dry.
- Root Development Timeline: Within 2 to 3 weeks, you will notice thick, white roots emerging vigorously from the nodes.
- The Potting Milestone: Once the roots reach 1 to 2 inches long (usually around 4 to 6 weeks), it is time to pot them up!
- Planting in Soil: Plant your rooted cuttings into a well-draining indoor potting mix enriched with perlite. Water thoroughly once, and your brand-new heartleaf philodendrons are ready to thrive!
6. Frequently Asked Questions (FAQ)
1. Can I propagate a heartleaf philodendron in plain tap water instead of moss?
Yes, water propagation works well for philodendrons, but moss produces a sturdier root system that transitions into potting soil with virtually zero transplant shock.
2. Should I use fertilizer in the water when rehydrating sphagnum moss?
Never add fertilizer to propagation moss. Cuttings do not have established root systems to process nutrients; fertilizer will burn the raw stem tissue and encourage bacterial rot. Use plain filtered water.
3. Why is my philodendron stem turning brown and mushy in the moss?
Mushy brown stems indicate stem rot, usually caused by sphagnum moss that was kept too wet and lacked air circulation. Trim away the rotted brown section back to healthy green tissue, let it callus for an hour, and restart in fresher, drier moss.
4. How much light does a propagation box need?
Propagation boxes require bright, indirect light. Never place a sealed plastic container in direct southern window sunlight, as the greenhouse effect will rapidly overheat the box and cook your cuttings.
5. Can I propagate a philodendron using just a single leaf without a node?
No. A leaf petiole cut without its attached stem node will stay green in moss for months, but it will never grow a new vine or roots because it lacks the necessary meristematic growth cells.
6. How long does it take for sphagnum moss cuttings to root?
Under warm conditions with bright indirect light, heartleaf philodendron cuttings typically display robust root growth within 2 to 4 weeks.
7. Do I need to remove the lower leaves before putting the cutting in moss?
It is helpful to trim away any lower leaves that would otherwise be buried directly under the damp moss, as buried foliage decays and invites mold. Leave 1 or 2 upper leaves intact for photosynthesis.
8. What is “air layering,” and how does it differ from a moss box?
Air layering involves wrapping a ball of damp sphagnum moss directly around a node while the vine is still attached to the mother plant, wrapping it in plastic wrap until roots form, and then cutting it off to pot independently.
9. Can I reuse sphagnum moss from a previous propagation?
It is not recommended. Used moss can harbor fungal spores or mineral salt deposits from previous root activity. Always start fresh, high-grade sphagnum moss for new propagations to ensure sterile conditions.
10. When should I transplant my moss-rooted cuttings into a traditional pot?
Wait until the roots are at least 1 to 2 inches long and have branched out nicely. If you pot them too early when roots are microscopic, they may struggle to adapt to standard potting mix.
Conclusion
Propagating heartleaf philodendron vines using simple sphagnum moss layering techniques is a rewarding, highly effective way to expand your indoor jungle. By understanding node anatomy, maintaining a sterile, damp moss environment, and providing gentle warmth and indirect light, you can easily turn a single trailing vine into dozens of lush new plants.