How to Propagate Succulent Leaf Cuttings on a Tray Filled with Dry Organic Cactus Soil
Welcome to kcplants, your ultimate digital greenhouse for growing a thriving indoor and outdoor garden no matter where you live—from the bustling apartments of New York and San Francisco to the sun-soaked backyards of California, Texas, and Washington.
One of the most rewarding aspects of plant parenthood is propagation. If you have ever wanted to multiply your favorite succulents without spending a dime, propagating succulent leaf cuttings is the definitive, magic-bullet method.
Below is your exhaustive, master-level guide to propagating succulents using a tray filled with dry organic cactus soil, optimized to help you master every single nuance of the process.
1. Introduction: The Magic of Succulent Propagation
Succulents are among the most resilient and generous plants on Earth. Unlike many traditional houseplants that require complex stem cuttings or root division, most popular succulents (like Echeveria, Sedum, Graptopetalum, and Crassula) can regenerate an entirely new, genetically identical plant from a single, healthy leaf.
By laying leaves across a tray filled with dry organic cactus soil, you mimic nature’s own drop-and-grow cycle. This technique minimizes the risk of rot, maximizes your success rate, and allows you to sprout dozens of new plant babies (known as “pups”) simultaneously with minimal effort.
2. Understanding Your Climate: Adapting to TX, NY, CA, WA, and SF
While indoor growing environments can be easily controlled, your local regional climate plays a massive role in how fast your propagation trays root and grow:
- California & Texas: These regions offer fantastic, abundant natural sunlight. However, intense summer heat waves can scorch delicate leaf propagations. Keep your trays in bright, indirect light rather than baking them on a blazing southern windowsill.
- New York & Washington: Shorter winter days and heavy cloud cover mean your leaves may take longer to sprout. Investing in a low-wattage LED grow light can dramatically speed up winter propagation.
- San Francisco: SF’s famous microclimate brings cool, foggy summers and damp air. Because ambient humidity is higher here, be extra cautious with moisture—always stick strictly to dry soil and ensure good airflow to prevent mold.
3. Gathering Your Tools and Materials
Before you begin, set yourself up for success by gathering the proper gear:
- Mother Plants: Choose healthy, plump, pest-free succulents.
- Propagation Tray: A shallow plastic nursery tray, a terracotta saucer, or even a recycled takeout container with drainage holes works wonders.
- Organic Cactus Soil: Look for a high-quality organic mix enriched with perlite, pumice, or coarse sand for optimal drainage.
- Spray Bottle: Filled with plain water (to be used only after roots appear).
- Bright, Indirect Light Source: A north- or east-facing windowsill, or a dedicated full-spectrum LED grow light.
4. Step-by-Step Propagation Guide
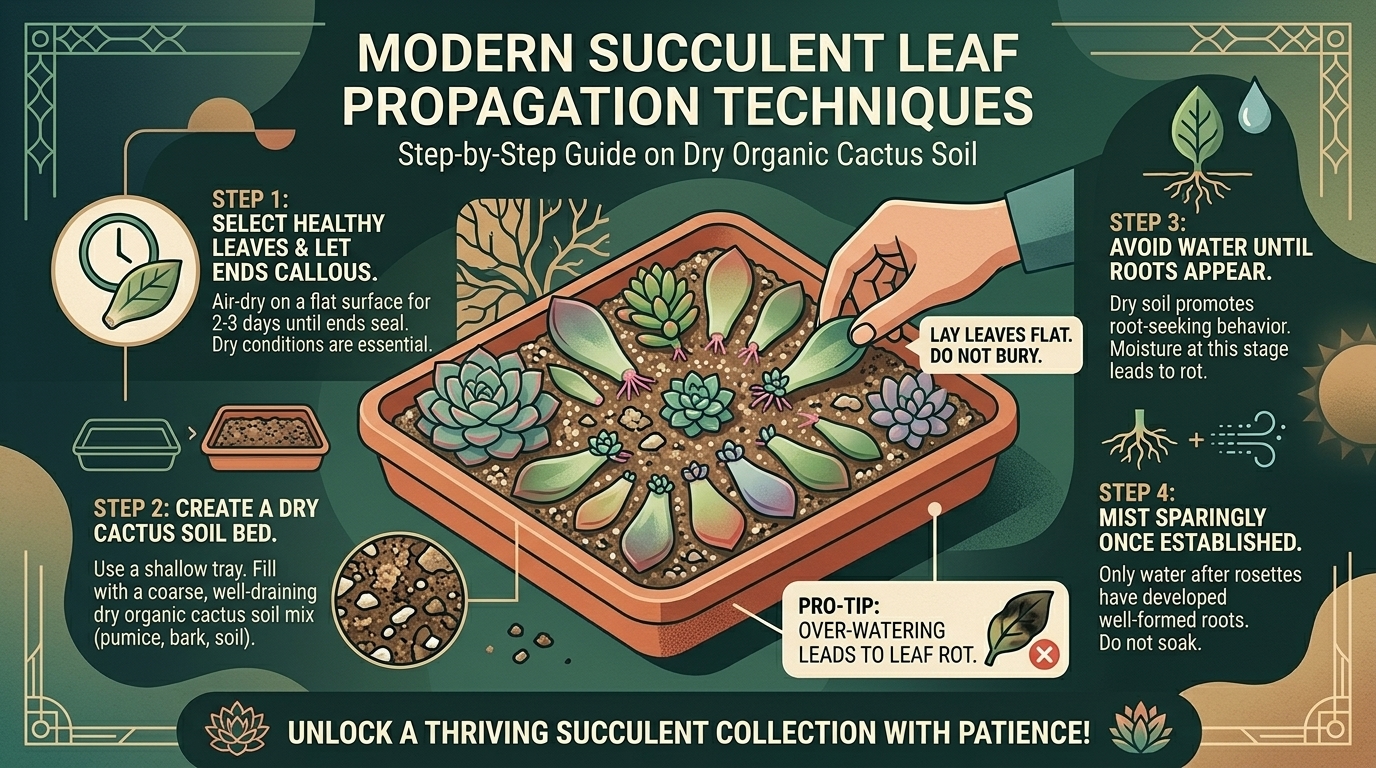
Step 1: Selecting and Harvesting the Best Leaves
Inspect your mother plant and choose plump, firm, mature leaves near the base of the stem. Avoid bruised, yellowing, or translucent leaves.
- The Technique: Gently grasp the leaf and wiggle it slightly side-to-side while pulling. Crucial rule: You must secure a clean “pluck” where the entire leaf base detaches intact. If a leaf snaps in half mid-way, it will usually just dry up and fail to root.
Step 2: Allowing the Leaves to Callus
Place your harvested leaves on a clean, dry paper towel in a shaded spot for 2 to 5 days (sometimes up to a week).
- Why this matters: The open wound where the leaf detached from the stem needs time to form a dry, protective callus. If you place a fresh, wet wound directly onto soil, bacteria can enter, leading to rot and sudden death.
Step 3: Preparing Your Tray with Dry Organic Cactus Soil
Fill your shallow tray with your organic cactus soil, leveling it out. The soil must be completely dry.
- Why dry soil? Until roots emerge and actively search for water, wet soil serves no purpose other than to rot the leaf base.
Step 4: Arranging the Leaves
Lay your callused leaves flat on top of the dry soil surface, either resting them gently or pointing the tips slightly upward. Do not bury or push the ends into the dirt; nature needs the open air to form the pups.
Step 5: Positioning for Success
Place the tray in a warm area that receives bright, indirect sunlight. Direct, harsh midday sun will cook the tender leaves before they have a chance to sprout.
5. Maintenance and Watering Milestones
- Weeks 1 to 3 (The Waiting Game): Do not water. The mother leaf will sustain itself, slowly shrinking and shriveling as it transfers its internal moisture and energy into growing tiny pink roots and microscopic leaf buds.
- Weeks 4 to 6 (Roots Appear): Once you spot tiny pink root tendrils wriggling out of the base, you can begin lightly misting the soil around the roots once a week, or use a dropper to place a few drops of water directly near the roots. Let the soil dry out entirely between waterings.
- Months 2 to 4 (The Mother Leaf Dies): Eventually, the original mother leaf will turn completely brown, crispy, and fall off. Do not panic—this means it has successfully done its job! You are now left with an independent baby succulent pup with its own root system.
6. Transplants and Long-Term Care
Once your baby succulents have detached from the mother leaf and measure about half an inch to an inch across, they are ready to graduate to their own small individual pots filled with fresh organic cactus soil.
Handle them carefully by their leaves (avoiding delicate roots) and treat them like mini adult succulents: give them gradual exposure to stronger light and water only when the soil is bone-dry.
7. Troubleshooting Common Mistakes
- Leaves Turning Mushy and Translucent: This is rot, usually caused by overwatering or using soil that stays wet too long. Discard mushy leaves immediately.
- Leaves Shrivelling Up Completely Before Roots Form: The air is likely too hot or dry, or the leaf was harvested when the mother plant was dehydrated. Ensure a slightly more humid, shaded environment.
- Stretched, Leggy Growth (“Etiolation”): Your tray isn’t getting enough light. Move it to a brighter spot or supplement with a grow light.
8. Frequently Asked Questions (FAQ)
- Can I propagate succulent leaves in water instead of soil? Yes, water propagation is popular, but soil propagation on dry organic mix yields tougher, more resilient root systems that transition to pots with a much higher survival rate.
- Should I cover my propagation tray with plastic wrap? Generally, no. Covering traps excess humidity, which frequently triggers fungal mold and rots the leaves before they can root.
- Why did my leaf grow roots but no baby plant? This is common! Sometimes roots grow first, and baby leaves follow shortly after. Keep the tray in optimal lighting and be patient.
- How long does the whole process take? From initial leaf pluck to a standalone baby succulent takes anywhere from 2 to 4 months, depending on ambient temperature and sunlight levels.
- Can I use regular garden dirt for propagation? No. Regular garden soil is too heavy, compacts easily, and retains too much moisture, which will almost certainly rot your succulent cuttings. Always use a fast-draining cactus mix.
- Do I need to use rooting hormone powder? It is completely optional. Succulents contain natural hormones that make them root readily on their own without chemical additives.
- What time of year is best to start propagating? Spring and early summer are ideal because plants are in their active growth phase, but indoor propagation can be done year-round with adequate light.
- Why are my baby leaves turning yellow? This usually happens when the mother leaf is transferring its final nutrients to the pup. It is a normal part of the drying-up process.
- How often should I water my tray once roots form? Mist or water lightly every 7 to 10 days, ensuring the soil dries completely between waterings to prevent root rot.
- Can I propagate every type of succulent this way? Not all. While leaf cuttings work wonders for Echeveria and Sedum, plants like Aeoniums or certain cacti do not propagate reliably via single leaves and require stem cuttings instead.
9. Conclusion
Propagating succulent leaf cuttings on a tray filled with dry organic cactus soil is an art form blending patience, science, and nature. Whether you are expanding your urban jungle in New York City or cultivating a drought-resistant oasis in Texas or California, this simple technique guarantees a rewarding harvest of vibrant new plant life.