Welcome to kcplants, your premier digital greenhouse and urban gardening hub. Whether you are living in a compact high-rise apartment in New York City or San Francisco, managing a spacious home in Texas, or enjoying the crisp Pacific Northwest air in Washington and California, bringing fresh food directly into your kitchen has never been easier or more rewarding.
If you want to supercharge your daily nutrition without needing an outdoor garden, a sprawling yard, or years of horticultural experience, growing indoor microgreens on your kitchen counter is the ultimate solution. In this comprehensive, master-level guide, we will explore the best microgreens to grow quickly, how to cultivate them step-by-step, and how to seamlessly integrate these nutrient powerhouses into your daily diet.
1. Introduction: The Power of Kitchen Counter Microgreens
What exactly are microgreens? They are the young, tender seedlings of edible vegetables and herbs harvested just after the first true leaves have developed—typically 7 to 14 days after germination. Do not let their tiny size fool you: scientific studies have repeatedly shown that microgreens contain up to 40 times more concentrated nutrients (such as vitamins C, E, and K, as well as essential beta-carotenes) than their fully matured counterparts.
Growing them on your kitchen counter means you have a farm-to-table salad bar just steps away from your stove. Best of all, you don’t need expensive equipment, extensive space, or a green thumb to harvest a fresh batch every single week.
2. Navigating Climate & Indoor Growing: TX, NY, CA, WA, and SF
While indoor microgreen gardening shields your crops from external weather elements, your local regional climate can still subtly influence your indoor ecosystem:
- San Francisco & Washington: Cooler ambient temperatures and high indoor humidity during certain months can slow down germination or encourage mold if airflow is restricted. A small, oscillating desk fan on low speed can work wonders here.
- New York: Apartment heating systems during winter can make indoor air extremely dry, causing your soil or growing mats to dry out much faster. Keep a close eye on your watering schedule.
- Texas & California: Abundant natural light makes window-adjacent counter setups thrive, but intense summer heat waves can occasionally stress tender seedlings. Ensure your trays aren’t sitting directly over a hot oven or absorbing blistering afternoon window glare without ventilation.
3. The Top Microgreens to Grow Quickly on Your Counter
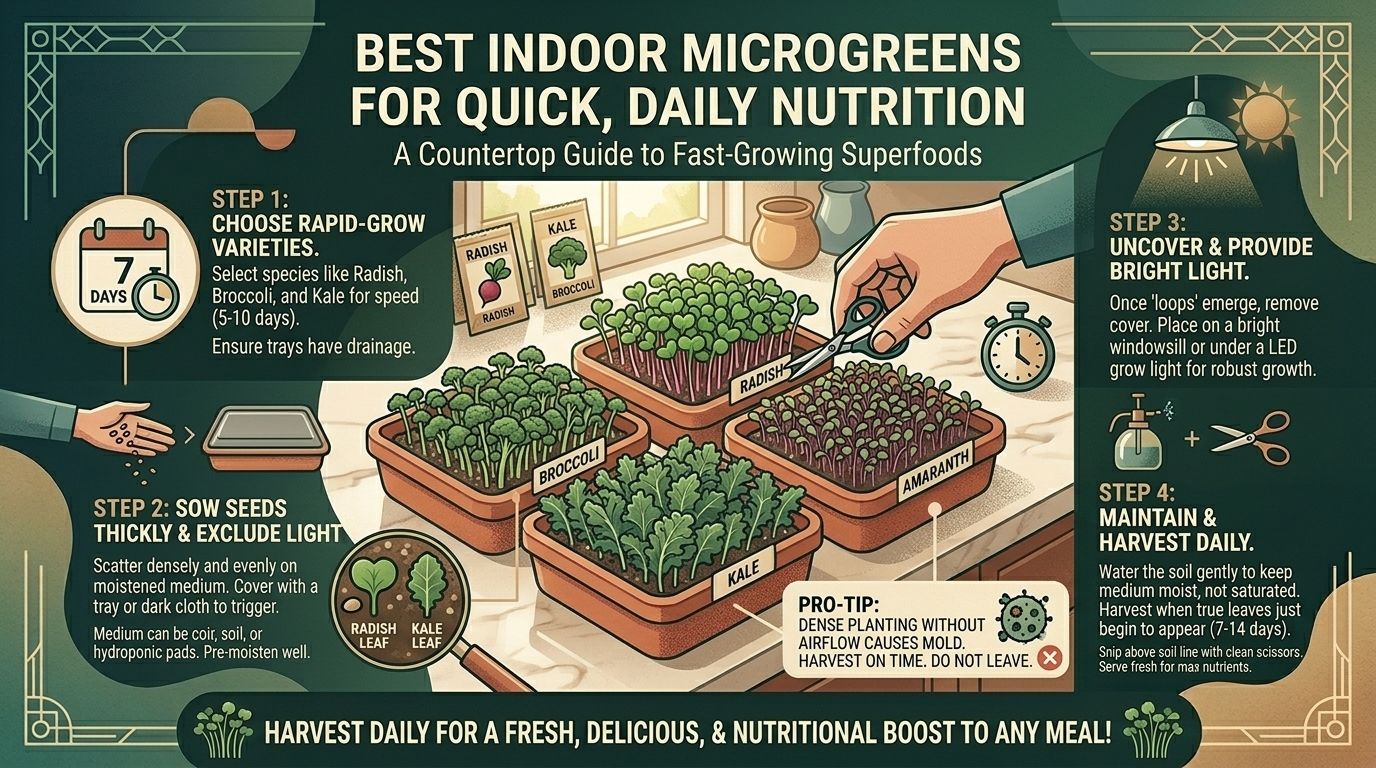
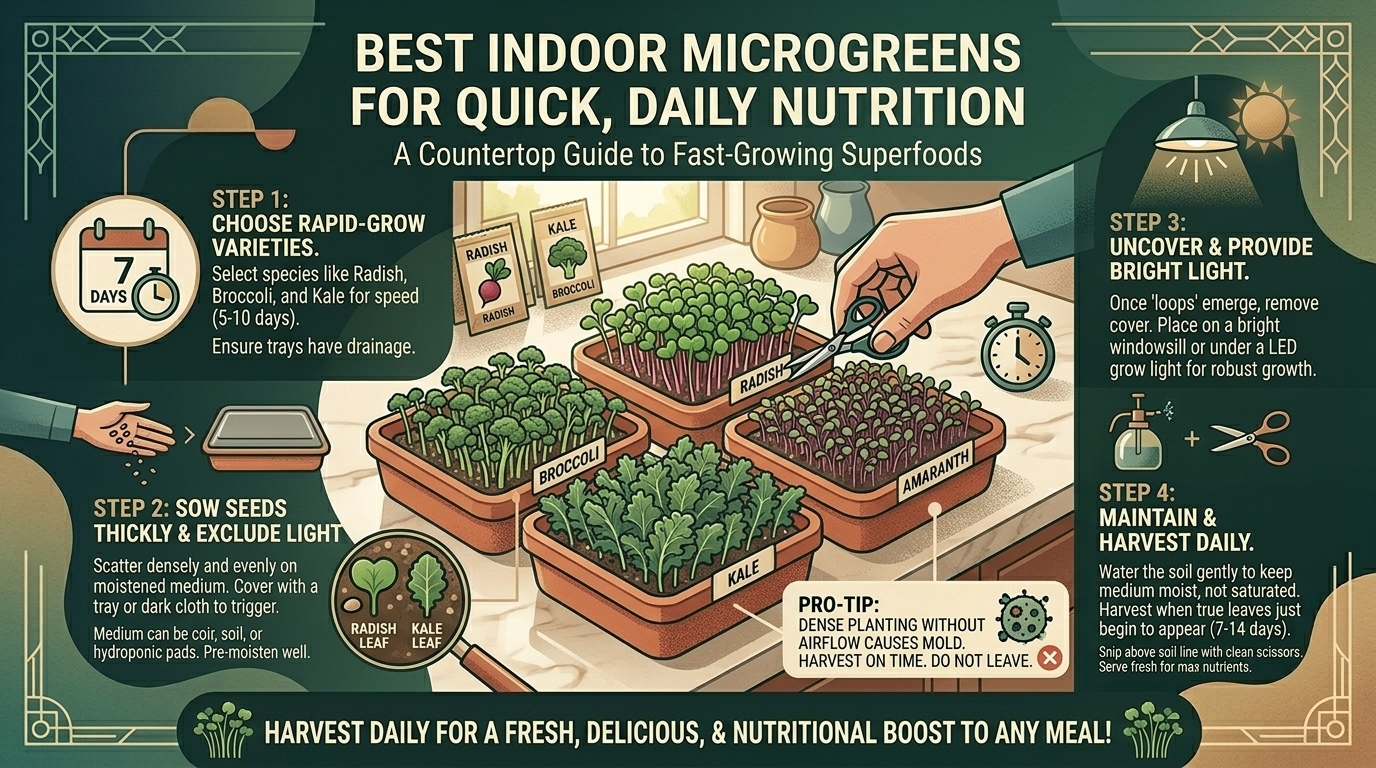
Not all microgreens are created equal. If you want lightning-fast growth, incredible flavors, and maximum nutritional density, these are the five best varieties to plant on your kitchen counter:
1. Radish (Pink Lady, Daikon, or China Rose)
- Harvest Time: 6 to 8 days
- Flavor Profile: Zesty, spicy, and peppery (reminiscent of a mature radish root).
- Why Grow It: Radishes are universally recognized as the absolute fastest and easiest microgreen for beginners. They sprout aggressively within 24–48 hours and grow with fierce vigor, making them nearly foolproof.
2. Broccoli (Calabrese)
- Harvest Time: 8 to 10 days
- Flavor Profile: Mild, earthy, and subtly nutty.
- Why Grow It: Broccoli microgreens are a nutritional powerhouse, heavily packed with sulforaphane—a powerful antioxidant compound associated with cellular health and immune support.
3. Kale (Dwarf Blue Curled or Lacinato)
- Harvest Time: 8 to 12 days
- Flavor Profile: Earthy, slightly sweet, and robust.
- Why Grow It: If you love leafy greens, kale microgreens offer a concentrated dose of calcium, iron, and vitamins A, C, and K, all while growing effortlessly in shallow counter trays.
4. Arugula
- Harvest Time: 7 to 10 days
- Flavor Profile: Nutty, sharp, and brilliantly pungent.
- Why Grow It: Arugula adds an instant gourmet kick to eggs, avocado toast, and pizzas. It germinates quickly, though its stems can be slightly delicate, requiring gentle misting rather than heavy watering.
5. Peas (Speckled Pea Shoots)
- Harvest Time: 10 to 14 days
- Flavor Profile: Sweet, crisp, and intensely fresh—just like biting into a fresh garden pea pod.
- Why Grow It: Pea shoots grow tall (up to 4–6 inches) and can often be harvested a second time if you trim them carefully above the lowest node. They provide a satisfying, crunchy texture that makes them fantastic for stir-fries and snacking.
4. Essential Tools for Countertop Microgreen Success
You do not need a commercial greenhouse setup. To get started on your kitchen counter, gather these simple items:
- Shallow Growing Trays: Look for trays roughly 1 to 2 inches deep (recycled plastic takeout containers with drainage holes poked in the bottom work wonderfully). You will want one tray with drainage holes and one solid tray to sit underneath as a base.
- Growing Medium: You can use organic potting soil, coco coir, or specialized hydroponic hemp/jute mats. Coco coir is a favorite for indoor kitchens because it is clean, lightweight, and completely soil-free.
- High-Quality Non-GMO Seeds: Purchase seeds specifically labeled for microgreens or sprouting to ensure high germination rates and freedom from chemical treatments.
- Spray Bottle: Essential for gentle, even watering during the sensitive germination phase.
- Lighting: While a bright kitchen window can work, a compact LED grow light bar mounted under a kitchen cabinet guarantees uniform, straight growth without your seedlings stretching or leaning.
5. Step-by-Step Cultivation Guide
Step 1: Prep Your Growing Medium
Fill your tray with about 1 to 1.5 inches of damp (not soaking wet) coco coir or organic potting mix. Level and gently press the surface flat to create an even planting bed.
Step 2: Dense Sowing
Unlike traditional gardening where seeds are spaced far apart, microgreen seeds should be sown densely, covering nearly the entire surface of the soil without overlapping heavily.
Step 3: The Blackout Phase (The Secret to Uniform Growth)
Once sown, mist the seeds lightly with water, press them gently into the medium to ensure good contact, and cover the tray with a solid lid, cardboard, or a second inverted tray.
- Why this matters: Keeping seeds in total darkness for the first 2 to 4 days tricks them into stretching upward rapidly in search of light, resulting in long, clean, easy-to-harvest stems. Check daily and mist if the surface feels dry.
Step 4: Unveiling and Light Exposure
Around day 3 or 4, once the seeds have sprouted and pushed the cover upward, remove the blackout lid. Place your green carpet of seedlings under your kitchen grow light or on a bright windowsill. Watch them transform from pale yellow to vibrant emerald green within 24 hours.
Step 5: Watering from Below
As the roots grow downward into the soil, switch from top-misting to bottom-watering. Pour a small amount of water directly into the bottom solid tray, let the growing medium absorb it from the roots up for 15 minutes, and pour out any standing excess. This keeps the delicate stems and leaves dry, preventing mold or “damping off.”
Step 6: The Harvest
When your microgreens reach about 2 to 3 inches tall (or when the first set of true leaves begins to peek out), they are ready! Use a sharp pair of kitchen scissors or clean shears to snip the stems just above the soil line.
6. Creative Ways to Incorporate Daily Microgreens Into Your Diet
Growing microgreens is only half the fun; eating them fresh every day unlocks their true value. Because they are delicate and packed with flavor, they are best enjoyed raw or lightly incorporated at the very end of cooking:
- Morning Boost: Toss a handful of radish or broccoli microgreens into your morning scrambled eggs, omelets, or avocado toast.
- Salad Enhancers: Mix a handful into standard spring mixes to instantly elevate the texture, color, and nutritional profile of any salad.
- Smoothie Superchargers: Blend mild varieties like kale or broccoli into your daily fruit or green smoothie—they dissolve easily without altering the sweet fruit flavor.
- Gourmet Garnishes: Top soups, grain bowls, tacos, and homemade pizzas with a crown of vibrant pea shoots or spicy arugula microgreens right before serving.
7. Troubleshooting Common Countertop Challenges
- White Mold vs. Root Hairs: Often, beginners panic when they see fuzzy white fuzz around the base of their stems and mistake it for mold. Look closely: if the fuzz looks like fine, microscopic root hairs radiating off the main roots, it is completely normal! True mold smells musty and forms web-like patches across the leaves. Prevent mold by ensuring good air circulation with a small fan.
- Leggy, Weak Stems: If your microgreens are falling over or look pale and stretched out, they are desperately craving more light. Move them closer to a grow light or a sunlit window immediately.
- Slow Germination: If your kitchen is particularly cold (common in older San Francisco or Washington homes during winter), germination can drag. Place a heating mat designed for seedlings underneath your tray to speed things up.
8. Frequently Asked Questions (FAQ)
- Do I need chemical fertilizers to grow microgreens? No, you do not! Microgreens grow so quickly (in under two weeks) that all the necessary nutrients required to sprout and develop are already packed tightly inside the seed itself. Plain water is entirely sufficient.
- Can I regrow microgreens after I harvest them? Most microgreens (like radish, broccoli, and kale) will not regrow after being cut because their growing tip is removed during harvest. However, pea shoots can occasionally produce a secondary, smaller crop if cut cleanly above the lowest set of leaves.
- Is soil required, or can I grow them hydroponically? You can easily grow microgreens hydroponically using specialized hemp, jute, or cellulose mats. Many urban gardeners prefer hydroponic mats for kitchen counters because they eliminate loose dirt entirely, keeping your kitchen counters spotless.
- How long do harvested microgreens last in the refrigerator? Once harvested, pat them completely dry, place them in an airtight container lined with a dry paper towel, and store them in your crisper drawer. They will stay fresh, crisp, and vibrant for 5 to 7 days.
- Why do my microgreens smell bad or turn mushy? This is a classic sign of overwatering combined with poor ventilation, leading to fungal rot (“damping off”). Always bottom-water your trays and make sure air can circulate freely around your counter setup.
- Are microgreens the same thing as sprouts? No! Sprouts are germinated in jars of water in total darkness and are eaten whole—roots, seed coat, and all—usually within 3 to 5 days. Microgreens are grown in soil or media, exposed to light, and you only eat the stems and leaves (leaving the roots behind).
- Can I grow microgreens in a dark kitchen without windows? Absolutely. Because microgreens grow so rapidly under artificial conditions, a simple LED under-cabinet grow light or a small desktop horticultural light fixture is all you need to grow a thriving crop in a windowless apartment kitchen.
- What are the absolute easiest microgreens for an absolute beginner? Radish and broccoli are universally considered the gold standard for beginners due to their rapid 7-day turnaround, high germination rates, and resistance to minor environmental fluctuations.
- Should I sanitize my trays between crops? Yes. Always wash your growing trays thoroughly with warm soapy water and a mild bleach or hydrogen peroxide rinse between planting cycles to kill off any lingering bacteria or mold spores.
- Can children safely help grow and eat microgreens? Microgreens are one of the most educational, safe, and exciting gardening projects for children. Watching seeds sprout from darkness to vibrant green in less than a week is a fantastic way to spark a lifelong love for healthy eating and nature.
9. Conclusion
Growing indoor microgreens on your kitchen counter is a transformative habit that combines convenience, incredible flavor, and unmatched nutritional density. Whether you are cultivating fresh greens in a high-rise view of New York, a cozy bungalow in Washington, or a sunny kitchen in Texas, California, or San Francisco, you are just a week away from your first harvest.
Grab a tray, scatter your favorite seeds, and elevate your daily wellness journey right here with kcplants!
What is your favorite microgreen variety to add to your daily meals, and what kind of kitchen setup are you using to grow yours?