How to Divide a Crowded Mother-in-Law’s Tongue Plant Into Multiple Smaller Pots Successfully
Welcome back to kcplants.com! If you are a plant lover anywhere across the diverse climates of Texas, New York, California, Washington, or San Francisco, chances are you have a Mother-in-Law’s Tongue (Sansevieria, now officially reclassified as Dracaena trifasciata).
Often called snake plants, these hardy architectural wonders are legendary for surviving neglect, low light irregular watering schedules. However, their unstoppable resilience comes with a catch: they grow via underground stems called rhizomes, pushing up thick clusters of pups until they literally crack their plastic containers wide open.
When your snake plant becomes root-bound, growth stalls, watering becomes nearly impossible as soil disappears, and the pot begins to bulge. Dividing a crowded mother-in-law’s tongue is the ultimate way to refresh your plant, curb overcrowding, and turn one overgrown specimen into a thriving army of new houseplants for free.
This comprehensive, step-by-step guide covers everything you need to know to divide your snake plant successfully, tailored to indoor growing conditions across the United States.
1. Understanding Snake Plant Growth: The Rhizome System
Before grabbing your pruning shears, it helps to understand how a mother-in-law’s tongue expands beneath the surface.
How Snake Plants Multiply
Unlike many houseplants that grow from a central crown, snake plants spread horizontally via rhizomes—stems that creep just beneath or at the soil surface.
- The Pup Factory: These underground runners send up vertical shoots (known as “pups”) that emerge as brand-new mini snake plants.
- Root Pressure: As these clusters multiply, the root ball becomes an dense, interlocking mat of thick, fleshy orange-white roots and woody rhizomes. Left unchecked, this mass will exert enough physical pressure to warp plastic nursery pots or shatter cheap ceramic containers.
Why Division is Essential
Dividing a crowded snake plant isn’t just about propagation; it’s a vital health treatment. Splitting up a root-bound plant restores nutrient availability, gives roots room to breathe, and re-invigorates stalled vertical growth.
2. Regional Timing: When to Divide Your Snake Plant
While indoor houseplants can technically be repotted year-round, timing matters significantly based on your local regional climate and indoor seasons.
The Ideal Window: Spring and Early Summer
The absolute best time to divide your snake plant is in spring or early summer.
- Biological Activity: During these warmer months, plants enter their peak growing season. Their metabolism is high, making them primed to recover quickly from root shock and rapidly push out new roots in their fresh containers.
Regional Adjustments
- New York & Washington: Avoid dividing plants in the dead of winter (December through February). Short, dark days and chilly indoor microclimates near windowsills make recovery extremely slow, elevating the risk of rot. Wait until late spring when natural daylight intensifies.
- California & San Francisco: Mild coastal climates offer more flexibility, but the foggy, damp summers in San Francisco mean you should ensure your newly divided pots are kept in a warm, well-ventilated spot to speed up initial soil drying.
- Texas: Because Texas springs arrive early and bring plenty of warmth, you can safely tackle root divisions as early as March. Just keep newly potted divisions out of scorching direct afternoon sun while they recover.
3. Tools and Materials Needed
Preparation is key to a smooth, clean division process. Gather these items before you begin:
- A Sturdy Work Surface: A tarp, potting mat, or large table (snake plant soil can get messy).
- Sharp, Sterilized Cutting Tools: A heavy-duty utility knife, kitchen knife, or garden shears. Clean them with rubbing alcohol or a 10% bleach solution to prevent transferring bacteria or fungal pathogens.
- Fresh Potting Mix: A fast-draining cactus and succulent mix or a standard potting soil heavily amended with 30% to 50% inorganic material like perlite, pumice, or coarse sand.
- New Pots: A selection of slightly larger or appropriately sized containers (terracotta pots work exceptionally well for snake plants, as explored in our other guides at kcplants.com). Ensure all pots have active drainage holes.
- Gloves and Paper Towels: Fleshy snake plant sap can occasionally irritate sensitive skin, and you’ll want towels to clean up soil.
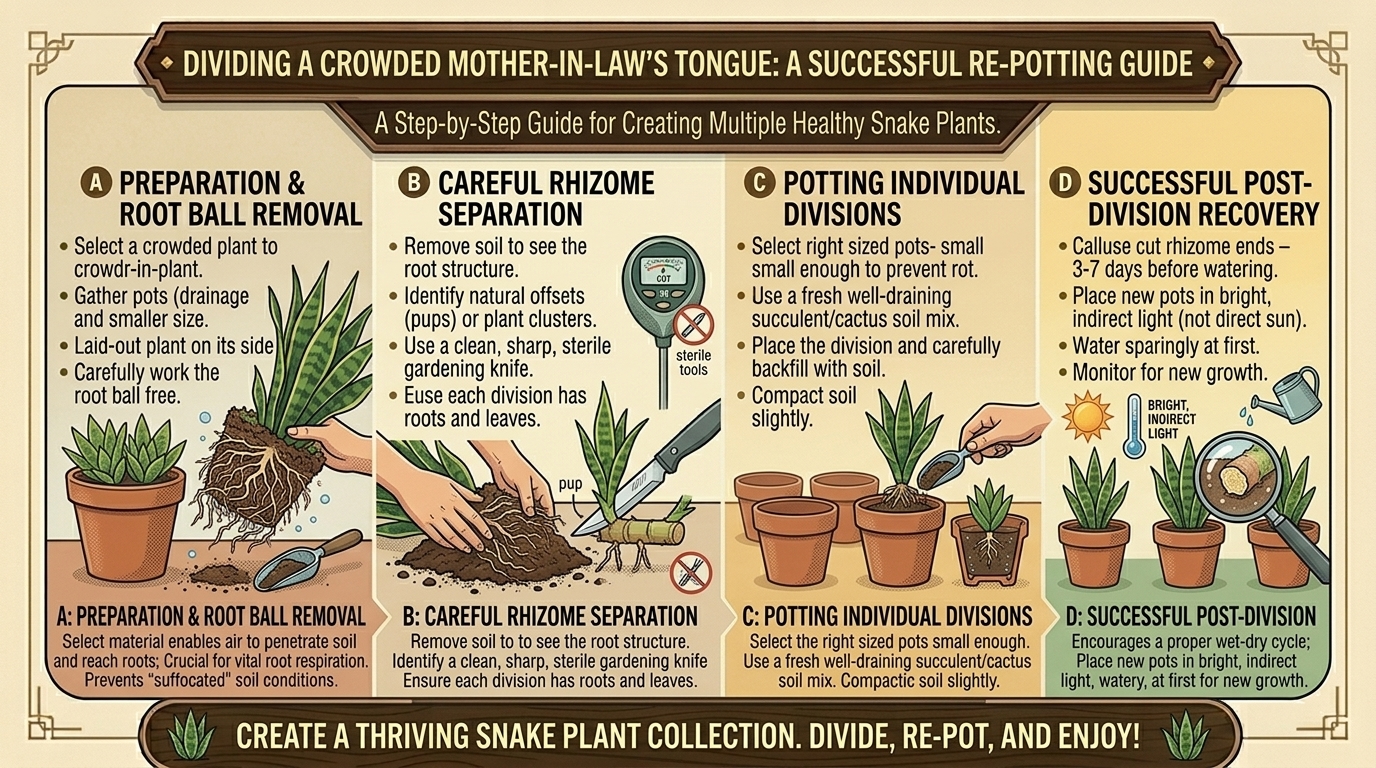
4. Step-by-Step Guide to Dividing Your Snake Plant
Follow this detailed breakdown to separate your crowded mother-in-law’s tongue without damaging the root system.
Step 1: Unpotting the Plant
Gently ease the snake plant out of its current container.
- If the pot is plastic and severely deformed by the roots, gently massage the sides or roll the pot on a flat surface to loosen the grip.
- If it’s stuck in a rigid ceramic container, never pull violently on the leaves, as they can snap at the base. Instead, slide a thin butter knife or repotting spatula around the inner perimeter of the pot to break the suction.
Step 2: Cleaning and Inspecting the Root Ball
Once out, the root mass will likely be caked tightly in old soil.
- Gentle Massage: Use your hands to gently shake, tease, and massage the root ball, loosening old, compacted dirt. You can even submerge the root mass in a bucket of lukewarm water to wash away stubborn soil, making it easier to see where individual sections connect.
- Root Inspection: Look closely for any dark, mushy, or foul-smelling roots—these are rotting and must be snipped away immediately with your sterilized knife. Healthy snake plant roots should be firm, plump, and whitish-yellow or orange.
Step 3: Locating Natural Division Points
Look at how the clusters of leaves group together.
- Every distinct cluster of vertical leaves has its own section of rhizome and root system attached.
- Identify natural gaps or narrow connecting stems where you can slice through the rhizome. Ensure each section you plan to separate has at least 2 to 3 strong leaves and a healthy portion of roots attached.
Step 4: Making the Cuts
Take your sterilized knife and make clean, decisive cuts through the connecting rhizomes.
- Don’t be afraid to use a bit of force; mature snake plant rhizomes can be remarkably tough and woody.
- Pro Tip: If a cut surface is large or slightly moist, let the divided sections sit out in a shaded, dry area for a few hours to let the wounds callous over. This prevents soil bacteria from entering the open cuts.
Step 5: Repotting Into Fresh Containers
Plant each newly divided section into its own separate pot using your fresh, well-draining soil mix.
- Depth Control: Plant the divisions at the exact same soil depth they were growing at previously. Do not bury the leaves too deep, as this can cause stem rot.
- Firming the Soil: Press the soil gently around the base of the leaves to stabilize the plant. If top-heavy, you can prop it up with small stakes temporarily until new roots anchor it down.
5. Post-Division Care: The Golden Rules
How you treat your newly divided snake plants in the weeks following surgery dictates their survival.
- Hold Off on Immediate Watering: This is the most crucial rule. Because minor root breakage is inevitable during division, watering immediately can cause open root wounds to rot. Wait 5 to 7 days before giving them their first deep watering, allowing the roots to heal and settle into the new dry soil.
- Provide Bright, Indirect Light: Keep your new pots in a bright room out of harsh, direct, scorching sun. They need energy from ambient light to recover, but direct midday sun will stress recovering leaves.
- Pause All Fertilizer: Do not feed your newly divided plants for at least 2 to 3 months. Fertilizer salts burn healing roots. Let them establish a robust root system first.
6. Frequently Asked Questions (FAQ)
1. Will single leaf cuttings grow into a new snake plant?
Yes! If you accidentally snap a leaf off during the division process, you can cut it into 3-inch sections and propagate them in water or soil. However, keep in mind that variegated cultivars (like Sansevieria trifasciata ‘Laurentii’ with yellow leaf edges) will revert to solid green when grown from leaf cuttings. To keep variegation, you must divide them via rhizomes.
2. Can I divide a snake plant in the middle of winter?
It is strongly discouraged. Winter dormancy means your plant lacks the energy and growth hormones required to heal from root trauma and grow new roots. If an emergency split is required (e.g., the pot completely shattered), keep the plant warm, use a heating mat, and water very sparingly.
3. Why are my newly divided snake plant leaves drooping?
Mild drooping is normal right after division due to temporary root shock as the plant adjusts to its new environment. Ensure it is planted securely, avoid overwatering, and give it a week or two to perk back up.
4. Do I need to use rooting hormone on the cut rhizomes?
Rooting hormone is generally not necessary for snake plants because they produce roots effortlessly on their own. However, dusting the cut ends with a little cinnamon powder can act as a natural antifungal agent to protect open wounds.
5. What is the best soil mix for divided snake plants?
Snake plants hate sitting in heavy, moisture-retentive soil. A mix composed of 50% standard indoor potting soil combined with 50% inorganic drainage amendments like perlite, coarse sand, and pumice is ideal.
6. How many pots should I make out of one crowded container?
It depends entirely on the size of the original mother plant. A large 10-inch pot packed with dense growth can often yield anywhere from 3 to 6 healthy independent divisions. Just ensure each new division has at least a few strong leaves and roots.
7. Why did my snake plant stop growing vertically before I divided it?
When a snake plant becomes severely root-bound, it runs out of physical space and nutrients in the soil. Its biological focus shifts entirely to survival rather than outward growth, which is why division triggers a massive burst of new pups.
8. Should I water the soil before or after repotting?
It is best to pot your divisions into slightly dry or barely damp soil. This encourages the roots to actively search for moisture and prevents soggy conditions around fresh cuts. Wait a week before giving them a thorough drenching.
9. Can I put multiple divided snake plants back into one large pot?
You certainly can! If you love the full, lush look of a dense container, you can group 2 or 3 of your newly divided sections together in a slightly larger pot, leaving a little room for future pup expansion.
10. How long does it take for a divided snake plant to establish new growth?
Under optimal spring and summer conditions with bright indoor light, you can expect to see new root growth and tiny emerging pups within 4 to 8 weeks after division.
Conclusion
Dividing a crowded mother-in-law’s tongue is one of the most rewarding gardening projects you can tackle. Not only does it solve structural issues like cracked pots and root-bound stagnation, but it also gifts you a collection of healthy new plants to decorate your home or share with friends.