Why Fertilizer Burn Causes Brown Edges on Indoor Plant Leaves and How to Flush Soil
Welcome back to kcplants.com! If you are a dedicated plant parent nurturing an indoor urban jungle across Texas, New York, California, Washington, or San Francisco, you have likely experienced this frustrating scenario: your favorite Monstera, Pothos, or Calathea is growing actively, and you decide to feed it with a liquid houseplant fertilizer to give it an extra boost.
A week later, instead of lush new growth, you notice ugly, scorched, brown, crispy edges creeping along the margins of the leaves.
You might instantly assume your plant is thirsty or that your indoor air is too dry. But in many cases, the real culprit is fertilizer burn (also known as nutrient burn or salt toxicity).
When chemical mineral salts from liquid fertilizers accumulate in potting soil, they create a toxic environment that dehydrates roots and scorches leaf tips.
This comprehensive, highly informative guide explores the science of nutrient toxicity, why fertilizer burn manifests as brown leaf edges, and step-by-step instructions on how to safely flush your soil to rescue your plants across every US climate zone.
1. The Science of Fertilizer Burn: Osmotic Shock
To understand why over-fertilizing causes brown edges, we have to examine how plant roots absorb water and nutrients.
The Mechanism of Osmosis
Plant roots rely on a delicate natural process called osmosis to draw water and dissolved minerals from the soil.
- Water naturally flows from an area of low solute concentration (inside the soil moisture) to an area of high solute concentration (inside the plant root cells).
- When you over-fertilize or feed a dry plant, you flood the potting mix with an excess of mineral salts (nitrogen, phosphorus, potassium, and trace elements).
- This creates the reverse effect: the concentration of salts in the soil becomes higher than the concentration inside the plant roots.
Cellular Dehydration
Instead of absorbing water, the soil literally sucks moisture out of the plant’s roots. The roots suffer osmotic shock, cell walls collapse, and the plant becomes hydraulically compromised. Because leaf margins and tips are the furthest points in the plant’s vascular network, they are the first to experience severe dehydration, turning papery, brown, and scorched.
2. Recognizing the Symptoms: Fertilizer Burn vs. Other Issues
How can you tell if those brown leaf edges are caused by fertilizer burn rather than underwatering or low humidity? Look for these distinct diagnostic signs:
- Crispy Brown Margins: The browning starts as a sharp, scorched yellow-brown halo right along the outer edges or tips of the leaves.
- White Crust on the Soil Surface: If you notice a chalky white or yellowish crust forming on top of your potting soil or clinging to the exterior rim of a terracotta pot, that is crystallized mineral salt buildup from fertilizer.
- Stunted, Deformed New Growth: Over-fertilized plants often produce distorted, warped baby leaves that struggle to unfurl properly.
- Sudden Root Dieback: If you unpot the plant, healthy white roots may be replaced by brown, brittle, or mushy roots that smell chemically stagnant.
3. Regional Indoor Factors Worsening Fertilizer Burn
Your regional climate and tap water chemistry play a massive role in how quickly mineral salts accumulate in indoor potting soil:
Texas & California (Hard Tap Water Challenges)
- The Challenge: Many cities in Texas and California have naturally “hard” tap water containing high levels of dissolved calcium, magnesium, and sodium. When you mix liquid fertilizers with hard tap water and apply it to soil, you are compounding the mineral salt load exponentially.
- The Solution: Use filtered, distilled, or rainwater when mixing liquid fertilizers, and reduce feeding frequencies during the hot summer months.
New York & Washington (Winter Dormancy Over-Feeding)
- The Challenge: During winter, indoor heating in New York and Washington drops ambient humidity and slows plant metabolism down to a near-dormant state. Well-meaning plant parents often continue fertilizing monthly out of habit. Because the plant isn’t using nutrients, salts accumulate rapidly in the cold soil.
- The Solution: Cease all fertilizing entirely from November through February, resuming weak doses only when spring growth begins.
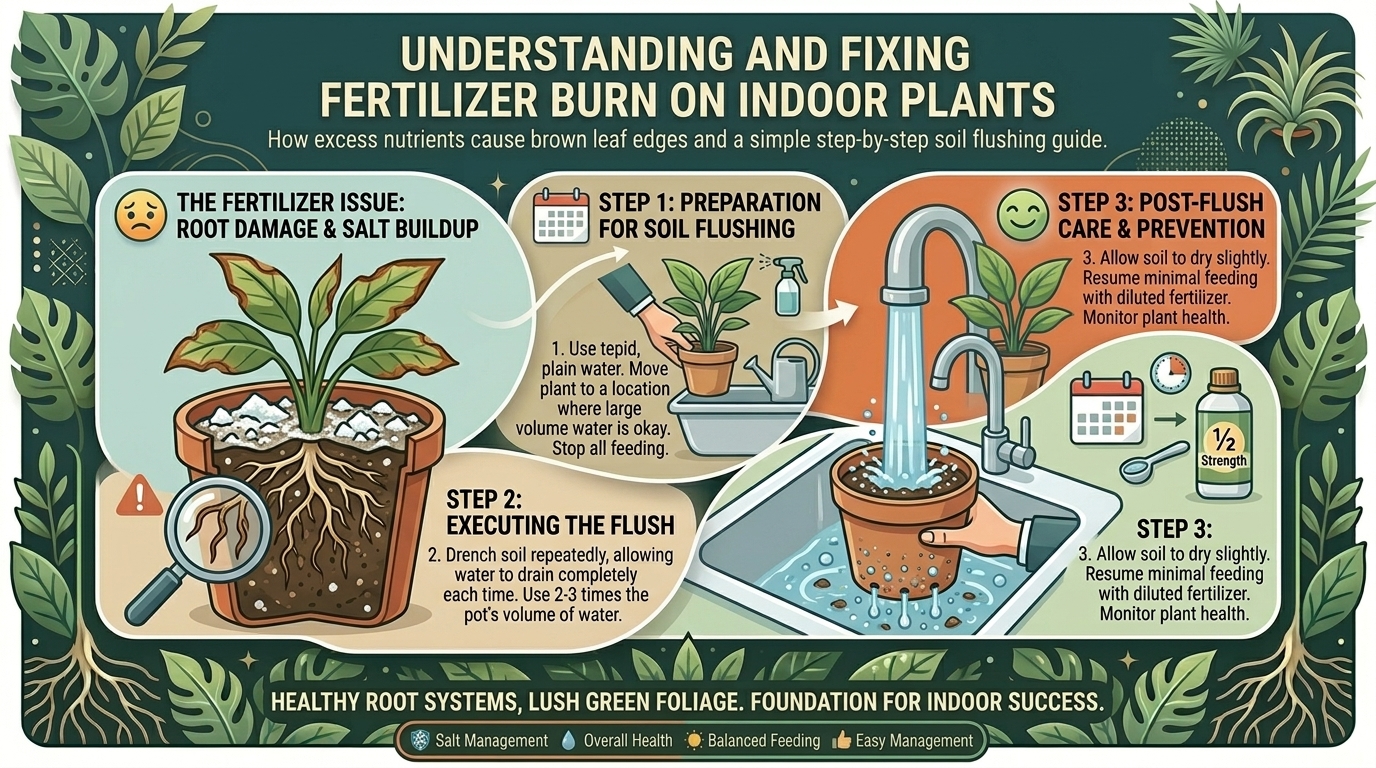
4. Step-by-Step Guide: How to Flush Soil and Remove Salt Buildup
If your plant is suffering from fertilizer burn, simply waiting it out won’t work. You must manually remove the accumulated mineral salts from the root zone through a process called soil leaching (flushing).
Step 1: Assess the Damage and Prune
- Using sterile scissors or shears, carefully trim away severely scorched, brown leaf tips and margins for aesthetic purposes. Remember to cut within the brown dead tissue, leaving a tiny 1-millimeter margin so you don’t puncture living green cells.
Step 2: Take the Plant to a Drainage Source
- Take your potted plant to a deep kitchen sink, a bathtub, or take it outdoors onto a patio where water can drain freely.
- Crucial Requirement: Your pot must have active drainage holes at the bottom for flushing to work. (If your pot lacks drainage holes, you will need to unpot and completely wash the root system in fresh soil).
Step 3: The Heavy Water Leach
- Pour room-temperature, filtered, or dechlorinated water slowly over the top of the soil.
- Allow the water to saturate the soil completely and run freely out of the bottom drainage holes.
- The Golden Rule of Flushing: Continue pouring water through the pot until the volume of water passing out of the drainage holes equals 2 to 3 times the total volume of the pot (e.g., if you have a 1-gallon pot, flush it with 2 to 3 gallons of water). This massive volume dissolves and washes away accumulated chemical salts.
Step 4: Complete Drainage
- Allow the pot to sit in the sink or basin for 30 to 45 minutes until all excess drip water has completely evacuated.
- Never return a freshly flushed, waterlogged pot directly into a sealed cachepot with standing water (as covered in our previous guides at kcplants.com).
Step 5: Post-Flush Recovery
- Place the plant back in its optimal bright, indirect lighting location.
- Do not fertilize your plant again for at least 2 to 3 months. Allow the root system time to heal, repair its microscopic root hairs, and resume normal uptake.
5. Frequently Asked Questions (FAQ)
1. How do I know if I am using too much fertilizer on my indoor plants?
Always follow the dilution instructions on your fertilizer bottle, and remember the golden rule of indoor gardening: “Weekly, weakly.” It is always safer to dilute liquid fertilizer to one-quarter or one-half strength and apply it more frequently than to douse your plant in full-strength chemical solutions.
2. Can organic fertilizers cause fertilizer burn like synthetic ones?
Synthetic chemical fertilizers release mineral salts instantly, causing rapid, severe fertilizer burn. Organic fertilizers (like fish emulsion or kelp meal) break down slower via soil microbes, making them much gentler, but excessive organic feeding can still accumulate salts over time.
3. What is that white crust on my soil and terracotta pot?
That white crust is a visual indicator of mineral salt accumulation from tap water and fertilizer residues. As moisture evaporates from the porous clay of terracotta or the soil surface, dissolved salts are left behind. You can scrub the pot with vinegar and scrape the topsoil layer away.
4. Should I repot my plant entirely if it has severe fertilizer burn?
If flushing the soil doesn’t revive the plant and the root ball is heavily encrusted with white fertilizer crystals or experiencing root rot, it is best to unpot the plant, gently rinse the old soil away from the roots under lukewarm water, and repot into fresh, clean potting mix.
5. Can I fertilize a dry plant straight out of the bag?
Never fertilize dry soil! Applying liquid fertilizer to a parched plant means the dry roots absorb the concentrated chemical solution instantly, triggering immediate osmotic shock and severe fertilizer burn. Always water your plant thoroughly with plain water a day before applying any liquid fertilizer.
6. Why did my lower leaves turn brown and drop after fertilizing?
Mobile nutrients in fertilizers (like nitrogen and potassium) are translocated by the plant toward new growth tips. However, toxic over-concentrations accumulate in the older, lower leaves first, causing them to scorch, yellow, and drop off prematurely.
7. How often should I flush my indoor plant soil as routine maintenance?
Even if you don’t suspect fertilizer burn, it is a fantastic horticultural practice to thoroughly flush your indoor plant soil with plain water every 3 to 4 months to prevent mineral salt buildup from tap water and routine feedings.
8. Are slow-release fertilizer pellets safer than liquid fertilizers?
Slow-release fertilizer spikes or granules release nutrients gradually over 3 to 6 months every time you water. While convenient, if exposed to high summer heat (like in a warm window in Texas), they can occasionally release their nutrient load too quickly, causing localized burn.
9. Can root rot mimic the symptoms of fertilizer burn?
Yes! Both root rot (from overwatering) and fertilizer burn (from high salt toxicity) damage the root system’s ability to transport water, resulting in the exact same symptom: crispy, brown leaf tips and edges. Always check your soil moisture and feeding history to diagnose correctly.
10. What N-P-K ratio is safest for general indoor tropical houseplants?
Look for a balanced, water-soluble liquid fertilizer with a stable N-P-K ratio (such as 10-10-10 or 3-1-2) formulated specifically for foliage houseplants, and always dilute it to half-strength during the growing season.
Conclusion
Fertilizer burn with its unsightly brown edges is a common pitfall for indoor gardeners, but it is easily preventable and correctable. By understanding how osmotic shock affects plant roots, practicing proper dilution ratios, avoiding fertilizing dry soil, and routinely flushing your potting mix, you can protect your indoor jungle from chemical salt toxicity.