How to Save Heirloom Tomato Seeds from Your Best Harvest to Plant Again Next Season
By the Horticultural Team at kcplants.com
There is a profound, almost magical connection that forms when you bite into a sun-warmed, perfectly ripe heirloom tomato harvested from your own backyard. Whether it is a deep, smoky Cherokee Purple, a sprawling Brandywine, or a sweet, vibrant Green Zebra, the flavor, texture, and rich history of heirloom varieties are unmatched by anything found on a commercial grocery store shelf.
Even more rewarding than eating that extraordinary tomato is preserving its genetic legacy for the future. By saving the seeds from your absolute best-performing fruit, you engage in a timeless agricultural tradition that spans thousands of years: seed saving. Unlike hybrid tomato varieties (F1 hybrids), which produce genetically unpredictable offspring, heirloom tomatoes “come true to type.” This means the seeds you harvest will grow into plants that closely mirror the parent plant, giving you the exact same exceptional flavor, disease resistance, and fruit quality year after year.
At kcplants.com, we champion region-smart cultivation techniques tailored for diverse microclimates across the United States—from the intense, baking summer sun of Texas and California to the cooler, shorter growing windows of New York, Washington, and urban spaces like San Francisco. In this comprehensive, master-class guide, we unpack the precise science, time-tested steps, and biological mechanisms required to successfully save, ferment, dry, and store your best heirloom tomato seeds for next season.
1. The Science of Tomato Seeds: Why Fermentation is Mandatory
If you have ever sliced open a ripe tomato, you likely noticed that every seed is completely encased in a slippery, gelatinous pulp sac. While beginners often make the mistake of simply wiping seeds onto a paper towel and letting them dry, this approach almost always leads to failure.
The Purpose of the Gel Sac
- Germination Inhibition: In nature, the slippery gel sac prevents the seed from germinating prematurely while still inside the moist, wet environment of the parent fruit. It contains natural chemical germination inhibitors.
- Pathogen Protection: The gelatinous coating acts as a physical barrier against seed-borne fungal and bacterial pathogens.
- The Necessity of Fermentation: To successfully save seeds for long-term storage, you must break down this gel sac. In nature, this happens when a tomato falls to the ground, rots, and ferments. In the home garden, we replicate this process using controlled biological fermentation. During a 3-to-4-day fermentation period, beneficial wild yeasts and bacteria consume the gel sac, kill off many common seed-borne bacterial diseases via natural acidity, and allow clean, viable seeds to sink to the bottom of the container.
2. Step-by-Step Seed Extraction: The Wet Fermentation Method
Fermenting tomato seeds is simple, clean, and requires nothing more than everyday kitchen items. Follow this precise protocol to process your harvest like a professional horticulturist.
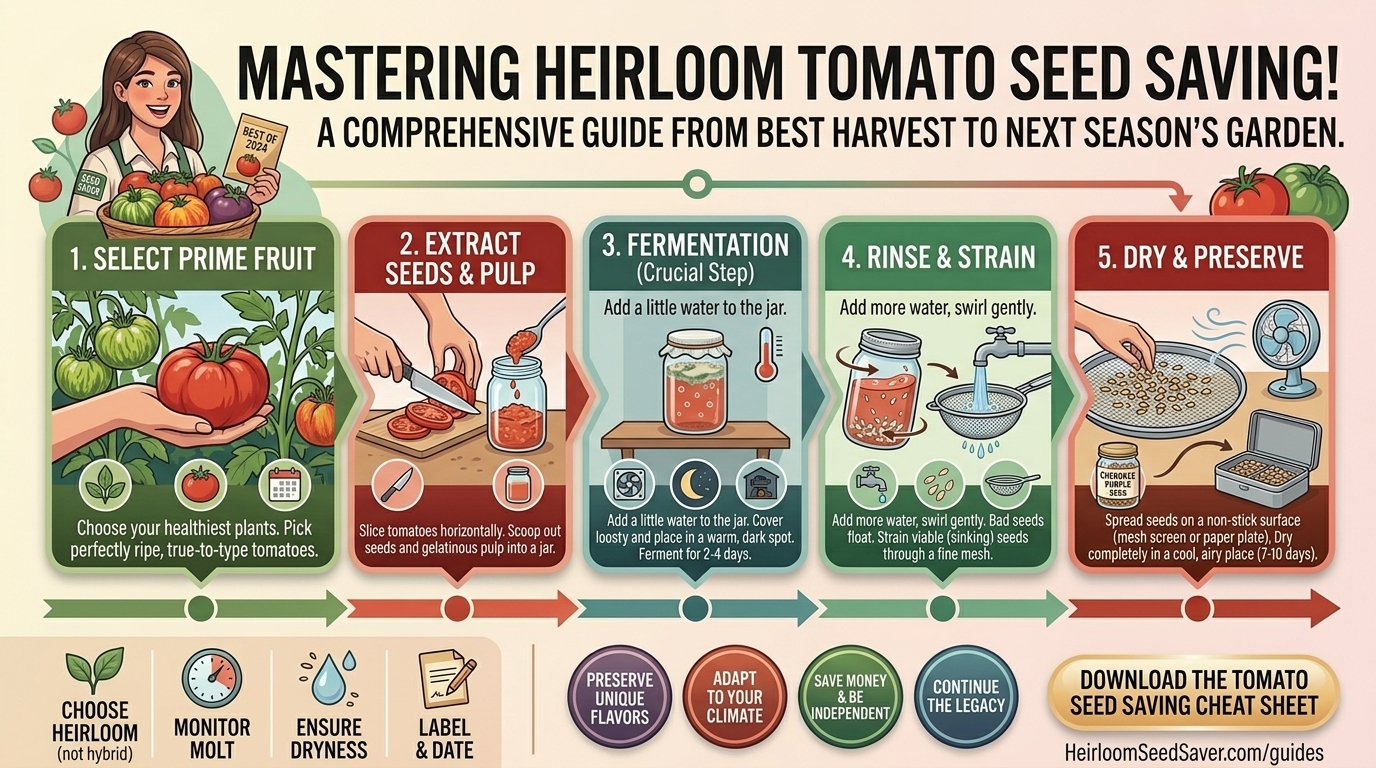
[Extract Seeds & Pulp into Container] ➔ [Cover with Breathable Cloth & Ferment (3-4 Days)] ➔ [Skim Mold & Floating Debris] ➔ [Rinse & Dry on Parchment Paper]
Step 1: Selecting Your Champion Fruit
Never save seeds from an unhealthy, diseased, or subpar plant, even if a single fruit looks decent. Choose your absolute best-performing heirloom plant: the one with the highest yield, strongest disease tolerance, and most exceptional flavor profile. Select a fruit that is completely ripe, fully colored, and unblemished.
Step 2: Squeezing and Scooping
Slice the tomato equatorially (across its middle) rather than top-to-bottom. Gently squeeze the seed cavities and use a small spoon to scoop the seeds, juices, and surrounding gel into a clean, labeled glass jar or plastic container. Add a tiny splash of water (about 2 tablespoons) if the mixture is too thick. Do not add too much water, or the seeds may germinate prematurely.
Step 3: Incubation and Airflow
Cover the mouth of the jar with a breathable fabric square (such as cheesecloth, a coffee filter, or a paper towel) and secure it tightly with a rubber band. This allows gases to escape while keeping fruit flies out. Place the jar in a warm room (70°F to 80°F) out of direct sunlight—such as a kitchen counter or top of a refrigerator.
Step 4: Monitoring the Fermentation Process
Over the next 48 to 72 hours, check your jar daily. As wild fermentation takes hold, a layer of white or grey mold will form across the top surface of the liquid. This is completely normal and desirable! You will also notice a distinct, slightly pungent fermented aroma. Once a solid white fungus blanket covers the surface (usually around Day 3 or 4), the process is complete. Do not let the fermentation run past 5 days, or the seeds may absorb too much moisture and begin sprouting inside the jar.
3. Washing, Separating, and Drying Your Seeds
Once fermentation is complete, you must quickly separate the clean, viable seeds from the mold and pulp layer.
- Break the Mold: Remove the fabric cover and gently break through the surface mold layer using a spoon.
- Decantation (The Pour-Off): Add lukewarm water to the jar, stir vigorously, and let the mixture settle for 10 to 15 seconds. Viable, healthy tomato seeds are dense and will sink immediately to the bottom of the jar.
- Skim Debris: Pour off the top layer of water, floating debris, pulp, and mold. Add fresh water, stir, settle, and repeat this decantation process 3 to 4 times until the water runs completely clear and only clean seeds remain at the bottom.
- Strain: Pour the remaining clean seeds through a fine-mesh kitchen sieve. Shake off excess moisture.
- Drying on the Right Surface: Dump the seeds onto a paper plate, ceramic plate, or parchment paper. Never use standard paper towels for drying heirloom tomato seeds; the wet gelatinous residue bonds permanently to wood-fiber paper towels, making it nearly impossible to peel the dry seeds off later without tearing the paper.
- The Drying Phase: Spread the seeds out into a single, uniform layer. Place them in a warm, well-ventilated room out of direct sunlight for 5 to 7 days. Stir them daily with your fingers to prevent them from clumping together as they dry.
4. How to Test if Your Seeds Are Properly Dried
Storing seeds that still contain microscopic internal moisture is the number one cause of mold growth and seed death during storage.
- The Bend Test: Take a dry seed and try to bend it. A properly dried seed will be rock-hard and will snap or resist bending entirely. If it flexes or feels rubbery, it needs several more days of drying.
- The Hammer Test (or Crush Test): Place a seed on a hard surface and press down with the flat side of a knife. A fully dry seed will shatter or crack cleanly; a damp seed will flatten out without breaking. (Save a test seed for this, or rely on the hardness test!)
5. Regional Adaptations Across the United States
Climate conditions during your harvest season dictate how you manage your seed-saving workflow:
Texas & Inland California
- The Challenge: High ambient heat and late-summer humidity can accelerate fruit over-ripening on the vine, while rapid drying conditions require careful management to prevent seed overheating.
- The Strategy: Harvest your seed tomatoes in the cooler morning hours. During the fermentation phase, keep jars in an air-conditioned room to prevent rapid over-fermentation. When drying, keep parchment papers away from direct, hot window sunlight.
New York & Washington State
- The Challenge: Shorter growing seasons mean you must time your final fruit harvests before early autumn frosts arrive. Cooler indoor ambient temperatures can also slow down the seed fermentation process.
- The Strategy: If outdoor plants are threatened by early frost or heavy autumn rains, pick fully mature, blush-colored heirloom tomatoes and let them ripen indoors on a sunny windowsill for a week before extracting seeds. Place fermentation jars in the warmest room of your house (near a stove or appliance) to ensure complete biological breakdown within 4 days.
San Francisco & Coastal Microclimates
- The Challenge: Persistent cool marine fog, high relative humidity, and lower ambient indoor temperatures can drastically lengthen the seed-drying phase.
- The Strategy: Because San Francisco air holds high moisture, your seeds may take up to 10 days to dry completely on parchment paper. Consider placing a small oscillating fan on low speed nearby to promote gentle air circulation across your drying trays.
6. Proper Storage: Keeping Seeds Viable for Years
Once your seeds are 100% dry, proper storage is what stands between a successful next season and total failure. Tomato seeds are remarkably hardy; when stored under optimal conditions, their germination rates remain high for 4 to 10 years.
The Three Enemies of Stored Seeds
- Heat: High temperatures trick seeds into breaking dormancy. Never store seed packets in a warm garage, garden shed, or sunny kitchen cabinet.
- Moisture: Humidity causes fungal growth and activates internal metabolic processes, destroying seed viability rapidly.
- Light: Ultraviolet light degrades cellular structures inside the seed over time.
The Ideal Storage Protocol
- Containers: Store your dried seeds in paper envelopes, small glass vials with tight lids, or Mylar foil packets. Label every packet clearly with the variety name and the harvest year.
- The Cool, Dark Environment: Place your labeled seed envelopes inside an airtight glass mason jar or a plastic storage bin with a tight rubber gasket.
- The Desiccant Trick: Toss a food-grade silica gel packet (the kind found in medicine bottles or new shoe boxes) inside the container to absorb any lingering ambient humidity.
- Location: Store the airtight container in a cool, dark, temperature-stable location. A dark basement, a cool closet, or the back shelf of your refrigerator (not the freezer, unless vacuum-sealed) provides the ultimate longevity.
7. Common Seed-Saving Pitfalls to Avoid
Even seasoned gardeners occasionally make mistakes during the seed-saving process. Keep these common missteps in mind:
- Saving Seeds from F1 Hybrids: Always check your seed packet tags. If your tomato is labeled an F1 Hybrid (e.g., Early Girl, Celebrity), saving its seeds is a waste of time. The resulting plants will segregate genetically, producing erratic, unpredictable, and usually inferior fruit. Stick exclusively to heirlooms and open-pollinated varieties.
- Accidental Cross-Pollination: While tomatoes are primarily self-pollinating because their flowers possess both male and female organs inside a closed anther cone, bees can occasionally cross-pollinate varieties planted very close together. To guarantee 100% pure seed, space different heirloom varieties at least 20 to 50 feet apart, or use blossom bags.
- Rushing the Drying Process: Storing seeds into airtight containers before they are thoroughly dry leads to rapid mold development and zero germination next spring. When in doubt, give them two extra days of drying.
8. Step-by-Step Summary Checklist for Seed Savers
- Identify a healthy, disease-free heirloom plant and pick a fully ripe fruit.
- Slice the tomato across its equator and scoop seeds and gel into a clean glass jar.
- Cover the jar with a breathable cloth and secure with a rubber band.
- Ferment for 3 to 4 days at room temperature until a surface mold layer forms.
- Rinse and decant daily, discarding floating debris and saving the heavy seeds at the bottom.
- Drain through a fine-mesh sieve.
- Dry on parchment paper (never paper towels) in a well-ventilated room for 5 to 7 days.
- Test that seeds are completely hard and brittle.
- Store in labeled paper envelopes inside an airtight jar with a silica packet in a cool, dark location.
9. Frequently Asked Questions (FAQ)
1. Can I save seeds from any tomato I buy at the grocery store?
Only if it is specifically labeled as an heirloom variety. Most standard tomatoes sold in grocery stores are F1 hybrids grown for commercial shipping durability. Seeds saved from hybrid tomatoes will not grow true to type and will produce unpredictable results.
2. Why is the fermentation step necessary for tomato seeds?
Fermentation destroys the slippery gel sac surrounding each seed, which contains natural chemical germination inhibitors. It also uses wild bacteria and acidity to kill off seed-borne bacterial and fungal pathogens, ensuring clean, viable storage.
3. What happens if I leave my tomato seeds in the fermentation jar too long?
If you let the mixture ferment past 5 or 6 days, the seeds can absorb too much water from the rotting pulp and begin germinating (sprouting) right inside the jar, which destroys their viability for long-term storage.
4. Why shouldn’t I dry my tomato seeds on paper towels?
Wet tomato seed gel forms a strong natural bond with the wood-fiber matrix of standard paper towels as it dries. When you try to peel the seeds off later, the paper tears and sticks permanently to the seed coats. Always use parchment paper or ceramic plates.
5. How long do saved heirloom tomato seeds remain viable?
When stored properly in a cool, dark, dry environment, heirloom tomato seeds maintain high germination rates for 4 to 10 years, though their germination vigor gradually declines over time.
6. Do I need to worry about cross-pollination between different tomato varieties?
Tomato flowers are primarily self-pollinating, so cross-pollination is relatively rare. However, if you are growing multiple heirloom varieties right next to each other and bees visit them, natural cross-pollination can occur. For absolute purity, separate varieties by 20+ feet or cage them.
7. Can I store my saved tomato seeds in the freezer?
Not unless they are professionally vacuum-sealed. Standard home freezers contain fluctuating humidity levels and frost cycles. If moisture gets into the seed cells and freezes, ice crystals will rupture the seed embryos and kill them instantly. Stick to a cool refrigerator shelf or a dark basement.
8. How do I know if my dried seeds are actually ready for storage?
Try to bend a seed or crush it with a flat blade. A properly dried seed will be rock-hard and snap cleanly. If it flexes, bends, or flattens out without breaking, it needs more drying time.
9. Will seeds from a green heirloom variety (like Green Zebra) grow true?
Yes! As long as the variety is an open-pollinated heirloom (and not a hybrid), saving seeds from a ripe Green Zebra tomato will produce true-to-type Green Zebra plants next season, regardless of their mature color.
10. Should I wash my seeds with bleach or hydrogen peroxide?
It is not necessary if you complete the natural fermentation process correctly. The natural acidic fermentation process kills off most harmful pathogens. However, some advanced seed savers use a weak 10% bleach solution rinse as an extra sanitizing step, though thorough water rinsing is usually more than enough for home gardens.
10. Conclusion
Saving heirloom tomato seeds from your best harvest is one of the most rewarding, cost-effective, and deeply traditional skills a gardener can master. By embracing the simple science of wet fermentation, proper drying techniques, and cool, dark storage, you take active control of your garden’s genetic future.