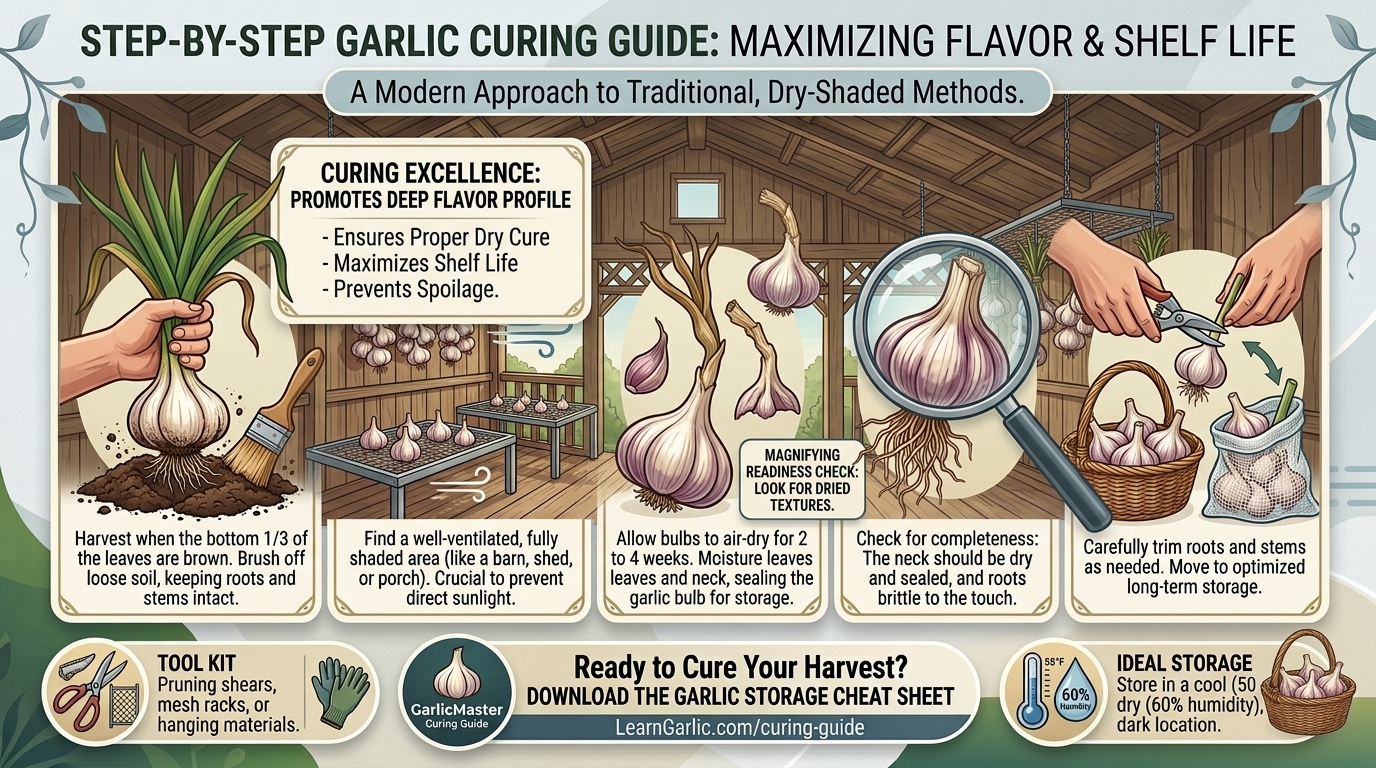
How to Cure Harvested Garlic Bulbs in a Dry Shaded Area Before Storing Them Away
There is a profound sense of accomplishment that comes with unearthing a bountiful harvest of homegrown garlic. After months of watching green shoots push through the winter soil, weathering spring rains, and clipping away stubborn flower scapes, finally lifting those plump, subterranean spheres out of the dirt feels like unearthing buried treasure.
Yet, your job as a master gardener is only half done the moment the garlic leaves the ground.
Freshly harvested garlic—often referred to as “wet garlic” or “green garlic”—is high in moisture, wrapped in delicate, unsealed outer skins, and vulnerable to molds and rots. If you toss freshly dug garlic straight into a dark pantry or plastic bin, it will spoil, mold, or sprout within weeks.
The essential bridge between your garden bed and long-term pantry storage is curing: the slow, deliberate process of drying out the bulbs in a protected, shaded environment.
Whether you are gardening under the intense late-spring sun of Texas, navigating the humid transitions of New York, managing the diverse microclimates of California, working the temperate maritime air of Washington, or tending a compact urban plot in San Francisco, mastering the art of curing ensures your garlic stays crisp, aromatic, and shelf-stable for months.
This comprehensive, SEO-optimized guide walks you through the complete science, strategy, and step-by-step instructions for curing harvested garlic bulbs in a dry, shaded area.
Introduction: Why Curing is the Most Critical Step in Garlic Cultivation
Many novice gardeners make the mistake of assuming garlic is ready to eat and store the exact second it is pulled from the soil. In reality, freshly harvested garlic is biologically active, holding significant water weight within its fleshy cloves and outer wrappers.
Curing accomplishes three vital objectives:
- Seals the Wrapper: As the green foliage and roots slowly dry down, the plant channels its remaining energy and sugars into the bulb while papery outer layers shrink, dry, and tighten around the cloves. This creates an impermeable, natural armor that locks out bacteria and pests.
- Eliminates Excess Moisture: Moisture is the enemy of long-term food preservation. Curing evaporates excess water from the core, preventing damp rot and fungal development.
- Concentrates Flavor: The slow drying process concentrates the complex sugars, organic sulfur compounds, and aromatic oils that give garlic its signature pungent, savory punch.
Without proper curing, your hard-earned harvest will last barely two weeks. With proper curing, hardneck varieties can store safely for 4 to 6 months, and softneck varieties can last up to 9 to 12 months.
The Anatomy of the Curing Process: What Happens Inside the Bulb?
To cure garlic successfully, you need to understand what is happening beneath the papery skin. When you lift a garlic plant, you sever its connection to the underground root system. However, the plant is still technically alive.
As you hang or lay out the garlic in a shaded area, the plant undergoes a controlled senescence (aging process). The bulb draws down the remaining moisture and chlorophyll from the green leaves and thick stem, sealing off the neck where the stem meets the bulb. Once this neck is completely dry and pinched shut, pathogens are barred from entering the vulnerable interior of the bulb.
Regional Curing Challenges Across the US
Depending on where your garden is located, regional weather conditions during early summer (typically June and July) will dictate how you manage your curing environment:
- Texas: Texas summers arrive with blistering heat. While heat is helpful for drying, direct scorching sunlight will literally cook your garlic bulbs, turning them translucent, rubbery, and bitter. Texas growers must strictly prioritize deep shade and maximum airflow (such as a covered, open-air porch, breezeway, or shaded garage) to prevent heat damage.
- New York: Early summer in New York can bring high humidity and sudden rainstorms. High humidity is dangerous during curing because it slows down the drying process, inviting mold. New York gardeners should cure indoors in a well-ventilated space (like an unfinished basement with a running dehumidifier, a covered porch, or a spare room with oscillating fans).
- California & San Francisco: San Francisco’s cool, coastal fog provides a unique challenge—high ambient humidity combined with cool air. While temperatures are mild, you must avoid curing outdoors in the direct fog layer. Bring your harvested garlic into a dry garage, shed, or sheltered patio with good air movement. Interior California growers can utilize shaded, breezy carports.
- Washington: Western Washington’s maritime climate demands caution regarding moisture. Never leave curing garlic exposed to unexpected summer drizzle or heavy morning dew. A covered, open-sided shed or indoor room with constant airflow is essential.
Step-by-Step Guide: How to Cure Garlic Bulbs Like a Professional
Follow this systematic framework to take your garlic from fresh-dug to pantry-ready.
Step 1: Gentle Cleaning (Do Not Wash!)
- Once you gently unearth your garlic bulbs with a garden fork, shake or brush off large clumps of loose soil from the roots and bulb wrapper.
- Crucial Rule: Never wash your garlic with water before curing. Introducing moisture to fresh bulbs invites fungal spores and mold to take hold during the drying process. Leave the dirt-stained outer skin alone; it will flake off cleanly once the curing is complete.
- Keep Stems and Roots Intact: Do not trim the roots or cut off the green leaves yet! As the garlic cures, the bulb continues to draw vital nutrients and moisture downward from the foliage, ensuring maximum bulb size and flavor concentration.
Step 2: Select the Ideal Curing Location
Choose your curing spot based on three non-negotiable criteria:
- Dry: Low relative humidity (ideally under 60% if possible).
- Shaded: Absolute protection from direct sunlight (UV rays bleach wrappers and cook the oils).
- Well-Ventilated: Constant, gentle air movement is mandatory. Stagnant air breeds mold.
Ideal spots include: A covered, open porch, a dry garage, a shaded carport, an empty garden shed, or an indoor room equipped with an oscillating fan on low speed.
Step 3: Choose Your Curing Method
There are two primary methods for setting up your garlic during the drying phase:
- The Hanging Method (Bundles): Gather 5 to 10 garlic plants together, aligning their stems, and tie them securely near the base of the stalks using soft garden twine or string. Hang the bundles upside down from rafters, hooks, or clotheslines in your shaded drying area. This method maximizes vertical floor space and optimizes airflow around every single bulb.
- The Flat-Lay Method (Wire Racks or Slats): If you prefer not to hang them, lay the harvested plants out in a single, non-overlapping layer on wire mesh tables, slatted shelving, or even clean cardboard sheets and pallets. Ensure the plants are not piled on top of one another, as stacked garlic will trap moisture and rot in the middle.
Step 4: The Waiting Period (2 to 4 Weeks)
Leave your garlic undisturbed in its shaded, breezy sanctuary for 2 to 4 weeks (depending on your local humidity and ambient temperature).
During this time, you will notice the green leaves slowly turn yellow, then brown and papery. The roots will become brittle and dry like straw.
How to Tell When Garlic is Fully Cured
How do you know when the curing process is complete and the bulbs are ready for long-term storage? Check for these physical indicators:
- The Wrapper Test: The outer wrappers are completely dry, crisp, and papery to the touch.
- The Root Test: The root cluster is stiff, brittle, and dry.
- The Neck Test (The Ultimate Indicator): Cut open one test stem or squeeze the neck right above the bulb. If the stem feels even slightly damp, spongy, or fleshy on the inside, it is not ready. The neck must be 100% dry, brown, and pinched tightly shut like a dry twig. If you store garlic with a moist stem, trapped water will rot the entire bulb from the inside out.
Post-Curing Processing and Storage Preparation
Once your garlic has successfully cured, it is time to prep the bulbs for long-term pantry storage.
Step 1: Trimming Stems and Roots
- Using clean, sharp garden shears or pruning snips, cut the stems down to roughly 1 to 2 inches above the bulb. (Never cut too close to the shoulder of the bulb, or you risk exposing the cloves to air and bacteria).
- Trim the brittle roots down to about 1/4 to 1/2 inch long to prevent them from catching on storage baskets or gathering dirt.
Step 2: Gentle Cleaning
- Gently brush away any remaining dried dirt clinging to the roots or outer skins.
- You can peel away the single outermost, dirt-stained wrapper layer to reveal a clean, attractive, papery white or purple skin beneath. Do not strip off too many layers, as these wrappers protect the cloves.
Note: If you grew softneck garlic and prefer the classic braided look for hanging storage, skip trimming the stems! Instead, braid the pliable long dry stalks together into an ornamental garlic braid.
Long-Term Storage Best Practices
Now that your cured garlic is prepped and trimmed, follow these rules to maximize its shelf life in your home:
- Temperature: Store in a cool, dark, dry place with temperatures between 55°F and 60°F (13°C to 15°C). A pantry, cool basement, or dark cupboard is ideal.
- Air Circulation: Store your bulbs in wire baskets, mesh produce bags, brown paper bags with ventilation holes, or open shallow crates. Never store garlic in airtight plastic bags or plastic containers, as they trap ambient humidity and trigger rapid sprouting.
- The Refrigerator Warning: Never store whole garlic bulbs in the refrigerator. The cold temperatures combined with refrigerator humidity trick the garlic into thinking it is experiencing winter, triggering immediate sprouting and bitter rot. (Only peeled individual cloves should go into the fridge or freezer for short-term culinary use).
- Avoid Onion Proximity: Do not store garlic right next to onions or potatoes. Onions emit ethylene gas that accelerates sprouting, and potatoes release moisture that causes garlic to mold.
10 Essential FAQs About Curing Harvested Garlic
1. Why is direct sunlight bad for curing garlic bulbs?
Direct sunlight acts like an oven. The harsh UV rays and intense heat literally cook the garlic bulbs, turning the internal cloves translucent, rubbery, and chemically altering their flavor into a bitter, unpalatable mess. Always cure in deep shade.
2. Can I wash my freshly harvested garlic before curing it?
No. Washing fresh garlic introduces unwanted water into the damp outer wrappers and root zone, drastically increasing the risk of mold, bacterial soft rot, and fungal outbreaks during the drying phase. Brush off dry soil and leave water for after curing (or just wash when cooking).
3. How long does the entire curing process take?
Typically 2 to 4 weeks, depending on your climate. In hot, dry regions, it may take closer to 2 weeks; in humid or cooler coastal regions (like San Francisco or Washington), it can take 4 weeks or longer.
4. What happens if I cut the green leaves off immediately upon harvesting?
Cutting the green leaves off right at harvest robs the bulb of valuable nutrients and moisture that the plant naturally pulls down during the drying process. Furthermore, cutting fresh green stems leaves a wide, wet open wound that invites airborne pathogens and rots the bulb. Always cure with stems attached.
5. How do I know for sure if my garlic neck is dry enough?
Feel the stem directly above the bulb. If it feels firm, woody, and completely dry like a twig, it is cured. If it feels spongy, plump, or damp when squeezed, the interior moisture has not fully evaporated, and storing it now will cause it to rot.
6. Can I cure garlic indoors if the weather outside is too humid or rainy?
Yes! In fact, many indoor gardeners in humid climates successfully cure garlic inside an air-conditioned room, basement, or garage by setting up an oscillating fan on low speed to maintain continuous air movement over hanging or rack-laid bundles.
7. What is the difference in storage life between hardneck and softneck garlic?
Hardneck garlic features stiff central stems and rich complex flavors, typically storing well for 4 to 6 months. Softneck garlic features pliable stems (ideal for braiding) and a milder flavor, storing significantly longer—up to 9 to 12 months—due to its multi-layered, tight clove structure.
8. Why are my curing garlic bulbs turning yellow or brown on the outside?
That is entirely normal and desired! The outer wrappers transition from green to papery white, tan, or purple as they dry out, tightening around the cloves to form a protective shield.
9. Can I store my cured garlic in the refrigerator?
No. Whole bulbs stored in the refrigerator are exposed to cold and humidity, which breaks their dormancy and triggers rapid sprouting and mold. Keep whole bulbs in a cool, dark, dry pantry.
10. What should I do if I notice mold on a garlic bulb while it is curing?
Immediately isolate and remove any moldy bulb from the curing area so the mold spores do not spread to your healthy harvest. Check your ventilation and humidity levels, as mold indicates that your drying space is either too damp or lacks sufficient air circulation.
Conclusion
Curing is the vital link between a successful garden harvest and a pantry full of flavorful, long-lasting culinary treasures. By taking the time to dry your garlic properly in a dry, shaded, and well-ventilated area, you transform perishable green crops into shelf-stable bulbs wrapped in protective, papery armor.