How to Use Expanded Clay Pebbles in the Bottom of Decorative Cachepots to Catch Drainage Water
Welcome back to kcplants.com! If you are a passionate houseplant collector living anywhere from the sun-drenched homes of Texas to the high-rises of New York, the coastal apartments of San Francisco, or the vibrant urban spaces of California and Washington, you likely love the look of gorgeous decorative cachepots.
Cachepots—those stylish, un-drilled outer ceramic, metal, or glass containers—allow you to hide ugly plastic nursery pots while adding a chic, polished design element to your interior spaces.
However, cachepots present a notorious indoor gardening trap: drainage management. When you water your plants inside a cachepot, excess water runs out of the nursery pot and pools invisibly at the bottom. If left unchecked, the inner nursery pot sits submerged in this standing water, leading to severe root rot, oxygen starvation, and plant decline.
The ultimate insider trick used by professional horticulturists to solve this problem is adding a layer of expanded clay pebbles (often known by brand names like Lechuza Pon or Hydroton) at the bottom of the cachepot.
This comprehensive guide explores the science of drainage management, how expanded clay pebbles protect your plants, and step-by-step instructions for setting up a foolproof cachepot drainage system across diverse US climate zones.
1. The Dangers of the “Cachepot Trap”
To understand why expanded clay pebbles are essential, we must first look at why traditional cachepot usage often goes wrong.
The Hidden Swamp Hazard
When you water a potted plant, gravity pulls excess moisture downward. If your nursery pot sits directly on the flat bottom of an un-drilled cachepot:
- The water escaping the drainage holes has nowhere to escape. It collects into a hidden puddle at the bottom of the outer pot.
- Capillary action draws that standing water back up into the soil of the nursery pot.
- The lower root zone remains waterlogged indefinitely, cutting off oxygen and inviting anaerobic bacteria and root-rotting fungi.
Why Emptying Saucers Isn’t Always Enough
Many plant parents try to empty their cachepots after watering, but doing so with heavy plants, tightly fitted pots, or delicate tropicals is messy, inconvenient, and frequently forgotten—especially when managing a large indoor jungle.
2. What Are Expanded Clay Pebbles? (Leca / Hydroton)
Expanded clay pebbles are lightweight, porous ceramic balls made by heating natural clay to extremely high temperatures (around 1,200°C or 2,192°F).
Key Physical Properties:
- Inert and pH-Neutral: They do not break down, rot, or alter the chemical composition or pH of your potting soil.
- High Porosity: While smooth on the outside, the interior of each pebble is honeycombed with tiny air pockets that absorb moisture and release it slowly via evaporation.
- Incredible Lightweight: Unlike heavy river rocks or gravel, clay pebbles add zero burdensome weight to your decorative planters.
3. How Clay Pebbles Act as a Drainage Buffer
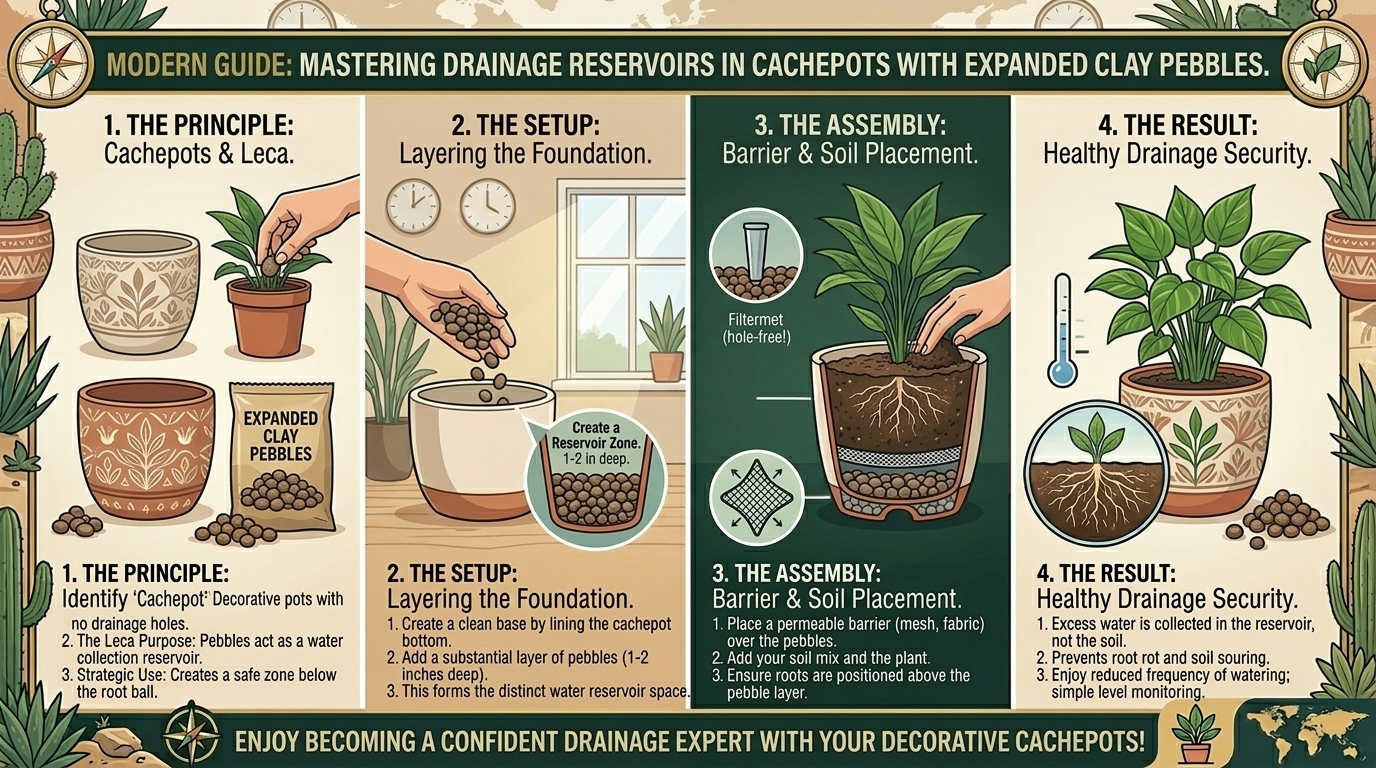
When you place a 1-to-2-inch layer of expanded clay pebbles at the bottom of a cachepot before inserting your nursery pot, you create a drainage reservoir buffer zone.
- Elevating the Root Zone: The pebbles physically lift the inner nursery pot above the floor of the outer cachepot, creating an airspace gap.
- Catching Excess Runoff: When you water your plant, any excess water flows out of the nursery pot and trickles down through the spaces between the clay pebbles, pooling safely at the very bottom of the cachepot.
- Preventing Soil Contact: As long as the water level at the bottom does not exceed the height of your pebble layer, your nursery pot’s drainage holes never touch standing water. The roots remain safely elevated and aerated.
4. Regional Considerations Across the US
Your local indoor climate influences how your cachepot drainage system functions:
New York & Washington (Dry Winter Heat vs. Humid Summers)
- The Challenge: During winter, indoor heating dries out ambient air rapidly, but stagnant cachepot water can linger because indoor air circulation drops.
- The Solution: The porous nature of expanded clay pebbles actually allows trapped drainage water to evaporate slowly and safely upward, providing a mild, beneficial humidity boost to your tropical plants without waterlogging the roots.
San Francisco & California (Coastal Dampness)
- The Challenge: Coastal fog and high humidity mean indoor soil and cachepot water take much longer to dry out naturally.
- The Solution: Use a slightly deeper layer of clay pebbles (2 inches) to ensure a higher elevation buffer, and always check that your cachepot runoff doesn’t exceed the pebble line.
Texas (Rapid Evaporation & AC Cycles)
- The Challenge: Continuous AC running in Texas homes dries out topsoil quickly, but hidden cachepot puddles can occasionally breed fungus gnats if organic debris falls into them.
- The Solution: Periodically lift your nursery pot and rinse out your cachepot pebbles every few months to keep the drainage reservoir fresh and clean.
5. Step-by-Step Guide: Setting Up Clay Pebbles in Cachepots
Follow this simple, step-by-step process to bulletproof your decorative plant displays.
Step 1: Selecting the Right Cachepot and Nursery Pot
Ensure your inner plastic nursery pot has active drainage holes at the bottom, and that your outer decorative cachepot is roughly 1 to 2 inches wider and taller than the nursery pot, leaving room for airflow and pebbles.
Step 2: Rinsing New Clay Pebbles
Before using expanded clay pebbles for the first time, rinse them thoroughly in a colander under running water to wash away manufacturing dust and fine clay powder.
Step 3: Creating the Pebble Buffer Layer
Pour a 1-to-2-inch layer of clean expanded clay pebbles into the bottom of the empty decorative cachepot. Shake the pot gently so the pebbles settle evenly across the base.
Step 4: Inserting and Checking the Height
Place your potted plant (in its plastic nursery pot) directly on top of the clay pebble layer.
- Look down into the gap between the pots. Ensure the bottom of the nursery pot sits comfortably above the top line of the pebbles.
Step 5: Watering with Confidence
You can now water your plant normally right inside the cachepot setup! Excess water will drain through the nursery pot, filter through the clay pebbles, and collect safely at the bottom out of reach of your plant’s roots.
6. Frequently Asked Questions (FAQ)
1. Can I use regular outdoor river rocks or gravel instead of expanded clay pebbles?
You can, but it is not recommended. Regular river rocks are extremely heavy, making your decorative pots cumbersome to move. Furthermore, rocks are non-porous and do not offer the moisture-regulation benefits that lightweight, porous expanded clay provides.
2. Can I plant my houseplant directly into a cachepot filled with clay pebbles (Semi-Hydroponics)?
Yes! This is known as passive hydroponics or the LECA growing method. However, if you are using clay pebbles just to catch drainage water, you must keep the plant in its inner nursery pot resting on top of the pebbles, rather than planting it directly into the pebbles without soil.
3. How often do I need to empty the standing water from the bottom of the cachepot?
If you add a proper 1-to-2-inch layer of pebbles and do not over-pour, the trapped water will naturally evaporate over a few days. However, if you notice a large pool of standing water touching the bottom of your nursery pot, tilt the cachepot and pour it out to prevent stagnation.
4. Do expanded clay pebbles attract pests like fungus gnats?
No, clay pebbles are inorganic and sterile, meaning they do not attract pests on their own. However, if organic debris (like dropped dead leaves or wet potting soil) falls down into the pebbles and stays wet, it can attract fungus gnats. Keep your cachepots clean!
5. Can I wash and reuse expanded clay pebbles?
Absolutely! If you repot a plant or change your decor, simply scoop out the clay pebbles, wash them in hot water with a little dish soap or hydrogen peroxide to sterilize them, rinse thoroughly, and they are ready to be reused indefinitely.
6. Do expanded clay pebbles raise humidity for indoor tropicals?
Yes, slightly! As excess water collects at the bottom of the cachepot among the porous clay pebbles, it evaporates upward around the nursery pot, creating a localized micro-humidity zone that plants like Calatheas and Ferns adore.
7. What size expanded clay pebbles should I buy for cachepots?
Standard horticultural grade pebbles (typically 8mm to 16mm in diameter) work best for the vast majority of decorative cachepots, providing an ideal balance of air gaps and structural support.
8. Why are my cachepot pebbles turning white or powdery?
That white chalky residue is mineral salt buildup from your tap water or fertilizer runoff. As the trapped water evaporates through the clay pebbles, dissolved minerals are left behind. You can easily remove the pebbles and soak them in a water-and-vinegar solution to dissolve the crust.
9. Will clay pebbles rot the roots of my plant if they touch?
If the water level at the bottom of the cachepot rises high enough to submerge the clay pebbles and touch the bottom of the nursery pot, root rot can occur. Always ensure your watering volume leaves a safe margin so water stays below the top of the pebble layer.
10. Where can I buy expanded clay pebbles?
Expanded clay pebbles are widely available at local garden centers, hydroponic supply stores, and online plant retail sites under various brand names like Hydroton, Lechuza Pon, or generic expanded clay aggregates.
Conclusion
Using expanded clay pebbles in the bottom of decorative cachepots is a brilliant, professional-grade solution to the age-old indoor watering dilemma. By creating an elevated drainage buffer zone, these lightweight, porous clay balls prevent root rot, manage excess runoff, and keep your indoor jungle thriving without sacrificing stylish interior design.