What Is the Absolute Best Way to Winterize Your Outdoor Garden Soil Using Cover Crops?
As the vibrant harvests of summer and early autumn wind down across regions as diverse as Texas, New York, California, Washington, and San Francisco, many home gardeners make a critical mistake: they strip their vegetable plots clean, rake them bare, and leave the raw soil completely exposed to the elements all winter long.
Leaving soil naked over the winter months is an invitation for ecological degradation. Heavy winter rains wash away precious, hard-earned nutrients through leaching, windstorms blow away topsoil, and freeze-thaw cycles compact the earth into a dense, lifeless brick.
For the modern gardener looking to practice regenerative, high-yield horticulture on kcplants.com, the absolute gold standard for winter soil care is planting cover crops (often affectionately called “green manure”). This comprehensive guide explores the science of cover cropping, how to select and manage the right varieties for your specific climate, and a step-by-step masterclass on how to winterize your outdoor garden soil for maximum spring fertility.
1. The Science of Winter Soil Protection
To understand why cover crops are vastly superior to traditional bare-fallow gardening or plastic sheeting, we must examine what happens beneath the soil surface during the off-season.
Halting Nutrient Leaching
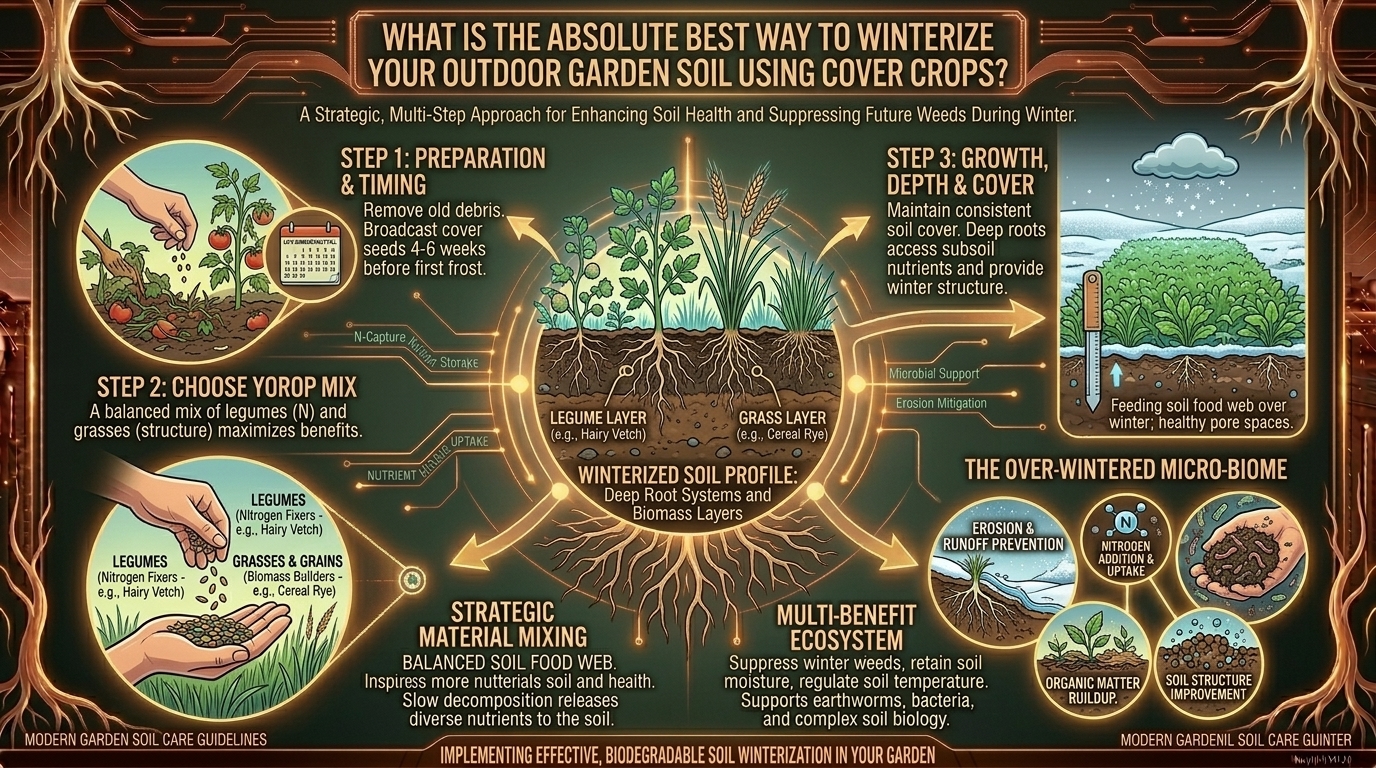
When soils are left bare through winter rains and snowmelts, water percolating downward strips soluble nutrients—especially nitrogen, potassium, and calcium—washing them deep below root zones where plants can never reach them. Cover crop root systems act like a biological sponge, locking these vital nutrients safely inside their living plant tissues until you terminate them in the spring.
Preventing Erosion and Compaction
Bare dirt takes the full brunt of pounding raindrops, which shatter soil aggregates, wash away topsoil, and crust over the surface. Cover crops blanket the earth with protective foliage, while their extensive root networks physically anchor the soil in place and create intricate pore channels that maintain aeration and drainage.
Feeding the Soil Food Web
Cover crops do not just sit passively; they engage in a symbiotic dialogue with the underground ecosystem. Through photosynthesis, they pump liquid carbon exudates out through their roots, feeding billions of beneficial bacteria, mycorrhizal fungi, and earthworms that keep your soil biologically active even during cold months.
2. Choosing Your Cover Crops: Legumes vs. Non-Legumes
Selecting the right cover crop depends heavily on what your soil needs most: nitrogen fixation or biomass building.
A. Nitrogen Fixers (Legumes)
Legumes—such as winter peas, crimson clover, and hairy vetch—form a mutualistic relationship with Rhizobium soil bacteria. These bacteria pull inert nitrogen gas out of the atmosphere and convert it into bio-available nitrates stored in root nodules. When you chop down these cover crops in spring, they release a massive, natural injection of organic nitrogen into your soil.
B. Biomass Builders and Nutrient Scavengers (Non-Legumes)
Grains and grasses—such as winter rye, oats, and daikon radishes—excel at rapid vegetative growth.
- Winter Rye: The ultimate survivor; it germinates in cold soils, tolerates brutal freezes, and produces massive root networks.
- Daikon Radish (Tillage Radish): Features a massive taproot that plunges deep into compacted clay soils (common in Texas and California), rotting in place over winter to create natural aeration shafts.
- Winter Oats: Grow quickly in autumn to suppress weeds, but are sensitive to hard freezes, acting as a self-terminating mulch in colder northern zones like New York and Washington.
3. Regional Adaptations Across the U.S.
Because our growing environments vary wildly across the country, your cover-cropping timeline and seed selections must be customized to your local winter climate:
Texas
- Climate Challenge: Mild to moderate winters, occasional sudden hard freezes, and heavy clay soils.
- Best Strategy: Plant cold-hardy legumes like crimson clover or austrian winter peas combined with oats in September or October. They establish easily during warm autumn days and grow actively through the mild Texas winter, preparing your beds for an early spring planting.
New York & Washington
- Climate Challenge: Freezing winter temperatures, deep snowpack, and heavy spring saturation.
- Best Strategy: Plant hardy winter rye or hairy vetch no later than early to mid-September. These powerhouses withstand heavy snow and sub-zero temperatures, resuming aggressive growth the moment spring sunshine hits.
California & San Francisco
- Climate Challenge: Mediterranean climate with wet winters and dry summers; varied microclimates from coastal fog to inland valleys.
- Best Strategy: Sow a diverse mix of bell beans (fava beans), field peas, and vetch right before the first autumn rains arrive (typically October or November). The winter rains trigger explosive growth, yielding lush green manure to chop down before spring planting.
4. Step-by-Step Masterclass: How to Winterize Your Soil with Cover Crops
Follow this foolproof, chronological framework to successfully establish, manage, and terminate your winter cover crops.
Step 1: Clear the Summer Debris
In late summer or early autumn, harvest your final warm-season crops (tomatoes, peppers, squash) and clear away diseased plant material, old stakes, and heavy surface weeds. Lightly rake the soil surface to ensure good seed-to-soil contact, but avoid deep tilling, which destroys natural soil aggregates and fungal networks.
Step 2: Broadcast and Sow Your Seeds
Select a tailored cover crop seed mix (or a single species like winter rye or crimson clover). Broadcast the seeds evenly across your garden beds by hand or with a small hand-crank spreader. Aim for good density so the emerging plants form a tight, weed-suppressing canopy.
- Rule of thumb: Rake or lightly tamp the soil so seeds are buried about a quarter-inch to a half-inch deep, protecting them from hungry foraging birds.
Step 3: Water to Germinate
Give your newly seeded beds a gentle, thorough watering to jump-start germination. In regions with reliable autumn rainfall (like Washington and San Francisco), nature will take over; in drier zones (like parts of Texas and inland California), provide supplemental irrigation until seedlings reach 2 to 3 inches in height.
Step 4: Let Nature Work All Winter
Once established, step back and let your cover crop do its job. It will weather the winter storms, build underground root structures, and protect your topsoil from erosion while outcompeting any dormant weed seeds.
Step 5: Termination (The Spring “Flipping” Process)
Approximately 3 to 4 weeks before you plan to plant your spring vegetable garden, you must terminate your cover crop.
- How to Do It: Use shears, a weed whacker, or a sharp spade to chop the green growth down to ground level while it is still tender and before it goes to seed (especially important for winter rye, which can become woody).
- The Rest Period: Leave the chopped green residue lying on top of the soil as a nutrient-rich mulch for 2 to 3 weeks to decompose, or lightly turn it into the top few inches of soil. Once the green matter breaks down into rich humus, your soil is primed, energized, and ready for spring planting!
5. Comprehensive FAQ: Everything You Need to Know
1. What happens if I let my cover crop go to seed in the spring?
If you wait too long and allow cover crops (especially grains like winter rye) to mature and set seed, their stems become tough, woody, and difficult to break down. Furthermore, they can drop their own seeds and become persistent weeds in your vegetable garden. Always terminate them before they flower.
2. Do I need to fertilize my cover crops after planting?
Generally, no. Cover crops are chosen precisely because they are resilient, rugged, and capable of scavenging nutrients that are already present in the soil. Adding heavy synthetic fertilizers defeats the organic, regenerative purpose of cover cropping.
3. Can I plant cover crops in raised garden beds?
Yes! Cover crops work exceptionally well in raised beds. Choose smaller-statured or easily manageable species like winter field peas, crimson clover, or oats rather than aggressive giant forage radishes or tall grains, making spring termination effortless in a confined space.
4. What is the absolute easiest cover crop for beginner gardeners?
Winter field peas or annual winter oats are fantastic for beginners. Oats grow rapidly in autumn to suppress weeds, and because they are sensitive to hard freezes in many zones, they naturally winter-kill, leaving a dead mulch blanket that is extremely easy to clean up or plant through in spring.
5. Will cover crops attract pests or rodents to my garden over the winter?
A dense, healthy stand of living green cover crops does not attract household pests. In fact, by maintaining living roots in the soil, they attract beneficial soil microbes and earthworms while discouraging subterranean pests that prefer bare, disturbed soil.
6. Can I direct-sow winter cover crops right around my existing autumn vegetables?
Yes, this is known as “under-sowing” or “inter-seeding.” You can broadcast cover crop seeds beneath sprawling autumn crops (like late brassicas or root vegetables) a few weeks before harvest so they are already established by the time you pull your final vegetables.
7. Do I have to till my cover crops into the soil in spring, or can I no-till?
You do not have to till! Many modern regenerative gardeners practice “no-till cover cropping.” You simply crimp, chop, or tarp (using a heavy black silage tarp or cardboard to block light) the cover crop to kill it, leaving the root structures intact underground to decompose naturally while planting directly into the mulch layer.
8. How long before spring planting should I terminate my cover crops?
You should terminate your cover crops roughly 3 to 4 weeks before planting your spring crops. This allows soil microbes enough time to begin digesting the green manure and releasing its locked-up nutrients without tying up available nitrogen when your new seedlings are trying to grow.
9. What is the difference between a cover crop and a green manure?
The terms are often used interchangeably. Technically, a cover crop is any crop planted primarily to cover and protect the soil from erosion and nutrient loss. A green manure is specifically a cover crop that is grown with the explicit intention of being chopped down and incorporated back into the soil to enrich its fertility.
10. Can I mix multiple types of cover crop seeds together?
Absolutely! Planting a multi-species cover crop blend (such as a mix of legumes like vetch, grains like rye, and taproots like radishes) mimics natural biodiversity. Different species root at different depths, fix different nutrients, and provide a multi-layered defense shield for your garden soil.
Conclusion
Winterizing your outdoor garden soil with cover crops is one of the most rewarding, ecologically sound practices you can adopt as a home grower. Instead of surrendering your vegetable beds to the harsh ravages of winter erosion, leaching, and compaction, you harness the power of living plants to build permanent soil structure, capture vital nutrients, and feed the microscopic life beneath your feet.