Few moments in the gardening calendar rival the sheer satisfaction of biting into a sun-warmed, vine-ripened tomato harvested straight from your own backyard. Yet, any seasoned gardener will tell you that the path from a tender young transplant to a towering, fruit-laden vine is paved with vigilance. Tomatoes are notoriously dramatic. They demand copious amounts of water, an abundance of soil nutrients, and protection from an array of soil-borne maladies.
If you garden anywhere across the diverse climates of Texas, New York, California, Washington, or the unique microclimates of San Francisco, you know that managing soil moisture and fertility is a constant balancing act. Scorching southern suns, torrential spring rains, and unpredictable coastal fogs can all wreak havoc on your tomato patch.
Enter the ultimate secret weapon of master gardeners: straw mulch.
Far more than just a neat cosmetic top layer, applying a thick blanket of clean straw around your heavy-feeding tomato plants is a transformative horticultural practice. This comprehensive, SEO-optimized guide explores the science, strategy, and step-by-step techniques of using straw mulch to lock in moisture, safeguard soil nutrients, and maximize your tomato harvest.
Introduction: The High-Maintenance Nature of Tomatoes
To understand why straw mulch is so revolutionary for tomatoes, we first need to understand the plant itself. Tomatoes (Solanum lycopersicum) are classified as heavy feeders. From the moment they take root, they pull massive quantities of nitrogen, phosphorus, potassium, and water from the surrounding earth.
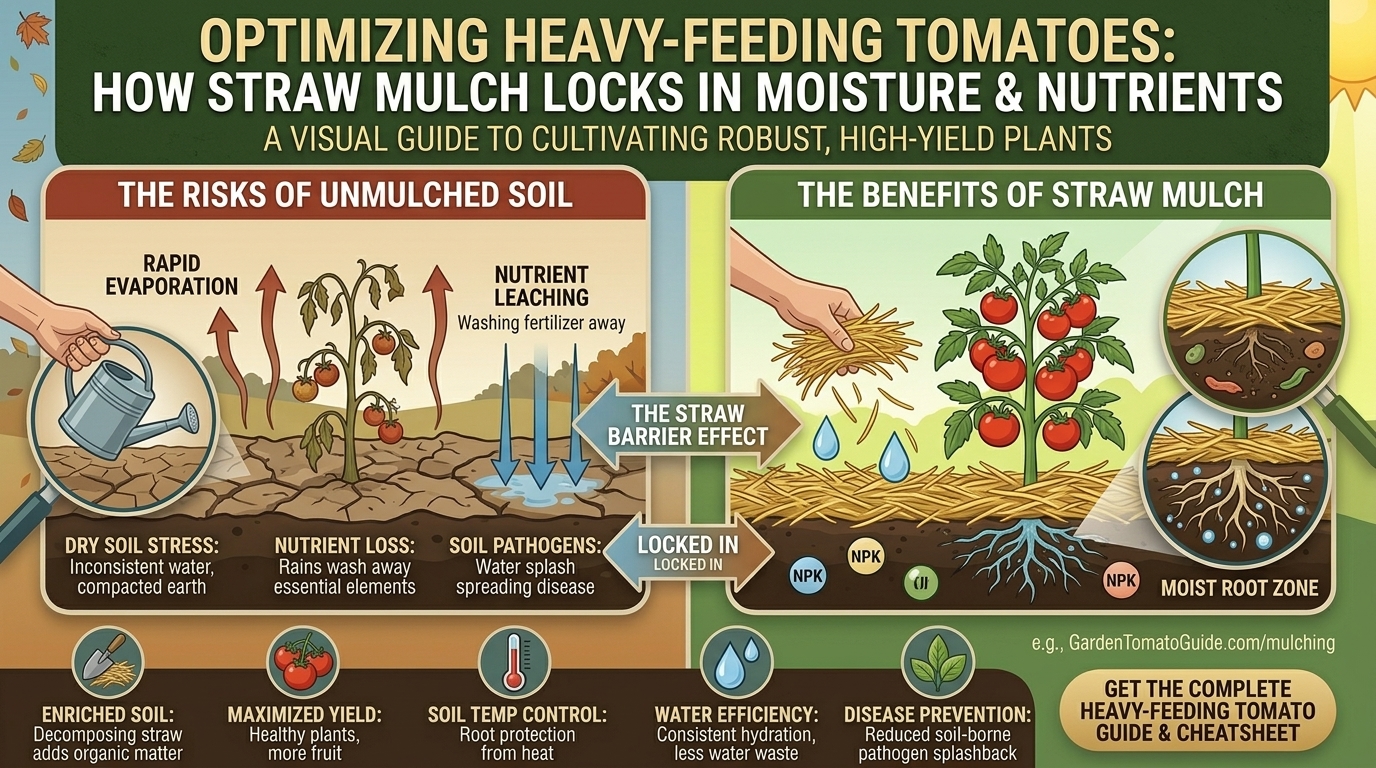
Compounding this high appetite is the tomato’s sensitivity to environmental stress. When soil moisture fluctuates wildly—swinging from bone-dry to soaking wet—tomato plants suffer. This erratic watering directly causes devastating physiological disorders, most notably blossom-end rot (a calcium deficiency brought on by inconsistent moisture uptake) and fruit splitting. Furthermore, heavy rains can splash soil-borne fungal spores directly onto the lower leaves, sparking blights that can wipe out an entire crop overnight.
Mulching with straw provides a physical and biological shield against these exact vulnerabilities.
The Science of Straw Mulch: How It Protects Your Soil
Straw is a byproduct of cereal grains (such as wheat, oats, or rye) consisting of the dry stalks left behind after the grain is harvested. When deployed in the garden, it functions as an organic powerhouse:
1. Evaporation Barrier
In regions like Texas, where summer temperatures regularly soar into triple digits, bare soil acts like a wick, rapidly evaporating precious moisture into the atmosphere. A 3-to-4-inch layer of straw acts as a thermal blanket, shading the soil surface, drastically reducing wind evaporation, and keeping root zones cool.
2. Splash Prevention and Disease Suppression
Fungal pathogens like early blight and Septoria leaf spot lurk in garden soil. When overhead watering or heavy summer storms hit bare ground, muddy water splashes upward onto the plant’s lower foliage. Straw creates a clean, dry carpet that intercepts raindrops, preventing soil from ever touching your tomato leaves.
3. Weed Suppression
Weeds are ruthless competitors for the nutrients and water your tomatoes desperately need. Straw blocks sunlight from reaching weed seeds, suffocating them before they can germinate, all without the need for synthetic herbicides.
4. Gradual Organic Enrichment
As straw slowly decomposes over the course of the growing season, it feeds beneficial soil micro-organisms and earthworms. This biological activity improves overall soil structure, turning dense or sandy earth into rich, crumbly loam.
Regional Strategies: Adapting Straw Mulch Across the US
Your local environment dictates how and when you should apply your straw mulch. Tailoring your approach to your specific region ensures optimal results:
- Texas: In intense heat, straw is essential for preventing rapid moisture loss and shielding roots from baking temperatures. Apply mulch as soon as spring soil temperatures have thoroughly warmed up (usually late April or May).
- New York: Wait until late spring to mulch. Because New York springs can be cool and damp, putting straw down too early will trap moisture and keep the soil cold, stunting early root growth. Let the sun warm the earth first, then apply the straw.
- California & San Francisco: In coastal zones like San Francisco, where summer days can be foggy and cool, keep the straw layer slightly thinner (around 2 to 3 inches) near the base of the plant to prevent excessive moisture retention that might attract slugs. In interior California valleys, pile it high to fight the dry heat.
- Washington: Western Washington’s famous spring rains and damp climate require caution. Ensure your tomato bed has excellent drainage, and keep the straw slightly pulled back from direct contact with the main stem to prevent crown rot during wet spells.
Step-by-Step Guide: How to Properly Mulch Tomatoes with Straw
Applying straw mulch is straightforward, but doing it correctly maximizes its benefits. Follow this step-by-step framework for success:
Step 1: Choose the Right Kind of Straw
- What to buy: Always purchase clean, weed-seed-free straw (wheat or oat straw is ideal).
- What to avoid: Do not use hay. Hay is harvested when the grass is still mature and full of viable seed heads; using hay will instantly turn your tomato bed into a massive weed patch. Additionally, ensure the straw has not been treated with persistent long-lasting herbicides (often called “killer compost” or aminopyralid contamination), which can severely deform tomato plants.
Step 2: Let the Soil Warm Up First
Never mulch cold soil. Tomatoes love heat. If you lay thick straw over cold spring earth, you trap the chill, delaying plant growth. Wait until your tomato transplants are well-established (about 12 to 18 inches tall) and the soil has completely warmed up in late spring.
Step 3: Weed and Water Thoroughly
Before laying down your mulch, pull any existing weeds and give your tomato bed a deep, thorough watering. You want to lock in a baseline of heavy moisture right before applying the barrier.
Step 4: Apply the Correct Thickness
Spread a loose layer of straw around your tomato plants, building it to a depth of 3 to 4 inches. As it settles, it will compact slightly into a dense, protective mat.
Step 5: Leave Breathing Room Around the Stem
Never pile straw directly against the main stalk of the tomato plant. Leave a 2-to-3-inch clearance ring around the stem. Direct contact with damp organic matter can retain moisture against the bark, inviting fungal rot or stem-boring pests.
Maintaining Your Mulched Tomato Bed Throughout the Season
Once your straw is in place, maintenance is remarkably easy, but a few key habits will keep your plants thriving:
- Checking Soil Moisture: Do not assume that because the top of the straw looks dry, the soil underneath is dry as well. Push your finger a few inches down into the straw and soil. Water only when the earth beneath feels dry 2 inches down.
- Reapplying as Needed: Straw breaks down over the course of a long growing season, especially in humid or wet climates. If you notice the layer thinning out significantly by mid-summer, simply toss down another light flake of straw to maintain the 3-inch depth.
- End-of-Season Cleanup: At the end of autumn, once your tomato vines have finished producing, you can gently rake up the remaining decomposed straw and work it directly into your garden soil as organic matter, or toss it into your compost bin.
10 Essential FAQs About Mulching Tomatoes with Straw
1. Is straw the same thing as hay?
No, they are entirely different products. Straw is the hollow, dry stalk left over after grain (like wheat or oats) is harvested; it contains very few seeds. Hay is cut grass grown specifically for livestock feed and is packed with viable weed seeds that will ruin your garden bed.
2. Will straw mulch attract rodents or pests?
In some rural or heavily wooded areas, thick piles of straw can occasionally provide nesting spots for mice or voles. To minimize this, keep the mulch layer slightly thinner right against the base of the plant, and clear away debris at the end of the season.
3. Does straw rob nitrogen from the soil?
Only if it is mixed directly into the soil in large quantities. When used purely as a surface mulch, straw breaks down very slowly on top. It does not tie up soil nitrogen in the root zone where your tomatoes need it most.
4. When is the exact right time to apply straw mulch to tomatoes?
Wait until your tomato plants are established (about a foot tall) and the soil has thoroughly warmed up in late spring. Applying it too early in cold climates like New York or Washington will keep the soil cold and slow down early root development.
5. How deep should the straw layer be?
Aim for a settled depth of 3 to 4 inches. Anything less than 2 inches will not effectively block sunlight or prevent moisture evaporation, while anything over 6 inches can block too much oxygen and water from reaching the soil.
6. Can I use straw mulch if I live in a humid or wet climate?
Yes, but with extra care. If you garden in damp environments like western Washington or foggy parts of San Francisco, ensure your tomato plants are properly spaced for airflow, and keep the straw pulled a few inches away from the main stem to prevent excess crown moisture.
7. Does straw mulch prevent blossom-end rot?
Indirectly, yes! Blossom-end rot is caused by calcium deficiency triggered by inconsistent soil moisture. Because straw locks in steady, even moisture levels, it prevents the drastic wet-dry cycles that cause the disorder.
8. How do I water tomato plants through a thick straw mulch?
You can water directly underneath the straw using drip irrigation, soaker hoses, or a watering wand placed right at the base of the plant. If using an overhead sprinkler, the straw will successfully block mud from splashing onto the leaves, though you should ensure enough water penetrates the straw barrier to reach the roots.
9. Can I reuse my tomato straw mulch next year?
It is generally not recommended to reuse old straw mulch for tomatoes year after year, as lingering fungal spores (like blight) from the previous season can winter over in the material. It is safer to rake it into your compost pile and start fresh with clean straw next spring.
10. Will straw mulch change the pH of my garden soil?
Straw is generally pH-neutral or very slightly acidic as it breaks down, but it will not drastically alter your soil pH. However, it fosters an active soil biome of earthworms and microbes that helps maintain an ideal, nutrient-rich growing environment for heavy-feeding plants.
Conclusion
Growing exceptional tomatoes requires more than just good seeds and sunlight—it requires protecting the delicate ecosystem beneath the plants. By mulching your heavy-feeding tomato vines with a generous layer of clean straw, you create an impenetrable defense against moisture loss, weed competition, and soil-borne diseases.
Whether you are battling the dry heat of Texas, navigating the unpredictable spring weather of New York, or managing coastal conditions in San Francisco and Washington, straw mulch is a time-tested, organic practice that pays massive dividends. Protect your soil, lock in vital nutrients, and set your garden up for the most abundant, flawless tomato harvest you have ever experienced. Happy gardening!