How to Grow Garlic Cloves in Your Backyard Garden During Autumn for a Summer Harvest
There is a quiet magic in planting garlic. Tucked into the cool, forgiving soil of autumn, individual cloves rest quietly through the freezing depths of winter, only to erupt into vibrant green shoots when spring arrives. By the time summer rolls around, you are rewarded with robust, papery heads of homegrown garlic that taste infinitely superior to anything you will ever find on a grocery store shelf.
Whether you are gardening in the crisp chill of New York, the temperate coastal air of San Francisco, the diverse microclimates of California, the wet winters of Washington, or the sprawling landscapes of Texas, autumn is the undisputed golden hour for starting your garlic crop.
This comprehensive, SEO-optimized guide walks you through everything you need to know to grow a thriving, high-yield garlic harvest in your backyard.
Introduction: Why Autumn is the Season of Garlic
Garlic is one of the most rewarding, low-maintenance crops a backyard gardener can grow. Unlike many vegetables that demand frantic spring planting and constant coddling, garlic plays the long game.
Planting in autumn allows the clove to establish a strong, extensive root system before the ground freezes solid. This foundational growth gives the plant a massive head start come springtime. When the warm weather hits, the established roots can aggressively feed the plant, resulting in larger, more flavorful bulbs.
Furthermore, growing garlic locally aligns with regional adaptations. From the Mediterranean-like warmth of parts of California and Texas to the brisk winters of New York and Washington, selecting the right variety and timing ensures a bountiful harvest.
Understanding Garlic Types: Hardneck vs. Softneck
Before you press a single clove into the dirt, you must choose the right type of garlic for your climate and culinary preferences. Garlic generally falls into two primary categories:
1. Hardneck Garlic (Allium sativum ophioscorodon)
- Characteristics: Hardneck varieties produce a stiff central stem (the scape). They feature fewer cloves per bulb, but those cloves are larger, easier to peel, and known for complex, rich, often fiery flavors.
- Climate Preference: They thrive in regions with cold winters, making them the absolute best choice for New York, Washington, and colder parts of California and Texas.
- Bonus: They produce edible garlic scapes in late spring, which can be harvested and cooked into pestos, stir-fries, or butters.
2. Softneck Garlic (Allium sativum sativum)
- Characteristics: Softnecks do not produce a rigid central stem, making their stalks pliable enough to braid for storage. They contain more cloves per bulb (often 12 to 20+) and generally have a longer shelf life.
- Climate Preference: They prefer milder winters and perform exceptionally well in San Francisco, coastal California, and warmer regions of Texas.
Regional Planting Guide for US Growers
Because your garden could be situated anywhere from the Pacific Northwest to the Gulf Coast, your planting window and regional strategy will vary slightly:
- New York: Plant in mid-to-late October, roughly 4 to 6 weeks before the ground freezes hard. Mulch heavily (4 to 6 inches of straw) to protect bulbs from extreme freeze-thaw cycles.
- Washington: Plant in October through November. Western Washington gardeners should prioritize well-draining raised beds to prevent winter rot from excessive rainfall, while Eastern Washington gardeners can follow traditional cold-climate protocols.
- California & San Francisco: Plant later in the autumn, usually between November and December, when soil temperatures drop below 60°F (15°C). Softneck varieties and adapted hardnecks excel here.
- Texas: In North and West Texas, plant in November. In South and coastal Texas, choose softneck varieties and plant in late November to December. Because Texas winters are milder, garlic may not experience as many chilling hours, but it will still produce a wonderful harvest if planted in well-amended soil.
Step-by-Step Guide to Planting Garlic in Autumn
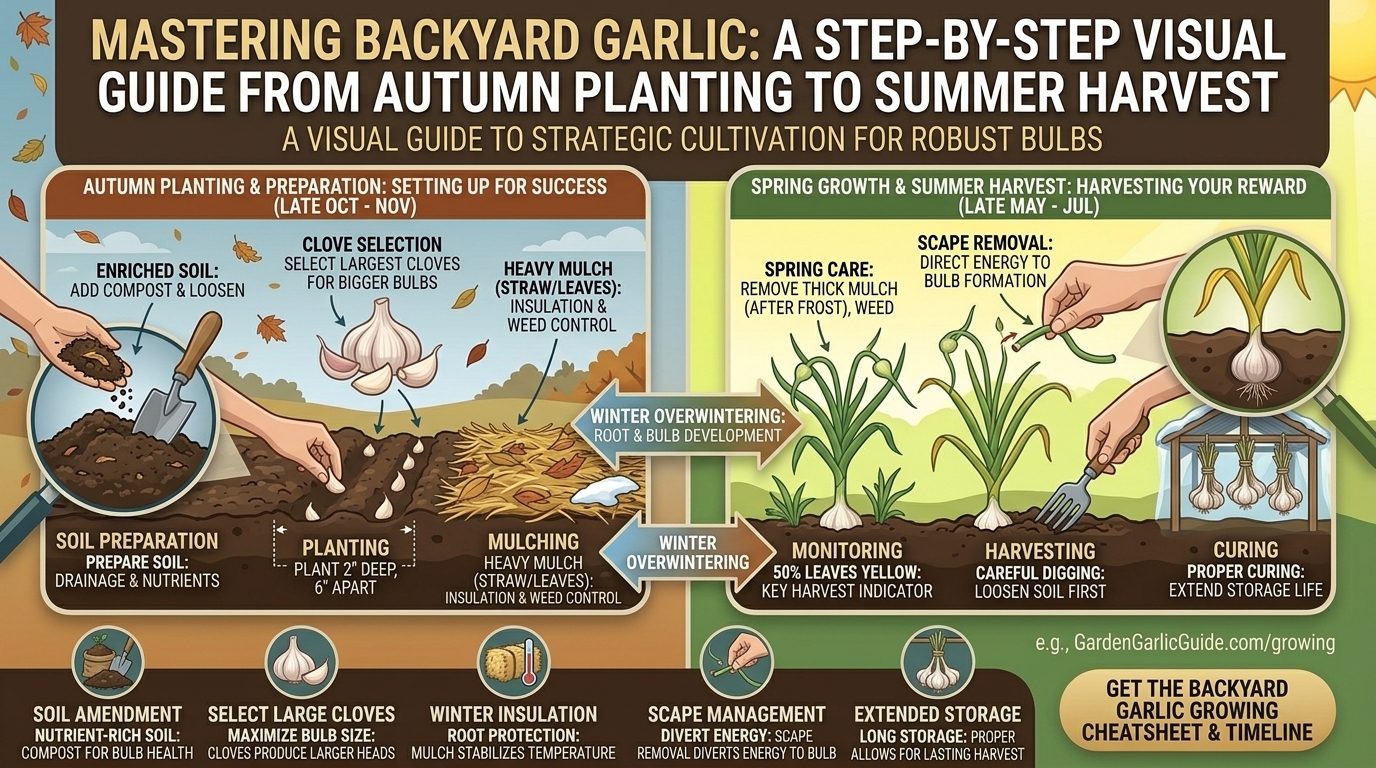
Step 1: Source High-Quality Seed Garlic
Never plant supermarket garlic from the produce aisle. Grocery store bulbs are often treated with anti-sprouting agents and may carry diseases. Purchase certified disease-free seed garlic from a reputable nursery or online supplier tailored to your region.
Step 2: Prepare the Soil
Garlic demands loose, fertile, and exceptionally well-draining soil. Standing water will cause the cloves to rot over the winter.
- Work organic matter, such as aged compost or well-rotted manure, deep into the top 8 to 12 inches of soil.
- Ensure a slightly acidic to neutral pH between 6.0 and 7.0.
Step 3: Separate the Cloves
Break apart the garlic bulbs into individual cloves on the day you plant them. Leave the papery skin intact on each individual clove, as this protects them from soil-borne pathogens. Discard any tiny, bruised, or damaged cloves.
Step 4: Planting Technique
- Spacing: Dig holes or trench lines spaced about 6 inches apart, with rows spaced 12 inches apart.
- Depth: Push each clove into the soil with the pointed end facing straight up and the flat, root end facing down. Plant them about 2 inches deep in mild climates, and 3 to 4 inches deep in colder regions like New York and Washington to protect against frost heaving.
- Cover and Water: Fill the trench with soil, gently tamp it down, and water deeply to settle the soil around the cloves.
Winter Care and Spring Maintenance
Once planted, garlic requires very little attention during the cold months, but proactive spring care sets the stage for massive bulbs.
Mulching for Winter
Apply a generous 3-to-4-inch layer of clean straw, shredded leaves, or untreated grass clippings over your garlic bed right after planting. This insulates the soil against harsh winter fluctuations, suppresses weed seeds, and retains moisture.
Spring Awakening
As soon as the weather warms in early spring, your garlic will send up vibrant green shoots. Carefully pull back any dense, matted mulch directly over the shoots so they can reach the sunlight, leaving mulch in the pathways to suppress weeds.
Watering and Feeding
- Watering: Garlic requires about 1 inch of water per week from spring until late spring. Keep the soil evenly moist but never waterlogged. Stop watering entirely about 3 to 4 weeks before harvest to allow the bulbs to cure in the ground.
- Fertilizing: Feed your garlic in early spring with a high-nitrogen organic fertilizer or side-dress with rich compost. Stop fertilizing by mid-spring to encourage bulb formation rather than excess leaf growth.
Managing Garlic Scapes (Hardneck Varieties Only)
In late spring or early summer, hardneck garlic varieties will shoot up a curly, central flower stalk called a scape.
- Why cut them? If left intact, the plant directs its energy toward producing flowers and seeds rather than swelling the underground bulb.
- How to harvest: Snip the scapes off cleanly at the base of the top leaf once they make a full loop or curl.
- Bonus use: Garlic scapes are a culinary delicacy! Chop them up and use them anywhere you would use mild garlic cloves.
Harvesting, Curing, and Storing Your Summer Crop
The moment you have been waiting for arrives in early-to-mid summer (typically June through July, depending on your region).
Signs It Is Time to Harvest
Do not wait until the plant completely disappears! Instead, look at the leaves:
- When the lower 3 to 4 leaves turn brown and dry out, while the upper leaves remain green, your garlic is ready.
- Test a bulb by gently digging around one with a trowel. If the bulb is plump and segmented with a tight, papery wrapper, it is harvest time.
The Harvest Process
- Loosen the soil carefully with a garden fork or spade—never pull the plants straight up by their stems, or the stalks may snap off, leaving the bulb trapped in the soil.
- Gently brush off excess dirt, keeping the roots and leaves intact (the plant will draw remaining nutrients from the foliage as it cures).
Curing for Long-Term Storage
Proper curing is essential if you want your garlic to store for months:
- Tie the plants in bundles of 5 to 10, or lay them flat in a single layer.
- Move them to a dry, shaded, and well-ventilated area (such as a covered porch, garage, or shed). Direct sunlight will literally cook the bulbs and ruin their flavor.
- Let them cure for 2 to 4 weeks until the roots are brittle, the wrappers are completely dry and papery, and the stems are brown.
- Trim the roots to about 1 inch and cut the stems down to 1–2 inches (or leave them long if you plan to braid softneck varieties). Store in mesh bags or wire baskets in a cool, dark, dry place.
10 Essential FAQs About Growing Garlic
1. Can I plant grocery store garlic in my backyard?
It is strongly discouraged. Store-bought garlic is frequently treated with sprout inhibitors to extend shelf life on supermarket shelves. Furthermore, commercial bulbs may harbor fungal or viral diseases that can contaminate your garden soil for years. Always buy certified disease-free seed garlic.
2. What is the best month to plant garlic in Texas vs. New York?
In New York, plant in mid-to-late October before the ground freezes solid. In Texas, plant later in the autumn—typically November—allowing the cloves to establish roots during the cooler winter months without harsh freezes.
3. Do I need to fertilize my garlic plants, and when?
Yes. Garlic is a heavy feeder. Apply a nitrogen-rich organic fertilizer or side-dress with compost in early spring when green shoots emerge. Stop all fertilization by mid-spring to encourage the plant to focus its energy on swelling the underground bulb.
4. Why are my garlic leaves turning yellow in spring?
A little bit of lower leaf yellowing in spring is normal as the plant transitions. However, severe yellowing can indicate overwatering, poor drainage, nitrogen deficiency, or onion thrips. Ensure your soil drains well and avoid soggy conditions.
5. What happens if I forget to cut off the garlic scapes?
If you leave the scapes on hardneck garlic, the plant will divert vital energy into producing bulbils (tiny aerial seeds) and flowers. This results in smaller, less developed underground garlic bulbs. While your garlic will still be edible, the harvest will be noticeably smaller.
6. How do I know when my garlic is ready to harvest?
Watch the foliage. When the lower leaves turn brown and dry out—usually leaving about 5 to 6 green leaves remaining—your garlic is ready. You can also brush away a little soil to inspect the size and firmness of the bulb wrapper.
7. Can I grow garlic in containers or raised beds?
Absolutely! Garlic grows brilliantly in raised beds and large containers (at least 10–12 inches deep and wide). Containers are especially beneficial in areas with heavy clay soil or excessive winter rainfall, such as parts of Washington, because they allow you to completely control soil drainage and composition.
8. How long does harvested garlic last in storage?
Properly cured hardneck garlic typically stores well for 4 to 6 months, while softneck varieties can last up to 9 to 12 months due to their tighter wrappers and multi-layered clove structure. Store them in a cool, dark, dry, and well-ventilated space—never in the refrigerator, as cold and humidity trigger sprouting.
9. Why are my harvested garlic bulbs splitting apart underground?
Bulbs split open (known as “boutique” or open cloves) when they are left in the ground too long after reaching maturity, or if they experience erratic watering cycles (heavy rain followed by extreme dry spells) late in the season. Harvest on time and maintain steady moisture levels.
10. Can I plant garlic in spring instead of autumn?
While you can plant garlic in early spring, it is rarely recommended for northern or transitional climates. Garlic requires a period of cold vernalization (exposure to cold temperatures) to trigger bulb formation. Spring-planted garlic often fails to form distinct cloves, resulting in small, single-round bulbs often called “solo garlic.”
Conclusion
Growing garlic is one of the most satisfying projects a gardener can undertake. By taking advantage of the autumn planting window, you give your plants the vital head start they need to develop deep roots, withstand winter, and surge forward in the spring.