How to Build a Raised Garden Bed Frame Using Rot-Resistant Natural Cedar Wood Planks Safely
Building your own raised garden beds is one of the most rewarding DIY projects a home gardener can undertake. Not only do raised beds eliminate the back-breaking labor of tilling dense native earth, but they also offer superior drainage, better soil warmth in spring, and complete control over your growing medium.
However, when constructing a garden bed that will spend years in direct contact with wet, heavy soil, material choice is everything. Cheap softwoods like pine or spruce will warp, buckle, and rot into a crumbling mess within 3 to 5 seasons. On the flip side, chemically pressure-treated woods can introduce unwanted compounds into your organic vegetable garden.
The gold standard for balancing structural longevity, food safety, and aesthetic beauty is natural, untreated cedar wood.
Whether you are gardening on a sunny urban deck in San Francisco, designing backyard plots in New York, managing heavy clay beds in Texas, or working with moisture-rich soils across Washington State and California, this comprehensive blueprint walks you through building a professional-grade, rot-resistant cedar raised bed safely.
1. Why Cedar Is the Ultimate Choice for Raised Beds
Before picking up a saw, it helps to understand why cedar (most commonly Western Red Cedar or Eastern White Cedar) reigns supreme in the gardening world.
Natural Preservatives (Tannins and Thujaplicins)
Unlike ordinary lumber, cedar trees evolved natural chemical defenses to survive harsh outdoor elements. Cedar wood is packed with natural oils, tannins, and organic compounds called thujaplicins.
- These compounds act as natural fungicides and insect repellents, actively preventing decay-causing fungi and wood-boring pests from colonizing the wood fibers.
- Properly installed untreated cedar raised beds routinely last 10 to 15 years (and often longer) without needing any chemical sealants or toxic preservatives.
Safety for Edible Crops
Because cedar relies on its own internal chemistry rather than chemical treatments to resist rot, you can grow organic vegetables, herbs, and fruits with total peace of mind, knowing no synthetic toxins are leaching into your soil.
Dimensional Stability
Cedar is exceptionally stable. It resists warping, twisting, and shrinking when exposed to alternating cycles of summer heat and winter moisture, keeping your garden frame perfectly square over the years.
2. Tools and Materials Checklist
For a standard, highly durable, beginner-friendly raised bed measuring 8 feet long by 4 feet wide by 11 inches deep (using two stacked 2×6 boards per side), gather the following supplies:
Lumber (Nominal 2-Inch Thickness)
- (4) 2×6 Cedar Boards – 8 feet long (for the long sides)
- (4) 2×6 Cedar Boards – 4 feet long (cut two 8-foot boards in half, or buy pre-cut 4-foot boards for the short ends)
- (Note: Always choose 2-inch nominal thickness—such as 2×6 or 2×12—rather than thin 1-inch boards. Thick boards provide the structural mass required to withstand outward soil pressure).
Hardware & Fasteners
- Corner Posts: (4) 4×4 cedar or redwood posts cut to 11 inches in length (or 18 inches if you plan to drive them into the ground for extra anchoring).
- Screws: 3-inch exterior-grade ceramic-coated or stainless steel screws. Avoid standard drywall screws or cheap steel nails, which will rust out quickly when exposed to wet soil.
- Optional Reinforcement: Galvanized flat mending plates or corner brackets.
Tools
- Circular saw or hand saw (if cutting boards to size)
- Power drill and driver bits
- Clamps (to hold boards square during assembly)
- Carpenter’s square and tape measure
- Safety glasses and dust mask
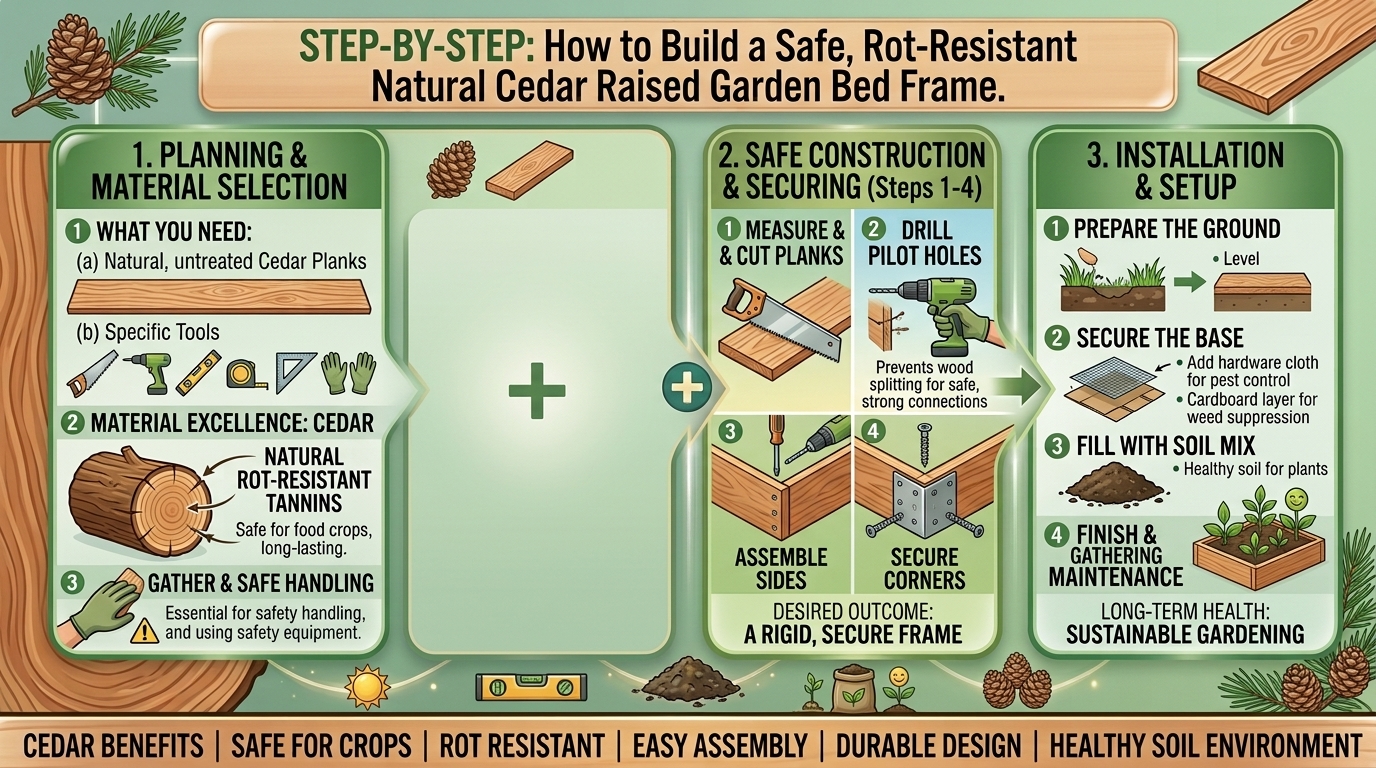
3. Step-by-Step Construction Guide
[ Preparation & Planning ]
       │
       ├──> Step 1: Cut & Square Lumber
       │
       ├──> Step 2: Assemble Corner Posts & Short Ends
       │
       ├──> Step 3: Fasten Long Sides & Check Square
       │
       └──> Step 4: Site Prep, Lining, & Soil Filling
Step 1: Measure and Cut
- Inspect your cedar boards for straightness. If you purchased standard 8-foot boards, keep two intact for the long walls.
- Cut the remaining two 8-foot boards precisely in half to create four 4-foot sections for the short ends.
- Cut your 4×4 post material into four 11-inch corner blocks.
Step 2: Build the Short Panels
- Lay two 4-foot 2×6 boards flat on a clean work surface, stacked tightly on top of each other to create an 11-inch wall height.
- Place an 11-inch 4×4 corner post flush against each end on the inside face of the boards.
- Pre-drill pilot holes through the cedar boards into the 4×4 post to prevent the wood from splitting.
- Drive 3-inch exterior screws through the boards into the post (use at least 4 screws per board). Repeat this for both 4-foot ends.
Step 3: Connect the Long Sides
- Stand your two short end assemblies upright.
- Position the 8-foot 2×6 boards across the outside edges of the 4×4 corner posts to form a complete rectangular frame.
- Crucial Check: Measure diagonally from corner to corner in an ‘X’ pattern. When both diagonal measurements are identical, your frame is perfectly square.
- Clamp the boards tightly in place, pre-drill your pilot holes, and drive 3-inch screws through the 8-foot boards into the 4×4 corner posts.
4. Siting, Lining, and Filling Your Cedar Bed
Building the frame is only half the battle; proper installation ensures your investment lasts a decade or more.
Choosing the Right Location
- Sunlight: Most vegetables and flowering perennials require 6 to 8 hours of direct sunlight daily.
- Level Ground: Clear away sod and level the footprint of your bed using a shovel and carpenter’s level. A level frame prevents soil and water from washing unevenly to one side.
Do You Need an Interior Liner?
A common question among builders is whether to line the inside walls of a cedar bed with plastic or landscape fabric.
- The Verdict: For natural, untreated cedar, interior plastic lining is generally unnecessary and often counterproductive. Linings trap moisture between the plastic and the wood, creating an anaerobic breeding ground for rot.
- Bottom Protection: If you have aggressive burrowing pests (like gophers or voles), staple a layer of hardware cloth (1/4-inch galvanized wire mesh) to the bottom of the frame before setting it on the ground.
5. Regional Adaptation: Building and Maintaining Cedar Beds Across U.S. Climates
Climate variations impact how wood ages and how soil behaves inside your frame:
California & San Francisco
- Climate Factor: Intense summer UV exposure and dry-wet seasonal swings.
- Cedar Advantage: Cedar’s natural oils resist UV degradation exceptionally well. In San Francisco’s maritime microclimates or inland California heat, unsealed cedar gracefully weathers to a sophisticated silver-gray patina without losing structural integrity.
Texas
- Climate Factor: Scorching summer heat, intense sun, and heavy expansive clay soils.
- Cedar Advantage: Texas heat can cause thin wood to split, making the choice of 2-inch thick cedar boards critical. The wood naturally insulates soil roots against extreme thermal spikes better than thin metal beds.
New York
- Climate Factor: Freeze-thaw winter cycles and humid summers.
- Cedar Advantage: When frozen solid, wet soil expands outward. Sturdy corner-post construction ensures your cedar joints absorb the shifting frost pressure without popping screws or breaking apart.
Washington State
- Climate Factor: High annual rainfall and damp conditions that invite moss and decay.
- Cedar Advantage: While lesser woods rot within 3 seasons in the Pacific Northwest, untreated cedar’s natural tannins shrug off constant moisture, easily lasting 10 to 15 years in damp environments.
6. Frequently Asked Questions (FAQ)
1. Should I treat or seal my cedar raised bed with oil or stain?
It is not necessary. Natural cedar contains preserving oils that protect it from decay on its own. If you choose to stain it for aesthetic reasons, ensure you use a 100% non-toxic, food-safe organic finish (such as raw linseed oil or tung oil) so chemicals do not leach into your soil.
2. How thick should cedar boards be for a raised bed?
Always use lumber that is at least 1.5 to 2 inches thick (nominally referred to as “2x” lumber, such as 2×6 or 2×12). Thin 3/4-inch boards or fence pickets will bow outward and break under the heavy weight of wet garden soil within a couple of seasons.
3. How many years will an untreated cedar raised bed last?
A well-built cedar raised bed constructed from 2-inch thick boards will typically last 10 to 15 years in most outdoor climates, depending on soil contact and local humidity.
4. Can I stack cedar boards to make a taller raised bed?
Yes! You can easily stack two 2×6 boards to create an 11-inch bed, or three boards for a deep 16.5-inch bed. Just ensure your interior corner posts match the total height of the stacked boards to maintain rigid structural stability.
5. Do I need to put anything at the bottom of the bed?
If you are placing the bed directly over lawn or earth, simply loosen the native soil underneath with a garden fork to encourage deep root penetration. If moles or gophers are an issue, staple hardware cloth to the bottom.
6. Will cedar wood make my garden soil too acidic?
Cedar contains natural tannins that are mildly acidic, but the tiny amount that leaches into surrounding soil is negligible and will not alter your overall garden bed pH in any measurable way.
7. What is the best fastener to use so the wood doesn’t stain?
Always use exterior-grade stainless steel or ceramic-coated deck screws. Standard steel screws will react with the moisture and tannins in cedar, causing ugly black streaks and stains to bleed down the outside of your wood panels.
8. How do I prevent soil from spilling out of the corners?
By building your frame with internal 4×4 corner posts and pre-drilling tight screw joints, your corners will remain flush and gap-free. If minor gaps appear over years of weathering, you can tuck a bit of landscape fabric along the inside corners.
9. Is Eastern White Cedar or Western Red Cedar better?
Both are excellent choices. Western Red Cedar is slightly more stable, richer in color, and widely available in western states, while Eastern White Cedar is a fantastic, durable alternative frequently found across eastern and northern regions.
10. Can I build a raised bed without power tools?
Yes, though it requires more effort. Most home improvement centers and lumber yards will cross-cut your cedar boards to your exact required dimensions for free or a nominal fee, allowing you to assemble the entire frame using just a hand screwdriver and pre-drilled holes.
Conclusion
Building your own raised garden bed using rot-resistant natural cedar is a satisfying weekend project that pays dividends for over a decade. By skipping toxic chemical treatments and investing in sturdy, 2-inch thick cedar planks, you create an immaculate, food-safe growing environment that elevates your landscape.