How to Clean Hard Water Mineral Crust Buildup Off Terracotta Pots Using Vinegar and Water
There is an undeniable, rustic charm to classic terracotta pots. With their warm, earthy tones, porous clay composition, and timeless aesthetic, unglazed terracotta planters are the ultimate companions for indoor and outdoor houseplants. Whether you are styling a sunlit urban loft in San Francisco, a cozy apartment in New York, a spacious courtyard in Texas, or vibrant residential spaces across California and Washington, terracotta pots offer unmatched breathability that keeps plant root systems healthy and oxygenated.
However, if you have owned terracotta pots for more than a few months, you have undoubtedly noticed a frustrating visual blemish: an ugly, chalky, white or crusty brown ring forming around the exterior walls and rims of the pots. This unsightly crust is not dirt or mold—it is hard water mineral buildup and fertilizer salt deposits.
While this mineral crust is completely harmless to your plants, it can ruin the polished look of your indoor decor. Fortunately, you do not need harsh chemical cleaners or abrasive scouring pads to restore your pots. Brought to you by kcplants.com, this comprehensive, expert-led masterclass breaks down why mineral buildup occurs, how to safely clean it using simple household vinegar and water, and pro tips to prevent future crusting.
Part I: What Causes White Mineral Crust on Terracotta Pots?
To effectively remove mineral buildup, it helps to understand the unique science of terracotta clay:
- The Porous Nature of Terracotta: Unlike glazed ceramic or plastic nursery pots, unglazed terracotta is porous. It features millions of microscopic pores that allow air and moisture to pass freely through the walls of the pot.
- The Evaporation Cycle: When you water your plant, moisture penetrates the soil and slowly seeps outward through the porous clay walls, evaporating into the surrounding air.
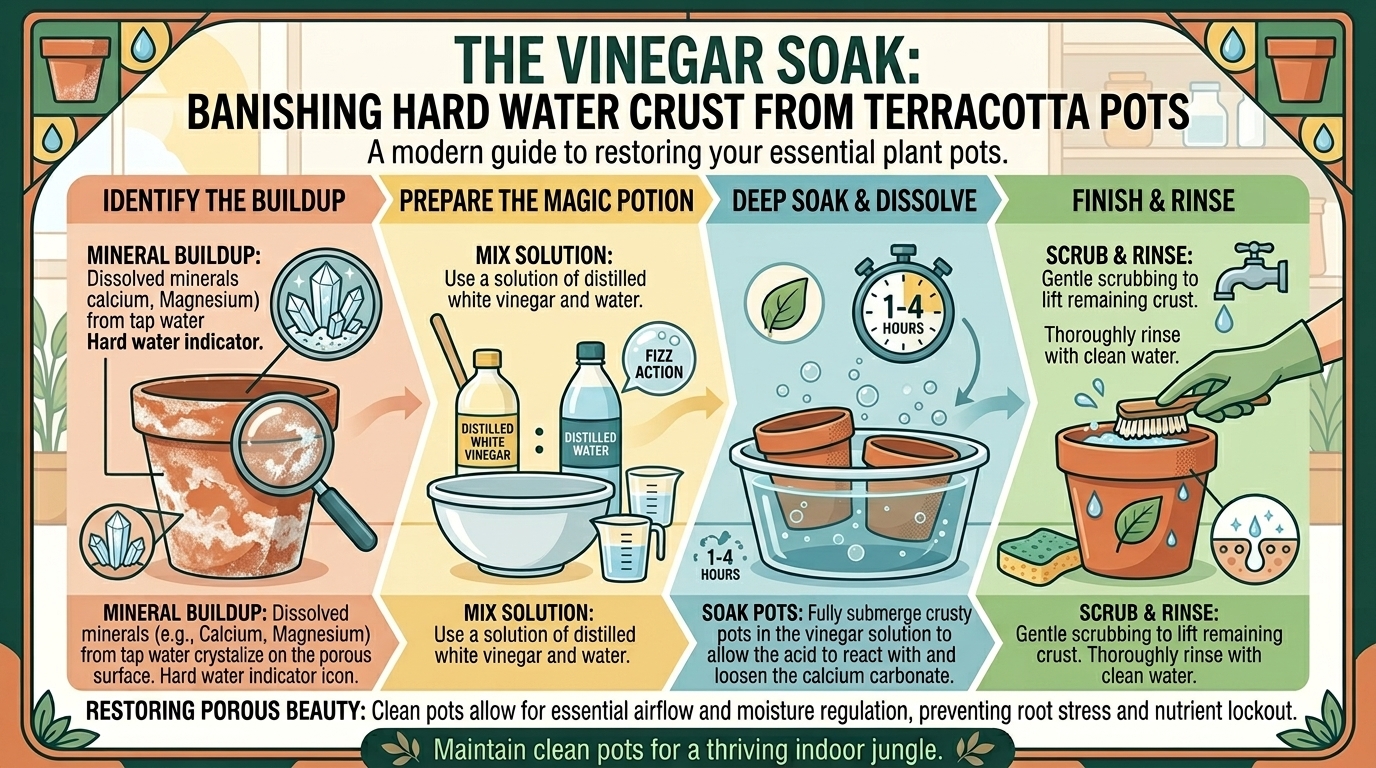
- Mineral Accumulation: Tap water contains dissolved minerals—primarily calcium, magnesium, and sodium—alongside trace mineral salts from liquid fertilizers. As the water evaporates through the clay, it leaves behind these solid mineral deposits. Over months and years, these deposits stack up, forming that stubborn, crusty white or yellowish-brown ring.
Part II: Materials and Tools Checklist
Before you begin your terracotta cleaning session, gather these simple, inexpensive household items:
- White Distilled Vinegar: The acetic acid in standard household vinegar acts as a natural, eco-friendly solvent that breaks down alkaline calcium carbonate crusts without harming the clay.
- Warm Water: Helps activate the vinegar and loosen stubborn debris.
- A Stiff-Bristled Brush: A nylon scrub brush, vegetable brush, or old toothbrush for scrubbing away softened mineral crust.
- A Large Tub or Basin: Large enough to submerge your terracotta pots (or a clean kitchen sink or plastic storage tote).
- Dish Soap: Mild, fragrance-free dish soap for a final degreasing wash.
Part III: Step-by-Step Guide to Cleaning Terracotta Pots with Vinegar
Follow this easy, foolproof method to make your weathered terracotta pots look brand new:
Step 1: Empty and Prepare the Pot
- Remove the plant and all potting soil from the pot.
- Gently brush away loose dirt and debris from both the interior and exterior surfaces using a dry brush.
Step 2: Mix the Vinegar Solution
- In your basin, large bucket, or plugged sink, prepare a cleaning solution consisting of equal parts white distilled vinegar and warm water (a 1:1 ratio). For exceptionally heavy, rock-hard crusts, you can use straight, undiluted vinegar.
Step 3: Soak the Pots
- Submerge the terracotta pots completely in the vinegar solution. If the pots are too large to submerge entirely, place them upright and fill the interior with the solution, then wrap the exterior with vinegar-soaked paper towels or rags.
- Soaking Duration: Let the pots soak for 30 to 60 minutes. You will actually see the vinegar begin to fizz slightly as its acetic acid chemically reacts with and dissolves the alkaline mineral salts.
Step 4: Scrub Away the Softened Crust
- Take your stiff nylon brush or old toothbrush and scrub the exterior and interior walls of the pot.
- The mineral crust should now be softened into a chalky paste that sloughs off easily under gentle pressure. Pay special attention to the top rim and drainage hole, where mineral accumulation is usually thickest.
Step 5: Rinse and Neutralize
- Once all crust is removed, rinse the pots thoroughly under clean running water to wash away residual vinegar and dissolved salts.
- Wash the pot with a tiny drop of mild dish soap and rinse again to remove any lingering organic grime.
Step 6: Complete Air Drying
- Allow your freshly cleaned terracotta pots to dry completely in the sun for 24 to 48 hours before planting in them again.
Part IV: Regional Water Differences and Mineral Buildup
Depending on where you live across our key regions, hard water severity dictates how fast mineral crust returns:
- San Francisco & New York: Municipal water supplies in urban centers often carry varying mineral profiles. While NY water is relatively soft, hard water spotting can still occur over time. Regular vinegar maintenance keeps pots pristine.
- Texas, California, & Washington: Much of Texas and California is famous for exceptionally hard municipal water packed with high concentrations of calcium and magnesium. If you live in these regions, your terracotta pots will develop white mineral crust much faster—often requiring cleaning every 3 to 6 months. In Washington’s softer water zones, crust buildup accumulates at a much slower pace.
Part V: Pro Tips to Prevent Future Mineral Buildup
- Switch to Filtered or Rainwater: Whenever possible, water your houseplants with distilled water, filtered water, or collected rainwater. Rainwater is completely devoid of hard mineral salts, eliminating crust formation entirely.
- Seal the Interior: If you want to stop mineral crust from forming on the exterior altogether, apply a breathable, non-toxic interior masonry sealer or terracotta pot sealer inside the pot before adding soil. This stops water from seeping straight through the clay walls.
- Flush the Soil Periodically: Every few months, take your potted plants to the sink and run clean water through the soil for 2 minutes straight. This “leaching” process flushes out accumulated fertilizer salts before they can migrate through the clay walls.
10 Frequently Asked Questions (FAQ)
1. What is the white crust on the outside of my terracotta pot?
The white crust is a buildup of mineral salts and calcium carbonate left behind when hard tap water evaporates through the porous walls of the terracotta clay.
2. Is the white mineral crust harmful to my houseplants?
No, the crust is completely harmless to plants. However, it can look unsightly and, if allowed to build up extremely thickly, can occasionally clog the porous clay pores.
3. Will vinegar harm my terracotta pots?
No. Standard household white vinegar is mild enough that it will not damage terracotta clay. It only reacts chemically with the alkaline mineral deposits, dissolving them away.
4. Can I use bleach instead of vinegar to clean terracotta pots?
While bleach can disinfect pots and kill mold or algae, it does not dissolve hard water mineral crust effectively. Vinegar is far superior for removing white mineral rings.
5. What if the mineral crust is too thick and won’t come off with a 30-minute soak?
For heavily encrusted pots, submerge them in a stronger solution (or pure undiluted vinegar) and let them soak overnight (8 to 12 hours) before scrubbing with a stiff brush.
6. Do I need to sterilize my terracotta pots before reusing them?
Yes. Soaking pots in a vinegar-and-water solution also helps kill lingering fungal spores, bacteria, or pest eggs from previous plants, keeping your new plants safe.
7. Why do my terracotta pots develop crust faster in some regions than others?
Regions with high mineral content in municipal water supplies (such as parts of Texas and California) experience rapid hard water crusting compared to areas with soft water.
8. Can I put terracotta pots in the dishwasher to clean them?
It is not recommended. Dishwasher heat and aggressive wash cycles can crack fragile terracotta pots, and dish soap residues can absorb into the porous clay and harm plant roots.
9. Should I dry my terracotta pots in the sun after cleaning?
Yes! Sun-drying helps completely evaporate trapped moisture inside the clay pores and provides natural UV sterilization before you add fresh soil and new plants.
10. How can I prevent hard water crust from forming on my pots in the future?
Use distilled, filtered, or collected rainwater for watering, or flush your soil periodically to rinse out excess mineral salts before they migrate through the clay.
Conclusion
Cleaning hard water mineral crust off terracotta pots is a simple, satisfying DIY project that instantly restores your planters to their original earthy beauty. By harnessing the natural solvent power of vinegar, utilizing a stiff brush, and adopting preventative watering habits like using filtered water, you can keep your terracotta collection looking pristine for years to come. Visit kcplants.com regularly for expert plant care guides, cleaning tips, and inspiration to help your indoor jungle thrive!