How to Grow Crisp Radishes in Just Three Weeks Inside a Compact Raised Container Bed
By the Horticultural Team at kcplants.com
There is a unique, deeply satisfying joy in planting a tiny, unassuming seed into the earth and harvesting a crisp, peppery, jewel-toned vegetable just three weeks later. For gardeners impatient for results—or urban growers working with limited square footage—the radish (Raphanus sativus) is the ultimate horticultural champion.
While traditional in-ground garden plots require extensive tilling, weeding, and soil amendment, mastering radish cultivation in a compact raised container bed changes everything. It gives you total control over soil composition, moisture retention, and pest management, turning even a tiny balcony in San Francisco, a sunny rooftop in New York, or a cozy patio in Texas into a high-yield micro-farm.
At kcplants.com, we design region-smart growing strategies tailored for diverse climates across the United States—from the blazing sun of the American Southwest and California to the crisp autumn windows of Washington and New York. In this comprehensive guide, we unpack the exact science, soil mechanics, and step-by-step techniques required to grow exceptionally crisp, perfectly formed radishes in as little as 21 days using compact raised container beds.
1. Why Raised Container Beds Are the Secret Weapon for Radishes
Radishes are subterranean root crops. Their quality, shape, texture, and flavor profile depend entirely on the immediate environment of the root zone. When grown in native ground, radishes frequently encounter compacted clay, hidden stones, or erratic moisture levels, resulting in forked roots, corky skins, or a tongue-numbing, unpalatable heat.
The Raised Container Advantage
- Fluffy, Uncompressed Soil Matrix: Raised containers allow you to hand-craft a loose, loamy soil blend free of stones and compaction, allowing the expanding radish root to swell effortlessly downward without physical resistance.
- Superior Drainage: Container bottoms and raised walls prevent waterlogging, ensuring that delicate roots never sit in stagnant moisture that causes rotting or splitting.
- Microclimate Control: Because containers warm up faster in spring and can be shifted out of blistering afternoon heat waves, you can easily manipulate temperature—the critical variable in crispness.
2. The 21-Day Miracle: Understanding Radish Physiology
How is it possible to go from dry seed to crunchy harvest in just three weeks? Radishes are cool-season annuals designed by nature for rapid maturation.
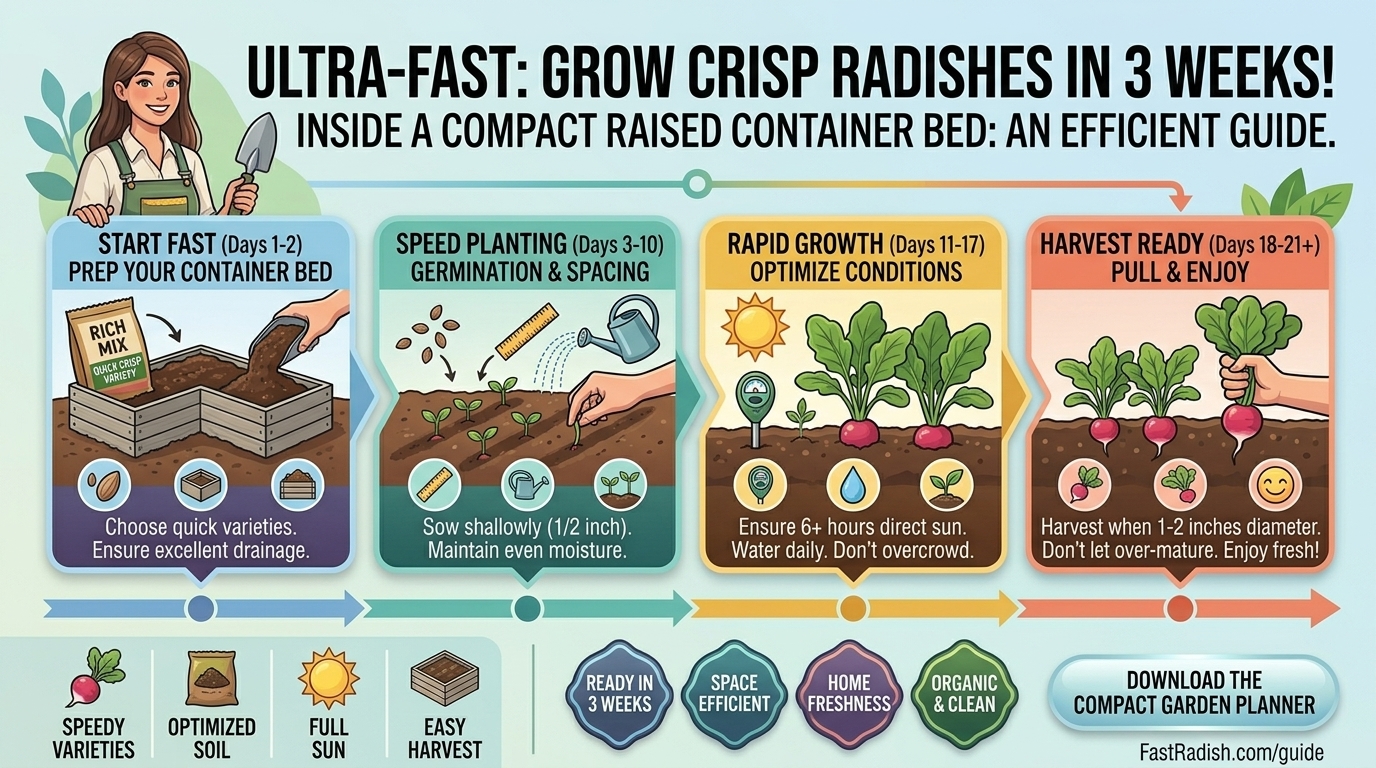
[Day 1-3: Germination] ➔ [Day 4-10: Leaf Expansion] ➔ [Day 11-18: Root Bulking] ➔ [Day 19-21: Harvest Ready]
The Growth Timeline
- Days 1 to 3 (Germination): Imbibition occurs as the seed absorbs moisture. The radicle (embryonic root) breaks through the seed coat within 48 to 72 hours under optimal conditions.
- Days 4 to 10 (Vegetative Expansion): Cotyledons unfurl, followed rapidly by the first set of true leaves. Concurrently, the hypocotyl—the stem section between the roots and leaves—begins to swell, forming the initial globe or cylinder of the radish.
- Days 11 to 18 (Rapid Root Bulking): This is the critical window. The plant diverts maximum photosynthates downward. Consistent moisture during this phase prevents the cell walls from hardening.
- Days 19 to 21 (Maturity): The roots reach peak diameter (typically 1 to 2 inches depending on the variety). Harvesting right on schedule ensures maximum crispness and mild, pleasant flavor.
3. Selecting the Right Cultivar for Containers
Not all radishes behave the same way in tight spaces. Choosing the correct variety determines whether you get a bumper crop or a row of leafy greens with no roots.
| Cultivar Type | Maturity Window | Shape & Habit | Best Regional Application |
| Cherry Belle | 21–24 Days | Small, round red globes | Universal; excellent for urban containers. |
| French Breakfast | 23–26 Days | Cylindrical, red with white tips | Cool northern springs (NY, WA, SF). |
| Sparkler | 22–25 Days | Bright red with a stark white bottom | High-visibility container borders. |
| Daikon / Long Black | 50–60 Days | Large, tapering roots | Not recommended for 3-week shallow containers. |
For a lightning-fast, 3-week harvest in a compact container bed, stick exclusively to early globe or small cylindrical varieties.
4. Crafting the Ultimate Container Soil Blend
Because radishes feed and expand entirely within a restricted volume of soil, your potting mix must be nutrient-dense, perfectly aerated, and moisture-retentive. Never use heavy native garden soil in a raised container; it compacts into concrete under watering cycles.
The Ideal 3-Part Container Recipe
- 40% High-Grade Organic Compost: Provides slow-release, balanced nutrients without excessive nitrogen (which causes lush green tops and tiny, woody roots).
- 40% Coconut Coir or Peat Moss: Retains vital moisture while maintaining a light, spongy texture.
- 20% Perlite or Horticultural Vermiculite: Creates microscopic air pockets, ensuring optimal oxygen exchange for developing roots and preventing soil compaction.
5. Regional Container Strategies Across the United States
Climate dictates how and when you can execute your 3-week radish cycle. Adapt your container placement based on your geographic region:
Texas & Inland California
- The Challenge: Rapidly rising spring temperatures and intense sunlight can shock cool-season crops, causing them to “bolt” (flower and go to seed prematurely, resulting in bitter, woody roots).
- The Strategy: Grow your radishes during early spring (February to March) or late autumn (October to December). Position your container bed where it receives morning sun but is filtered from harsh afternoon rays.
New York & Washington State
- The Challenge: Late lingering frosts and cool, damp spring soil that can delay seed germination.
- The Strategy: Utilize shallow wooden raised beds or fabric containers placed on a sunny south-facing deck or patio. The dark material absorbs solar heat, warming the root zone early in the season.
San Francisco & Coastal Microclimates
- The Challenge: Persistent cool marine fog and limited direct sunlight hours.
- The Strategy: San Francisco’s mild, temperate climate is a paradise for cool-season radishes. You can successfully grow continuous successions of crisp radishes from spring through late autumn, provided your containers sit in the sunniest spot available (like a wind-sheltered rooftop or sunny balcony).
6. Step-by-Step Guide: Setting Up Your 21-Day Radish Bed
Follow this straightforward protocol to ensure an abundant, restaurant-quality harvest from your compact container:
- Select Your Container: Choose a raised container or trough at least 6 to 8 inches deep (radishes do not need deep soil, but they do need enough depth to swell downward) and at least 12 inches wide.
- Fill and Level: Fill your container with your custom soil mix, leaving about an inch of headspace at the top. Tap the container gently to settle large air pockets, then rake the surface smooth.
- Sow with Precision: Poke shallow indentations about 1/2 inch deep, spaced 2 inches apart in a grid pattern. Drop a single seed into each hole.
- Cover and Water Gently: Lightly brush soil over the seeds and press down firmly to ensure good seed-to-soil contact. Mist the surface thoroughly using a fine spray nozzle.
- Thin Out Early (Crucial Step): If multiple seedlings emerge from a single spot, snip away the weaker contenders by Day 7. Overcrowding leads to deformed, tangled roots.
7. The Golden Rules of Maintenance: Water, Light, and Thinning
Maintaining crispness comes down to two major environmental factors: water consistency and temperature stability.
- The Moisture Rule: Radishes are roughly 95% water. If your container soil dries out completely even once during weeks two or three, the outer cells of the radish dehydrate and harden. When you water again, the inner cells expand rapidly, splitting the skin and turning the flesh woody and spicy. Keep the soil evenly moist like a wrung-out sponge.
- The Light Requirement: Radishes require a minimum of 6 hours of direct sunlight daily. Insufficient light leads to weak, elongated stems and stunted root development.
- Weed and Debris Control: Keep the surface of your container clear of fallen leaves or debris where slugs and fungal spores hide.
8. Common Container Pitfalls to Avoid
Even fast crops can fail if common missteps are made. Keep these troubleshooting tips in mind:
- Excess Nitrogen Fertilizer: Gardeners often make the mistake of feeding radishes high-nitrogen lawn or tomato fertilizers. High nitrogen triggers massive, gorgeous green foliage while completely shutting down root bulb formation. Stick to nutrient-rich compost at planting time; no extra feeding is needed for a 21-day crop.
- Late Harvesting: Leaving radishes in the container past their maturity window (Day 25+) causes them to become “pithy”—hollow, spongy, and excessively spicy. Harvest promptly when roots reach the size of a quarter or ping-pong ball.
- Inadequate Spacing: Failing to thin seedlings leaves plants fighting for light and space, resulting in skinny, stringy roots.
9. Frequently Asked Questions (FAQ)
1. Can I really grow radishes in just three weeks?
Yes! Fast-maturing globe varieties like ‘Cherry Belle’ can be successfully harvested in 21 to 24 days when grown in loose, well-amended container soil with consistent moisture and full sun.
2. How deep does my container bed need to be for radishes?
Your container only needs to be 6 to 8 inches deep. Radishes are compact root crops and do not require deep soil profiles like carrots or parsnips.
3. Why are my radishes all leafy greens with no round roots underneath?
This is almost always caused by excess nitrogen in the soil or insufficient sunlight. Too much nitrogen forces the plant to prioritize leaf growth over root bulking. Ensure your container gets 6+ hours of sun and uses balanced, compost-rich soil without synthetic high-nitrogen additives.
4. What causes radishes to split or crack open while growing?
Cracking is caused by erratic watering. If the soil dries out completely and is then heavily soaked, the inner flesh of the radish swells faster than the outer skin can stretch, causing it to split. Maintain steady, even moisture.
5. Why are my homegrown radishes so spicy and hot?
Radishes become overly pungent and spicy when they experience heat stress or drought stress during their growth cycle. Growing them in cooler seasonal windows and keeping the soil consistently damp yields mild, crisp, sweet radishes.
6. Can I reuse the potting soil in my container for a second batch of radishes?
Yes. After harvesting your first batch, rake out any remaining tiny root bits, replenish the mix with a handful of fresh organic compost to restore nutrients, and immediately sow your next round of seeds for continuous succession planting.
7. Do I need to start radish seeds indoors, or can I plant them directly outside?
Radishes have a sensitive taproot and do not transplant well. You must sow seeds directly into their final container bed outdoors (or on your sunny patio/balcony).
8. How close together should I space radish seeds in a container?
Space your seeds roughly 2 inches apart in a grid pattern. This gives each developing globe enough personal space to swell without crowding its neighbors.
9. What pests should I watch out for when growing radishes in containers?
The most common pest is the flea beetle, which chews tiny pinholes in young leaves. Protect your container plants by covering them with lightweight floating row covers during their first week of germination if flea beetles are active in your area.
10. Can I eat the radish greens as well as the roots?
Absolutely! Radish greens are entirely edible, highly nutritious, and packed with vitamins and minerals. Toss young, tender greens into salads, or sauté them lightly with garlic and olive oil as a delicious bonus harvest.
10. Conclusion
Growing crisp, peppery radishes in just three weeks inside a compact raised container bed is one of the most rewarding gardening projects you can tackle. By combining loose, high-quality container soil, precise seed spacing, and consistent daily moisture, you bypass the common pitfalls of traditional garden plots and unlock instant agricultural success.