How to Grow Spicy Chili Peppers in Pots on a Sunny Patio or Back Deck
Introduction: The Thrill of Container Pepper Gardening
There is an unmatched satisfaction in stepping out onto your patio or back deck, plucking a fiery, vibrant chili pepper straight from the vine, and tossing it into your evening meal. Whether you crave the smoky heat of a Jalapeño, the fruity tang of a Habanero, or the scorching punch of a Ghost Pepper, growing chili peppers in pots is one of the most rewarding urban gardening projects you can undertake.
Container gardening frees you from the constraints of poor native ground soil, yard space limitations, and stubborn weeds. By harnessing the microclimates of your sunny outdoor living space—whether you are soaking up the intense afternoon sun in Texas, managing urban container space in New York, utilizing balcony microclimates in San Francisco, soaking up coastal rays in California, or maximizing short warm seasons in Washington—you can cultivate an abundant, thriving pepper harvest right outside your door.
This comprehensive, highly informative guide covers everything you need to know to transform your patio or deck into a high-yielding, spicy pepper oasis tailored for kcplants.com.
The Botanical Profile of Container Peppers
Chili peppers (Capsicum species) are native to tropical and subtropical regions of the Americas, meaning they are naturally adapted to warm climates, intense sunlight, and well-draining soils. Because they are tender perennials grown as annuals in most temperate zones, they thrive wonderfully in containers when their core environmental needs are met.
Why Containers Are Ideal for Chili Peppers
- Thermal Regulation: Pots absorb solar heat faster than the surrounding ground, warming the root zone, which peppers love.
- Mobility: If a sudden heatwave threatens to scorch your plants or an early autumn frost rolls in, you can easily slide your pots into safer shelter.
- Pest and Disease Control: Growing in pots minimizes exposure to soil-borne pathogens, root-knot nematodes, and creeping ground pests like slugs.
Regional Strategies for kcplants.com Growers
Your local climate dictates how your potted peppers behave, when you should plant them, and how much attention their watering schedule requires.
Texas: Conquering the Intense Summer Heat
- The Challenge: Texas summers can feature relentless, scorching temperatures that cause pepper blossoms to drop due to heat stress.
- The Solution: Choose pots in lighter colors (white, tan, or terracotta) to reflect solar radiation and keep roots cool. Provide afternoon shade with a 30% shade cloth during peak July and August heatwaves, and water deeply every day.
New York: Maximizing Urban Balconies and Short Summers
- The Challenge: New York features a shorter frost-free growing window, and urban balconies can create wind tunnels or shaded pockets.
- The Solution: Start seeds indoors 8 to 10 weeks before the last spring frost. Position pots against brick walls that absorb and radiate heat overnight to keep your peppers warm.
California & San Francisco: Leveraging Coastal Fog and Mediterranean Sun
- The Challenge: While inland California offers ideal pepper-growing weather, San Francisco and coastal zones experience chilly, foggy mornings and cool marine layers.
- The Solution: Select early-maturing or cool-tolerant varieties (like milder Jalapeños or Cayenne peppers). Place containers in the sunniest, south-facing nook of your deck to capture every drop of solar warmth.
Washington: Embracing Pacific Northwest Moisture and Mild Summers
- The Challenge: Washington offers milder summers and frequent rain showers, which can waterlog pots or delay fruit ripening.
- The Solution: Use lightweight potting mixes enriched with perlite to ensure rapid drainage. Position containers under clear patio overhangs or sunny deck railings where you can manually control moisture levels.
Step-by-Step Guide to Growing Patio Chili Peppers
Phase 1: Selecting the Right Container
Chili peppers have robust root systems that require adequate depth and volume to support heavy fruit production.
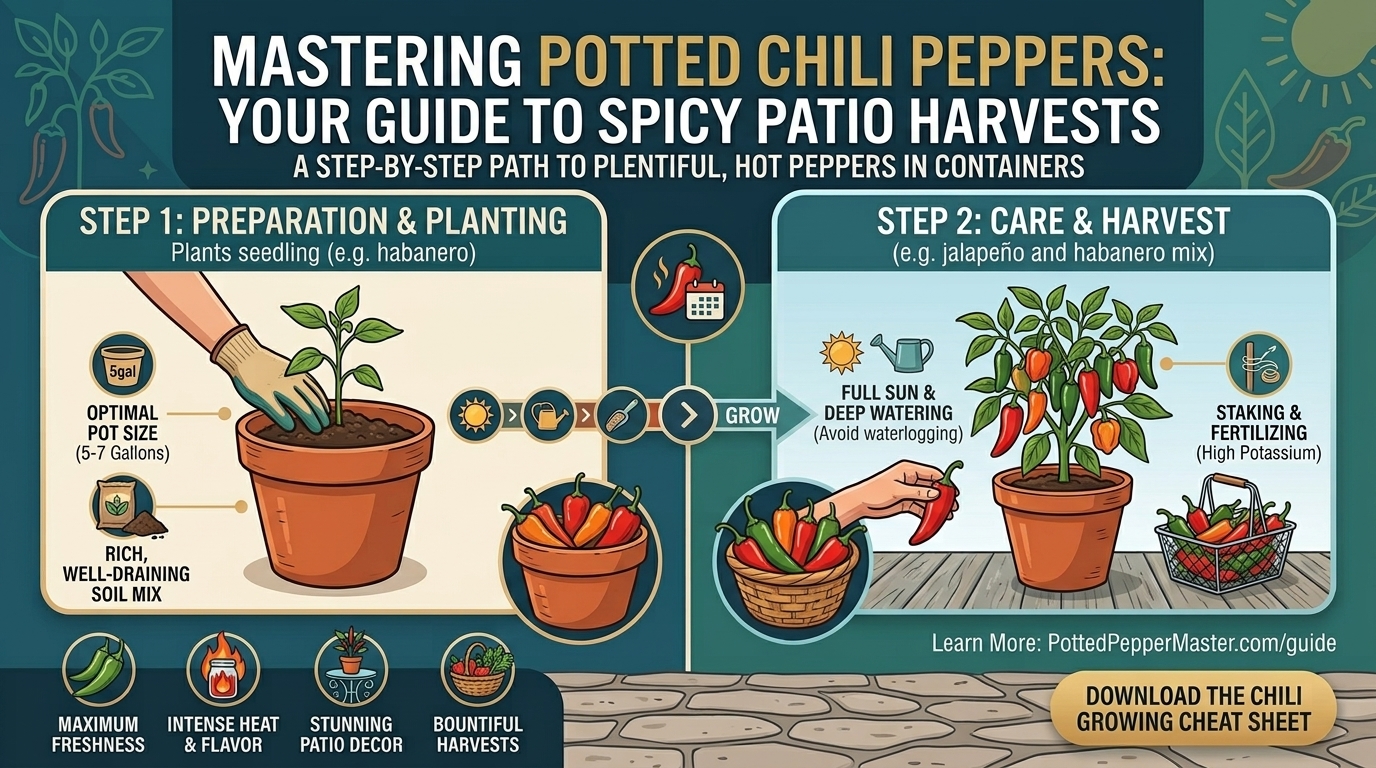
- Size Matters: For compact or ornamental varieties (like Thai Chilis or Pequins), use a 3-to-5-gallon pot (roughly 10 to 12 inches in diameter). For large varieties (like Bell peppers, Habaneros, or Bhut Jolokias), use a 7-to-10-gallon container (14 to 18 inches wide).
- Drainage is Mandatory: Ensure every pot features multiple drainage holes at the bottom. Stagnant water leads directly to root rot and plant death.
Phase 2: Crafting the Ultimate Potting Mix
Never use heavy garden soil straight from the yard in containers; it compacts easily and suffocates roots.
- The Ideal Blend: Combine 60% high-grade organic potting soil, 20% compost or aged manure for nutrient density, and 20% perlite or vermiculite to maximize aeration and drainage.
Phase 3: Planting and Positioning
- Sunlight Requirements: Chili peppers are true sun worshippers. They require a minimum of 6 to 8 hours of direct, unfiltered sunlight daily. Place your containers on a south- or west-facing patio or deck railing.
- Planting Depth: Plant your seedlings or transplants at the exact same depth they were growing in their nursery cells. Firm the soil gently around the base and water thoroughly to settle the roots.
Advanced Care, Feeding, and Maintenance
Watering Wisdom: The Soak-and-Dry Method
Overwatering is the #1 killer of container peppers.
- Stick your index finger 2 inches into the potting mix. If it feels dry at that depth, it is time to water. If it is damp, wait.
- Water deeply until liquid runs out of the drainage holes. On scorching summer days, large pots may require daily watering.
Fertilization: Feeding for Heat and Flavor
Peppers are moderate to heavy feeders, but their nutritional needs shift as they mature:
- Vegetative Stage (Weeks 1–6): Feed every two weeks with a balanced, organic water-soluble fertilizer higher in nitrogen to encourage lush green growth.
- Flowering and Fruiting Stage (Weeks 7+): Immediately switch to a low-nitrogen, high-phosphorus and potassium (P-K) fertilizer. Too much nitrogen results in massive, beautiful green bushes with zero peppers!
Pruning and Staking
- Topping: When your young pepper plant reaches about 12 inches tall, pinch off the very top growing tip. This encourages the plant to branch out horizontally, doubling your future flower and fruit sites.
- Staking: Heavy fruit loads can snap brittle pepper branches. Insert a small bamboo stake into the pot early on and gently tie the main stem to it using soft garden twine.
Troubleshooting Common Container Pest and Disease Issues
Even on a clean patio or deck, pests can find your peppers. Keep an eye out for these common culprits:
- Aphids: These tiny green or black bugs cluster on the undersides of tender new leaves. Blast them off with a strong stream of water from your hose or treat them with organic insecticidal soap.
- Blossom End Rot: Caused by irregular watering schedules, which disrupt calcium uptake. The bottom of the peppers turns sunken and black. Fix this by maintaining consistent soil moisture.
- Spider Mites: Thriving in hot, dry weather, they spin fine webs across leaves. Increase humidity around the plant by misting the foliage early in the morning and apply neem oil if infestation persists.
Frequently Asked Questions (FAQs)
1. What size pot do I need to grow chili peppers successfully?
Most standard chili pepper varieties need a container that holds at least 5 gallons of soil (about 12 inches wide and deep). Large, prolific varieties like Habaneros or Ghost peppers perform best in 7-to-10-gallon containers. Compact ornamental chilis can thrive in smaller 3-gallon pots.
2. How many hours of sunlight do patio chili peppers require?
Chili peppers need at least 6 to 8 hours of direct sunlight every day. A south- or west-facing patio, deck, or balcony is the absolute best location to maximize fruit set and heat development in the pods.
3. Why are the flower buds dropping off my potted pepper plant instead of turning into peppers?
Blossom drop is very common and is usually triggered by environmental stress. The most frequent causes are extreme daytime heat (temperatures consistently above 90°F), irregular watering schedules, or an excess of nitrogen fertilizer.
4. Should I use garden soil or potting mix for my container peppers?
You should always use a lightweight potting mix, never native garden soil. Garden soil becomes compacted, heavy, and waterlogged in containers, cutting off oxygen to the plant’s roots. Potting mix ensures proper aeration and drainage.
5. How often should I water chili peppers growing in containers?
Water your pots when the top 2 inches of soil feel dry to the touch. During mild spring weather, this might be every 3 to 4 days. During peak summer heat on a sunny deck, your containers may require thorough daily watering.
6. What kind of fertilizer is best for maximizing pepper yields?
Use a balanced organic fertilizer during the first few weeks of growth. Once the plant begins to flower, switch to a low-nitrogen, high-phosphorus and potassium formula (such as a tomato and vegetable fertilizer) to encourage heavy fruit production rather than excessive leaf growth.
7. Do chili peppers grown in pots need to be staked?
While smaller varieties can support themselves, most medium-to-large chili plants will benefit greatly from staking. Heavy clusters of ripening peppers can easily snap brittle branches, especially on windy patio decks.
8. Can I grow chili peppers indoors on a windowsill during winter?
Yes, chili peppers are technically perennial shrubs. If you bring your pots indoors before the first autumn frost and place them under a bright grow light or your sunniest south-facing window, they can survive and produce fruit year-round.
9. How do I make my chili peppers spicier?
Capsaicin (the chemical compound that creates heat in peppers) production is boosted by stress and sunlight. To increase heat, ensure your plants get maximum sun exposure, and slightly reduce watering as the peppers begin to change color and ripen on the vine.
10. When is the right time to harvest chili peppers?
You can harvest chili peppers at any stage of growth. Green peppers are crisp and slightly grassy, while fully ripe peppers (which turn red, orange, yellow, or purple depending on the variety) are sweeter, fruitier, and significantly hotter. Snip them off with pruning shears to avoid tearing the stem.
Conclusion: Spice Up Your Outdoor Living Space
Growing chili peppers in pots on a sunny patio or back deck is an immensely rewarding horticultural adventure. It combines the joy of edible gardening with beautiful, fiery aesthetics that elevate any outdoor living area.
By selecting the correct container size, investing in a premium well-draining potting mix, tailoring your watering and feeding habits to match your regional climate—whether you are gardening in sunny Texas, urban New York, foggy San Francisco, coastal California, or damp Washington—you are guaranteed a prolific harvest.