How to Store Surplus Home-Grown Root Vegetables Like Carrots and Beets Through Winter Months
Welcome to kcplants.com! If you have ever experienced the sheer triumph of pulling a bountiful harvest of crisp, vibrant carrots and deep, earthy beets from your garden beds, you know how rewarding home cultivation can be. But once the harvest rush settles, a delicious problem arises: What do you do with a massive surplus of root vegetables when winter sets in?
Whether you are gardening under the intense autumn cooling of New York, prepping for deep freezes in Washington, managing mild-to-cool transitions in California or San Francisco, or dealing with the unique late-season crispness in parts of Texas, knowing how to store your root crops properly is the ultimate skill of the self-sufficient gardener.
Instead of letting your hard work go to waste or relying on grocery store produce, you can enjoy crisp, garden-fresh carrots and beets straight from storage months after harvest. This comprehensive, SEO-optimized master guide covers everything you need to know to store your surplus root vegetables all winter long.
1. Introduction: The Science of Root Vegetable Storage
Root vegetables like carrots, beets, parsnips, and turnips are biologically designed to survive underground through harsh winters. They enter a state of dormancy, conserving sugars, moisture, and nutrients.
To successfully store them indoors (or outdoors), you must replicate their natural subterranean environment. Success relies on three golden environmental factors:
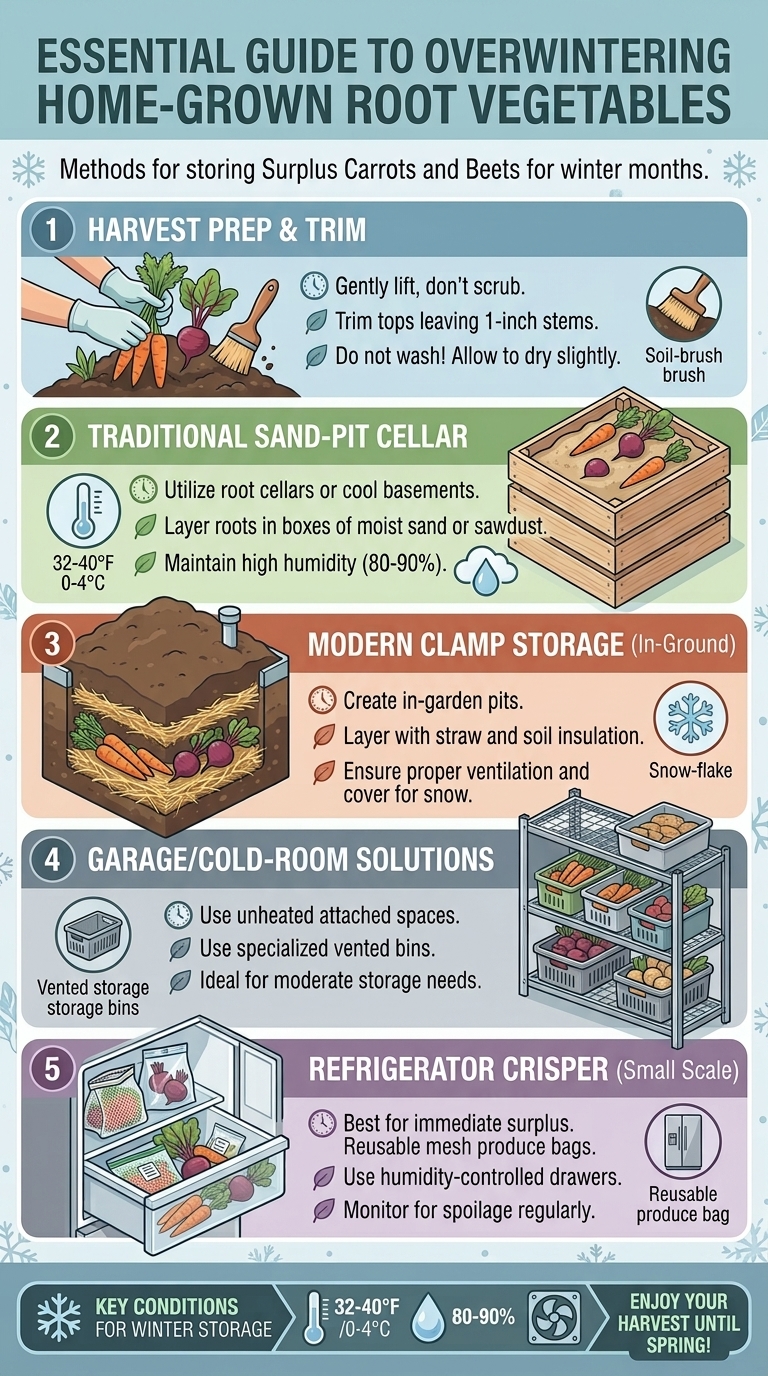
- Temperature: Cool, near-freezing temperatures (ideally between 32°F and 40°F).
- Humidity: High humidity (around 90% to 95%) to prevent the roots from shriveling and dehydrating, while avoiding stagnant wetness that causes mold.
- Ventilation: Just enough airflow to prevent fungal growth, combined with complete darkness to prevent them from trying to re-sprout.
2. Regional Timing and Harvest Preparations
The secret to long-term storage actually begins before you pick up a shovel.
Timing Your Harvest:
- In Northern Zones (New York, Washington): Allow your carrots and beets to experience a light frost or two. A touch of cold weather triggers the plant to convert its starches into natural sugars, making the stored roots taste sweeter and crisper. However, harvest them before the ground freezes solid.
- In Mild/Warm Zones (California, San Francisco, Texas): Because true freezing winters are rare, root vegetables can often be left directly in the ground (“field storage”) and harvested fresh as needed throughout the winter months, or dug up and stored when soil temperatures warm up too much in spring.
Pre-Storage Quality Control:
- Choose Blemished-Free Roots: Only store flawless, firm, undamaged roots. Any roots that are split, bruised, or damaged by garden forks will rot in storage and quickly ruin neighboring vegetables.
- Keep Some Dirt: Do not wash your carrots and beets before storing them. A light dusting of dry garden soil actually protects the skin from microbial decay. Brush off massive clumps gently, but leave the natural micro-layer intact.
3. The Crucial Pre-Treatment: Trimming the Tops
When you harvest root vegetables, they come with lush green foliage. Leaving these tops attached is the biggest mistake you can make.
- Why Trim? The green tops act like straws, continuously drawing moisture and energy out of the root. If left intact in storage, your carrots and beets will quickly become rubbery, soft, and dehydrated.
- How to Trim: Using a sharp pair of kitchen shears or a knife, slice the green tops off about 1/2 inch to 1 inch above the crown of the root. Do not cut right down into the shoulder of the carrot or beet, or the exposed flesh will weep, invite bacteria, and cause rot.
4. Top 5 Methods for Storing Carrots and Beets Through Winter
Depending on your living situation—whether you have a traditional root cellar, a cool basement, a garage, or just a refrigerator—you can choose from several proven storage methods.
Method 1: The Traditional Root Cellar / Cool Basement (Packing in Sand or Sawdust)
This is the gold standard for long-term storage (lasting 4 to 6 months).
- Find a clean, sturdy plastic bucket, wooden crate, or cardboard box.
- Lay down a 2-inch layer of damp (not soaking wet) packing material at the bottom. Great materials include slightly moistened sandbox sand, clean sawdust, peat moss, or shredded coco coir.
- Place a layer of trimmed carrots or beets on top. Ensure the roots do not touch each other, as this allows rot to spread if a single root fails.
- Cover with another 1-inch layer of damp medium, and repeat until the container is full.
- Store in a cool, dark space like a basement, unheated cellar, or crawl space where temperatures stay between 32°F and 38°F.
Method 2: The Refrigerator Crisper Drawer (For Smaller Batches)
If you don’t have a basement or cellar, your standard kitchen refrigerator can easily store a few weeks’ to a month’s worth of surplus.
- Trim the greens, and gently brush off large clumps of dirt (do not wash).
- Perforate a few small ventilation holes into a large zip-top plastic bag or use reusable produce bags.
- Place the roots inside, layering them with slightly damp paper towels to maintain high humidity.
- Store them in the coldest drawer of your fridge (the crisper drawer). Check them every couple of weeks and discard any that show softening.
Method 3: In-Ground “Field Storage” (Best for Mild Winters)
If you live in regions with mild winters (like parts of California, San Francisco, or warmer pockets of Texas), Mother Nature can be your storage unit.
- Leave your carrots and beets safely tucked into the raised beds or garden soil where they grew.
- Cover the bed with a heavy, 8-to-12-inch layer of organic mulch, straw, or fallen leaves to insulate the soil from freezing solid.
- Pull up fresh carrots and beets as needed throughout the winter months for cooking.
Method 4: Freezing Your Surplus (Long-Term Preservation)
If fresh storage space is limited, freezing is a foolproof way to preserve your harvest for up to 10 to 12 months.
- Wash, peel, and slice or dice your carrots and beets into uniform pieces.
- Blanching is Mandatory: Submerge sliced carrots in boiling water for 3 minutes (beets take about 4 to 5 minutes depending on size), then immediately plunge them into an ice-water bath to stop the cooking process.
- Dry the pieces thoroughly, spread them on a baking sheet to freeze individually (flash freeze), and then transfer them into airtight freezer bags or vacuum-seal bags.
Method 5: Dehydrating or Canning (Alternative Preservation)
- Dehydrating: Slice carrots and beets thin, toss them in a food dehydrator until crisp and brittle, and store them in airtight jars for quick additions to winter soups and stews.
- Pressure Canning: Because root vegetables are low-acid foods, they must be processed using a pressure canner (never a water-bath canner) following safe, tested USDA guidelines to prevent botulism.
5. Ideal Temperature and Humidity Control
Maintaining the microclimate of your storage space determines whether your roots stay crisp or turn to mush.
- Avoiding Freezing: If storage temperatures drop below 29°F, the water inside the root cells will freeze, expand, and rupture the cell walls. When they thaw, they will turn into an unappealing, mushy liquid mess.
- Combating Dry Air: Indoor winter heating systems in homes make air extremely dry. If you store roots in a standard room, they will dehydrate within days. Ensure your storage container seals in moisture or your packing medium remains slightly humid.
- Ethylene Gas Separation: Keep your stored carrots and beets away from ethylene-producing fruits like apples, bananas, and pears. Ethylene gas causes carrots to turn unpleasantly bitter and encourages premature sprouting.
6. Routine Maintenance and Inspection During Winter
Storage is not a “set-it-and-forget-it” activity. Neglecting your stored roots can result in losing an entire batch to a single rotting carrot.
- Bi-Weekly Checks: Once every two weeks, sort through your storage containers.
- The Sniff and Squeeze Test: Gently squeeze roots to check for firmness. Look for any signs of mold, white fuzz, or wet spots.
- Immediate Removal: The moment you spot a soft, rotting, or moldy root, pull it out immediately and discard it. This quarantine practice stops rot from jumping to healthy neighboring vegetables.
7. Troubleshooting Common Storage Issues
Even with the best intentions, storage problems can pop up. Here is how to diagnose and fix them:
- Roots are Rubbery and Shriveled: Cause: The storage environment is too warm and dry. Solution: Increase humidity by lightly misting your packing medium (sand/sawdust) with water, or seal them better in perforated bags with damp towels.
- White Mold or Fuzz Growing on Roots: Cause: Too much moisture combined with poor ventilation or packing bruised roots. Solution: Discard the moldy roots, let remaining roots air dry for an hour, and switch to a drier packing medium with better airflow.
- Roots are Sprouting Green Growth: Cause: The storage space is either too warm (above 45°F) or exposed to ambient light. Solution: Move your containers to a darker, colder location to put the plants back into complete dormancy.
8. Creative Uses for Your Stored Winter Roots
Having an abundant supply of stored carrots and beets means you can enjoy wholesome, vibrant meals all winter long:
- Root Vegetable Roasting: Toss chunks of stored carrots and beets in olive oil, sea salt, and rosemary, then roast them at 400°F until caramelized and sweet.
- Hearty Winter Soups: Dice stored roots into slow-cooker stews, beef bourguignon, or vegetable broths.
- Crisp Winter Slaws: Shred stored raw carrots and beets with a bit of cabbage, apple cider vinegar, and olive oil for a refreshing, nutrient-dense crunch in the dead of January.
9. Essential Pro-Tips for Maximum Shelf Life
- Variety Selection Matters: If you plan to store roots long-term, choose storage-specific cultivars (such as Danvers or Imperator carrots and Detroit Dark Red beets) rather than short-season baby varieties, which lack the dense cellular structure needed for winter storage.
- Handle with Care: Treat your harvested roots like fragile eggs. Bruising damages the skin barrier, making them vulnerable to storage fungi.
- Cleanliness: Always use clean, food-grade storage containers, sanitized crates, and fresh packing media to prevent cross-contamination from previous seasons.
10. Frequently Asked Questions (FAQ)
Q1: Can I store carrots and beets together in the same container?
A: Yes, absolutely! Carrots and beets share almost identical storage requirements (cool temperatures, high humidity, and darkness), making them perfect companions in a shared root cellar bucket or sand crate.
Q2: Should I wash my carrots and beets before putting them into storage?
A: No. Washing removes the protective outer skin barrier and introduces excess moisture that triggers fungal growth and rot. Leave a light coating of dry field dirt on them and brush it off gently right before cooking.
Q3: Why do my stored carrots taste bitter after a few weeks?
A: Bitterness is usually caused by exposure to ethylene gas (from nearby stored apples or fruit) or fluctuating storage temperatures. Keep your root vegetables completely isolated from fruit bowls.
Q4: How long will carrots and beets last using the sand/sawdust method?
A: When stored properly in a cool, dark basement or root cellar packed in damp sand or sawdust, high-quality carrots and beets can easily last between 4 to 6 months.
Q5: Can I store root vegetables in an unheated garage during winter?
A: Yes, provided your garage doesn’t experience deep sub-freezing temperatures. If a hard freeze threatens your region (like New York or Washington), cover your storage boxes with heavy blankets or move them closer to an interior house wall so the roots don’t freeze solid.
Q6: What should I do if my stored beets start growing green shoots?
A: Sprouting means the storage environment is either too warm or receiving light. Move the container to a colder, completely dark location, and snip off any small sprouts immediately. They are still safe to eat!
Q7: Can I freeze carrots and beets without blanching them first?
A: No. Blanching is essential because it deactivates natural enzymes that cause vegetables to lose their color, texture, flavor, and nutritional value during long-term freezing.
Q8: What is the ideal temperature range for a root cellar?
A: The sweet spot for storing root vegetables is between 32°F and 40°F (0°C to 4°C). Temperatures above 45°F will trick the roots into breaking dormancy and sprouting.
Q9: How can I store root vegetables if I live in a warm apartment (like in Texas or San Francisco)?
A: If you lack a cold basement or garage, your best options are storing small batches in the refrigerator crisper drawer with damp paper towels, or preserving your surplus via pressure canning or freezing.
Q10: Are parsnips and turnips stored the exact same way as carrots and beets?
A: Yes! Parsnips, turnips, and rutabagas share the exact same physiological makeup as carrots and beets and can be harvested, trimmed, and stored using identical methods.
Conclusion
Mastering the art of storing surplus home-grown root vegetables transforms your garden harvest from a fleeting summer-and-fall joy into a sustainable, year-round food source. By timing your harvest correctly, trimming the tops, managing humidity and temperature, and choosing the storage method that fits your living space—whether a traditional basement cellar, a refrigerator, or a cozy urban apartment—you can enjoy crisp, sweet, nutritious carrots and beets all winter long.