Why Flushing Indoor Potted Soil with Clean Water Removes Built-Up Synthetic Fertilizer Chemical Salts
Welcome back to kcplants.com! If you are a dedicated plant parent growing an indoor jungle anywhere from the sun-drenched homes of Texas to the high-rises of New York, the coastal apartments of San Francisco, or the vibrant spaces of California and Washington, you likely pride yourself on giving your plants the best care possible. You buy premium potting mixes, establish consistent watering routines, and feed your tropicals regular doses of liquid synthetic fertilizer to encourage lush, rapid growth.
However, many indoor gardeners eventually notice a heartbreaking phenomenon: despite regular watering and feeding, their houseplants begin to show mysterious symptoms. Leaves develop crisp, brown, scorched tips, lower foliage yellows and drops prematurely, and a crusty white powder begins forming around the rim of the pot or across the topsoil.
What is going on? You aren’t experiencing a pest infestation or a watering crisis—you are witnessing mineral salt accumulation.
Because indoor potted plants live in closed, artificial ecosystems without the benefit of heavy outdoor rainstorms to wash the soil clean, chemical fertilizer residues build up over time. The ultimate remedy for this invisible hazard is a horticultural practice known as soil flushing.
This comprehensive guide explores the chemistry of fertilizer buildup, why synthetic salts harm roots, and how and when to properly flush your potted indoor plants to keep them thriving across every US climate zone.
1. The Science of Synthetic Fertilizers: What Are Salts?
To understand why soil flushing is essential, we must first look at what happens when you feed an indoor houseplant with standard liquid or water-soluble synthetic fertilizers.
How Synthetic Nutrients Work
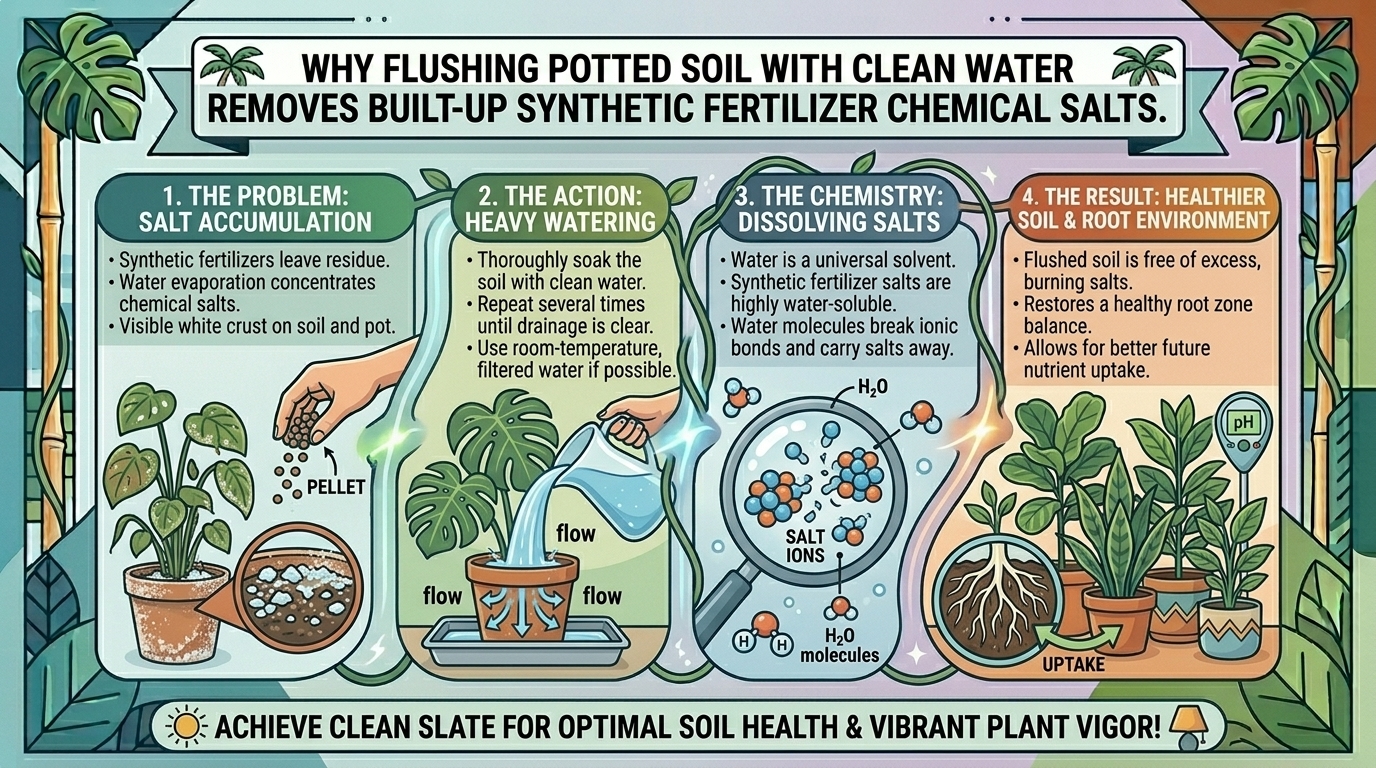
Unlike slow-release organic amendments (like worm castings, compost, or bone meal) which rely on soil microbes to break down nutrients slowly over time, synthetic chemical fertilizers are mineral salts.
- Compounds like ammonium nitrate, potassium chloride, and monopotassium phosphate dissolve instantly in water into charged ions (cations and anions).
- When you water your plant with this liquid feed, the roots rapidly absorb these dissolved mineral ions to fuel stem growth, leaf expansion, and cellular repair.
The Undrunk Residue Left Behind
Plants are remarkably selective eaters; they never absorb 100% of the nutrients you give them.
- The excess mineral ions that are left unabsorbed do not simply vanish. As the water in the potting soil evaporates between waterings, these leftover mineral salts are left behind in the soil matrix.
- Every time you fertilize without thoroughly flushing the pot, more mineral layers accumulate, compounding into a dense, toxic concentration of chemical salts around the root zone.
2. Why Mineral Salt Buildup Destroys Houseplants
When chemical salts accumulate in a potted container, they wreak havoc on the plant’s biology through two primary destructive mechanisms:
1. Osmotic Burn (Reverse Osmosis)
Healthy roots rely on osmotic pressure to draw water and nutrients inward from the soil.
- When high concentrations of mineral salts accumulate in the soil, the chemical balance reverses. The soil solution becomes saltier and denser than the fluid inside the plant’s root cells.
- Instead of water flowing into the roots, the hyper-saline soil actually pulls moisture out of the roots. This causes osmotic burn (commonly called fertilizer burn), shriveling root hairs, scorching leaf tips, and leaving the plant dehydrated despite damp soil.
2. Nutrient Lockout and pH Imbalance
Excess mineral salts drastically alter the chemical composition and pH of your potting soil.
- When specific salts (like calcium or sodium) build up, they bind to soil exchange sites, blocking the plant’s ability to absorb vital micronutrients like iron, magnesium, and phosphorus.
- Even if your soil is full of nutrients, the plant experiences nutrient lockout, displaying deficiency symptoms (like chlorosis or stunted growth) purely because toxic salt crystals are blocking root uptake.
3. Regional Indoor Factors That Worsen Salt Accumulation
Your local indoor environment and regional water quality play a massive role in how fast mineral salts accumulate in your pots.
New York & Washington (Hard Water & Winter Heating)
- The Challenge: Municipal water supplies in many northeastern and northwestern urban areas contain varying levels of dissolved minerals (hard water). When you combine mineral-heavy tap water with synthetic liquid fertilizers and run dry indoor heating systems that accelerate evaporation, salt crystals form rapidly in the soil.
- The Solution: Use filtered or rainwater when possible, and commit to a routine soil flushing schedule every 4 to 6 weeks during peak growing seasons.
San Francisco & California (Coastal Evaporation & Indoor Microclimates)
- The Challenge: Coastal homes experience unique humidity dynamics. While mild temperatures keep plants active, indoor airflow can cause surface soil moisture to evaporate unevenly, leaving white efflorescence crusts clinging to porous terracotta pot rims.
- The Solution: Monitor your pot rims regularly. If a white chalky crust appears, it is a visual red alert that chemical and mineral salts are migrating outward through the soil and need to be leached out.
Texas (Intense Air Conditioning Cycles)
- The Challenge: Texas summers mean heavy, continuous indoor AC usage, which strips indoor humidity and dries out potting soil much faster than expected. Rapid evaporation supercharges salt crystallization around root tips.
- The Solution: Ensure that every time you water your Texas houseplants, you apply enough water to let a small amount drain out the bottom, preventing localized salt pooling.
4. What is Soil Flushing and How Does It Work?
Soil flushing is the process of pouring a massive volume of clean, pure water slowly through a potted plant’s soil to dissolve and wash away accumulated chemical salt residues out through the bottom drainage holes.
The Mechanics of Leaching
Think of your potting soil like a sponge packed with microscopic chemical grit.
- When you flush the soil, fresh water acts as a solvent, breaking down the crystallized salt deposits and carrying them downward via gravity.
- By forcing excess water out through the drainage hole, you physically purge the toxic heavy mineral load from the root zone, resetting the soil’s chemical baseline.
5. Step-by-Step Guide to Safely Flushing Your Potted Plants
Flashing your soil is simple, but it must be done correctly to avoid drowning your plant or waterlogging its root system.
Step 1: Choose the Right Location
Take your potted houseplant to a place where it can drain heavily—such as a kitchen sink, a bathtub, or outdoors on a warm patio. (Never flush a plant in a decorative ceramic cachepot without removing the inner nursery pot first, or the plant will simply sit in a pool of toxic runoff!)
Step 2: Use Clean, Room-Temperature Water
Use lukewarm, filtered, distilled, or dechlorinated tap water. Ice-cold water can shock tropical root systems, while hot water can scald delicate feeder roots.
Step 3: The Heavy Pour (The Rule of 3)
Slowly pour water over the topsoil, allowing it to saturate the entire root ball.
- The Golden Ratio: Pour enough water through the pot until the volume of water draining out of the bottom equals at least two to three times the total volume of the pot (e.g., if you have a 1-gallon pot, flush it with 2 to 3 gallons of water).
- Pour in stages so the water has time to dissolve the salt crystals rather than just channeling down the sides of a dry pot.
Step 4: Complete Drainage
Let the plant sit undisturbed in the sink or tub until all dripping completely stops (usually 15 to 30 minutes). Never let a freshly flushed pot sit in standing drainage water, as stagnant runoff will be re-absorbed by the soil, defeating the purpose of flushing.
Step 5: Return to Bright Light
Place the clean, drained plant back in its designated spot. Its roots are now free of toxic salt barriers, allowing them to absorb fresh moisture and nutrients efficiently.
6. Frequently Asked Questions (FAQ)
1. How often should I flush my indoor houseplant soil?
For plants receiving regular liquid synthetic fertilizer during the active spring and summer growing seasons, you should flush the soil every 4 to 6 weeks. If you use slow-release organic fertilizers or water exclusively with distilled water, flushing is needed much less frequently (every 3 to 4 months).
2. Can I flush soil if the plant is currently suffering from root rot?
No! If a plant is suffering from root rot, its root system is already drowning in suffocating, stagnant moisture. Pouring gallons of water through the soil will worsen the rot. Instead, unpot the plant, trim away rotting roots, and repot in fresh, clean soil.
3. What is the white crust forming on the rim of my terracotta pot? Is that fertilizer salt?
Yes! That white, powdery or crusty buildup is called efflorescence. It is a combination of mineral deposits from your tap water and synthetic fertilizer salts that were pulled through the porous clay walls of the terracotta pot as the soil dried out. You can scrub it off with a brush and vinegar water.
4. Is tap water making salt buildup worse?
Municipal tap water contains dissolved minerals like calcium, magnesium, chlorine, and sodium (often measured as Total Dissolved Solids or TDS). Over time, these tap water minerals compound with synthetic fertilizer salts, accelerating root-zone toxicity. Using filtered or rainwater minimizes this buildup.
5. Should I fertilize immediately after flushing my plant’s soil?
Never fertilize right after flushing! Flushing strips away all the accumulated mineral salts—both bad and good. If you add fertilizer immediately, the fresh roots will be flooded with unbuffered chemicals. Wait at least 1 to 2 weeks after flushing before reintroducing a diluted fertilizer dose.
6. Can I use soil flushing to fix an over-fertilized “burnt” plant?
Yes, heavy soil flushing is the primary emergency treatment for accidental over-fertilization. If you accidentally gave your plant too much fertilizer and notice leaves curling or browning at the edges, flush the pot immediately with triple its volume in water to leach out the excess chemical shock.
7. Do organic fertilizers cause salt buildup like synthetic ones do?
Organic fertilizers (like fish emulsion, blood meal, or worm castings) break down slowly via soil microbes and produce significantly fewer soluble mineral salts than harsh synthetic chemical fertilizers, making them much gentler on indoor potted ecosystems.
8. Why do top-watered plants accumulate salt faster than bottom-watered plants?
When you water exclusively from the top with small amounts of water, salts dissolve and push downward, but if the water doesn’t drain out the bottom, those salts concentrate right at the bottom of the root ball. Conversely, bottom-watering can draw dissolved salts upward through capillary action, crusting the topsoil. Regular top-flushing is the only way to wash salts out of the pot.
9. Does soil flushing wash away beneficial soil microbes?
If you are growing with standard sterile indoor potting soil, there are minimal microbes to wash away. However, if you are using a living, biologically active super-soil, heavy flushing can leach out some mobile nutrients, so organic gardeners often use gentler leaching volumes or rely on beneficial soil biology to process nutrients naturally.
10. How can I tell if my plant’s soil needs a flush without waiting for leaf burn?
Aside from white crust rings around the pot rim, you can test your soil’s electrical conductivity (EC) using an inexpensive soil tester. An EC reading that spikes high indicates heavy salt saturation, signaling that it is time for an immediate thorough flush.
Conclusion
Soil flushing is one of the most underrated yet vital maintenance practices in indoor horticulture. By purging accumulated synthetic fertilizer chemical salts and tap water minerals from your potted plants, you protect delicate roots from osmotic burn, eliminate nutrient lockout, and restore vibrant, healthy growth.